
IBAC得獎作品
Large SculpturES
99 -A Bug's Life
99-Woo Run Away
98-Heavenly Concerto
98-The King of Hearts
98-BESt Foot Forward
97-A Touch of Magic
97-Once Upon a Dream
97-The Journey
97-Jack and the Beanstalk
96-Fishing For Compliments
96-Elephantasy
96-Monster Mash BAsh
95-Rock`n Roll is Here to Stay
95-The Wild Rose of England
95-Do the Swamp Thing
94-Globimagen Dragon
93-Dream Maker
92-You First
92-Cogsworth
92-Pink Cadillac
91-Space Cowboy
90-Pinocchio Marionette
SMall & Non-Round SculpturES
99-Circus Bear on the Wheel
98-Button BAby
97-Drinks on the House
97-The Bride
96-Father Christmas
95-Jack in the Box
93-ChinESe Fighting Rooster
93- Good Time
93-Indian Myths
CenterpiecES
99-Countdown 2000
99-Celebrating 2000
98-The Young BAsketBAll Player
97-Happy Birthday
96-Romantic Wedding
96 -Simply Elegant
96-Elevated Heart
95-Mardi Gras theme#1
95-Mardi Gras theme#2
93-Christmas theme
92-ChinESe Lanterns
92-Hearts and Music Sheet
Buffet Arrangements
99-Win, Lose, or Draw
99-Casino Magic
98-The Pumpkin
97 -The Power of a Dream
97-The American Sail
97-Shooting Stars
96-The Reef
96-Tropical Buffet
96-Flowers of Paradise
95- Music theme#1
95-Music theme#2
94-Birthday theme
93-Futuristic theme
93-Futuristic theme
92-California, Here I Come
91-Deep in the Heart
Events & Special Projects
99-Final Night Gala Centerpiece
99-The Crystal BAll
99-World Record Sculpture Challenge
98-The Phantom of the IBAC
97-The Golden Age of Greece
97-Pajama PARTy/Alien Abduction
96-Elegant Mardi Gras
95-Chicago Supper Club
95-WW1 Bi-PlanES
94-Hollywood Lights
89- Macaw in Flight
氣球禮品教學
Looney Tunes Balloon Recipe
Looney Tunes Balloon Recipe
 Ingredients Ingredients
Preparation Fill the basket with Styrofoam. Cut one foot squares of colored tissue paper and place corsage pins in the middle of the squares. Cover the Styrofoam with these tissue paper squares by sticking the corsage pins into the Styrofoam. The tissue paper should create a fan shape, place these closely together to create a full festive look. Blow up 5 five inch balloons and tie to the cups and sticks. Blow up five 260 Twisty balloons and tie (two of the five being green balloons). Take the two green 260 twisty balloon and bend to create two leaves. Insert one leaf on each side of the basket. Insert the three remaining 260 twisty balloons in the middle of the basket about 1 ½ feet high. Insert the five inch balloons around the 260 twisties at different heights and angles. Make a bow for the front of the basket by twisting a red 260 twisty to form a bow. Tie the bow together with curling ribbon and then tie the bow to the basket. Glue or tape a 18 gauge floral wire to the back of a napkin and insert the bow to the basket. Place party horns at each side of the basket. Float three Looney Tune helium filled balloons treated with Super Hi-FloatO from the basket by tying them to the basket or by pushing the weighted bouquet into the Styrofoam. Time: 40 Minutes Materials: $10.00 Suggested Retail: $30.00 Recipe designed and created by Dottie Blanchard. |
Wedding Elegance Balloon Recipe
Wedding Elegance
Balloon Recipe Ingredients Ingredients
Preparation Fill bag to top with foam blocks. Inflate the 5" balloons to 3" and tie and attach to the cups and sticks. Cut 16 one foot lengths of tulle and use to tie a bow on each side of the cups. Insert the first balloons into the center of the foam blocks using a 16" stick. (Reduce the stick length of the remaining balloons as necessary to achieve the distribution of balloons as shown in the picture.) To make the gold leaves, cut gold foil in the shape of a leaf (about 7" long). Using 1/2" clear tape, attach a piece of 18 gauge floral wire to the back of the leaf for strength. Insert leaves in a "sunburst" pattern around the center balloons. Insert ting-ting into foam block. Distribute between balloons as desired. Make two gold honey-comb bows and insert one bow in front and one in back of the arrangement. Cover any exposed foam blocks with white tulle and foil paper and fasten with corsage pins. Use Hi-Float to thinly coat the inside of up to six uninflated heart-shaped balloons. Fill 11" heart shaped balloon with helium. Tie white tulle at the neck of the balloon, leaving approximately a two foot tail. Attach a weight (such as a metal washer) to the end of tail and drop into arrangement. Recipe designed and created by Dottie Blanchard . |
Candy Kisses Balloon Recipe
Candy Kisses Balloon
Recipe 
Create and display this "Candy Kisses" bouquet in your store in January to generate increased interest in everyday "love" sentiments. Featuring the new HERSHEY'S KISSESTM Balloon from Qualatex®, it's also perfect for promoting Valentine's Day gifts and deliveries.
Preparation 1) To stuff the 16" Diamond Clear balloons with the 6" Red, White, and Pink Hearts, first inflate the 16" with helium, but do not tie. Place an uninflated 6" Heart over a straw or small dowel and stuff into the 16" balloon, inflate the Heart, and tie while plugging the 16" closed. Repeat until all have been inflated. Finally, replace any helium lost from the 16", tie, and attach ribbon. 2) To create the Heart "collar" on the 16", first inflate the four 6" Ruby Red Hearts and tie in pairs. Twist two pairs together to make a four-balloon cluster. Wrap the cluster onto the neck of the 16". 3) Inflate remaining balloons with helium and attach to ribbon. Attach each balloon in the bouquet separately to the tin box and adorn with a bow.
|
Roses Are Red Balloon Recipe
Roses Are Red Balloon
Recipe 
Valentine's Day sales will bloom with this "Roses Are Red, My Love" bouquet of balloons featuring the new "Red Rose" Helium Shape from Qualatex®.
Preparation 1) For the base of the bouquet, tape or glue weight inside the design dish. 2) Glue floral foam inside design dish. 3) At the base of the bouquet, the Diamond Clear Heart has magically been stuffed with a Fantasy Rose made out of balloons. To make the Fantasy Rose, cut off the top half of the necks of three 11" Round Ruby Red balloons. Secure the first balloon to a floral pick with floral tape, rolling what was the neck end of the balloon. Then add one balloon at a time, covering the previous balloon, and tape in place. Once complete, cover the pick with floral tape. 4) Place the Fantasy Rose into an empty water tube and insert into the uninflated Diamond Clear Heart balloon. Inflate the Heart with air, then grasp the neck of the Heart, pull it down around the water tube, sealing the balloon, and secure with duct tape. Insert the water tube into floral foam. 5) Attach each balloon in the bouquet separately to a floral pick and insert into the side of floral foam at an an angle. (Note: Do not insert pick straight up and down into foam. The lift of the bouquet may cause pick to pull out.) Insert onion grass into floral foam. 6) Finally, "fill" floral foam with foil squares. To fill, fold a square over the eraser on a pencil and push into foam. You can also dip squares into glue, prior to insertion, for increased hold. |
New Year Pizzazz Balloon Recipe
New Year Pizzazz
Balloon Recipe 
New Year's sales will be a dazzling success with Qualatex®. This "New Year Pizzazz" bouquet is great for deliveries, centerpieces, and decor! Ingredients
Preparation 1) Glue weight and floral foam to the inside of the design dish. 2) To make the confetti-filled 16" balloons, add HI-FLOAT to the balloons. Insert a funnel into the neck of a 16" balloon and blow to open up the balloon. Pour in confetti and glitter, remove funnel, and inflate with helium, blowing the jet of helium into any areas where the confetti bunches up. Tie balloon. Repeat with second 16" balloon. (NOTE: Always wear protective eyewear when inflating confetti-filled balloons.) 3) Stuff the 16" balloons with two of the 11" Stars-A-Round" balloons. Take an 11" balloon and slip it over the end of a straw or dowel. Insert the 11" inside a 16". Helium inflate the 11", and while tightly grasping the neck closed, further inflate the 16" balloon, then tie both balloon necks together. Repeat until all "Stars-A-Round" balloons have been stuffed. 4) Add balloon "collars" to the 16" balloons. Inflate one 5" Gold and one 5" Onyx. Black and tie together to make a duplet. Repeat with a second 5" Gold and 5" Onyx Black. Twist the two pairs together to make a four-balloon cluster. Wrap the cluster onto the neck of the 16". Repeat for the second 16" balloon. 5) Attach each balloon in the bouquet separately to a floral pick and insert into the side of floral foam at an angle. (Note: Do not insert pick straight up and down into foam. The lift of the bouquet may cause pick to pull out.) 6) Air inflate the 5" Diamond Clear and the last 5" Onyx Black and attach to CUP-N-STICK balloon holders. Spray with gold glitter paint and insert into floral foam at base. 7) Air inflate the 4" Citrine Yellow Microfoil Star, attach to a CUP-N-STICK and insert into floral foam. 8) Insert ting-ting, ribbon, and foil squares into foam. To insert the foil squares, fold a square over the eraser on a pencil and push into foam. You can also dip squares into glue, prior to insertion, for increased hold. Photos and instructions courtesy of Qualatex® . The bouquets above are available on postcards as part of the Qualatex "The Very Best Profit Kit" . The Profit Kit also offers a 12-month Profit Planner, balloon samples, and more! |
Love Connection Topiary Balloon Recipe
Love
Connection Topiary Balloon Recipe
Air-filled balloon topiaries make simple, quick, and versatile centerpieces that offer great profit opportunities! Once you've mastered the basic topiary technique, you can let your creativity flow to create original works of art and personalized designs for your customers. 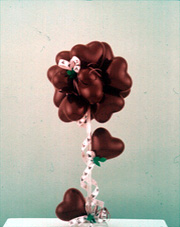 This topiary is perfect for Valentine's Day, as well as everyday love and anniversary celebrations. Ingredients
Preparation To Make a Basic Topiary: 1) Inflate two 5" balloons (or 6" Heart balloons) and tie together to make a "duplet." Repeat to make six duplets. (NOTE: Use balloon sizing templates to ensure all balloons are the same size. Improperly sized balloons will make the topiary look sloppy.) 2) Twist two duplets together, intersecting at the knots. 3) Add the next duplet, bringing it right through the middle intersecting knots, and continue with the remaining duplets until you have a beautiful sphere of 12 balloons. 4) Tape the large washer inside the design dish 5) Turn the design dish upside down and cool glue the pedestal to the design. 6) Stretch a 5" balloon over the top of the pedestal to create more surface for the cool glue and to soften the edge so balloons won't pop. Cover the stretched balloon with cool glue. 7) Strategically place the topiary sphere on top of the pedestal. 8) Accent as desired. To Make the Love Connection Topiary: Follow instructions for the basic topiary. Then, air inflate the two remaining Heart balloons. Cool glue one to the base and one to the pedestal. You can conceal the knots of the balloons with ribbon. Accent with silk leaves. Secrets
to Topiary Success:
1) Use 12 balloons. 2) All balloons should be sized exactly the same - use sizing templates. 3) When adding duplets, bring them through the middle of the topiary sphere each time. 4) When tying duplets, make knots as close to the ends of the balloons as possible. 5) Place a 5" uninflated balloon over the top of the pedestal to create more gluing surface and to prevent balloons from popping on sharp edge. 6) Add visual weight to the base to balance the top - ribbons, balloons, floral products, and other small elements that coordinate with the theme. These elements increase the perceived value of your design. 7) Whatever elements you use in the top of your topiary you must also use in the bottom. 8) Keep it simple. 9) Give your topiary a great name! |
Hog Wild Topiary Balloon Recipe
| Hog Wild Topiary
Balloon Recipe This Hog Wild design illustrates how with just a few simple tricks, the basic topiary design can be turned into a cute, clever and personalized centerpiece. It's perfect for everyday deliveries to pig lovers, and can be used for farm-, barbecue- and animal-themed celebrations. 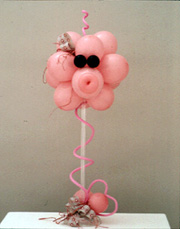 With a few alterations, this topiary can easily be turned into a bunny, a dog, a sheep, and other animals. Ingredients
Preparation Follow instructions for basic topiary, then follow instructions below: 1) To make the eyes, under inflate two 5" Onyx Black balloons to 2", tie closed, and glue in place. 2) To make the snout, under inflate a Pink 5" balloon to 3" and tie. Push the neck end of the balloon through the body until it reaches the other side. Grab the neck (through the balloon) while still holding the balloon with your other hand. Twist three times to wrap latex around the neck into a ball, and tie a piece of ribbon around the ball to secure. Glue in place. 3) Glue a small piece of foam wire for the tail. 4) Underinflate the last two 5" Pink balloons and cool glue to the base. 5) make a heart shape out of foam wire and cool glue to the base. 6) Add ribbon and raffia to conceal mechanics and accent as desired. Topiaries designed by Linda Bruce, CBA. Photo and instructions courtesy of Balloon Images magazine, a Qualatex® publication. |
Top Teacher Balloon Recipe
| Top Teacher Balloon
Recipe Three GEO Donut balloons have been cleverly turned into apples, complete with balloon worms sticking out of them. A coordinating mug filled with pencils and a button, and accented with a balloon apple made from a 321Q balloon, holds down the bouquet and will always remind the teacher of this special gift.  This bouquet of balloons really makes the grade with special teachers. It's perfect for National Teacher Day , 1998! Ingredients
Preparation 1) To make the stem and leaf portions of the GEO Donut apples, partially inflate an Emerald Green 260Q balloon with air. While holding the end closed (to not let the air out), bend the inflated portion to make a curve (the leaf). About 4" from the top of the inflated portion, twist several times to create a straight stem. Wrap the uninflated portion of the balloon around the inflated portions and knot closed. Trim off any excess of the balloon. Repeat for two more stems. Set aside. 2) To make the worms, inflate approximately 1/3 to 1/2 of an Emerald Green 260Q. Wrap the uninflated portion around your hand. (The tighter the balloon is wrapped, the smaller and tighter the curl for the end of the worm will be.) Inflate the rest of the 260Q and knot the end. To make the worm's head, grasp the end of the straight portion of the 260Q about an inch down, and twist several times to create a bubble. Repeat for two more worms. Set aside. 3) Insert a worm through the middle of an uninflated Ruby Red GEO Donut. Inflate the GEO with helium, knot closed, and tie to ribbon. Repeat for two more "apples." 4) Glue stems to the tops of the GEO Donuts. 5) Air inflate the 9" Microfoil balloon, attach to a CUP-N-STICK balloon holder and insert into mug. 6) Insert pencil, button, and shred into mug. 7) Helium inflate remaining balloons, attach to ribbon, and tie each balloon separately to the mug. 8) To make the small apple at the base, air inflate a Ruby Red 321Q balloon to 4 inches and tie. Hold the inflated balloon in your left hand with the black stem pointing to your left and the knot pointing to your right. Place your right index finger on the knot and push the knot all the way through the inflated balloon. Grasp the knot firmly with your left hand and carefully remove your right index finger. Twist the balloon several times at the point between the knot and the inflated balloon. Push the knot into the balloon and release it. 9) Cool glue artificial leaf to 321Q apple and glue apple to mug. Photo and instructions courtesy of Balloon Images magazine, a Qualatex® publication. |
Halloween Buffet Balloon Recipe
Halloween Buffet
Balloon Recipe 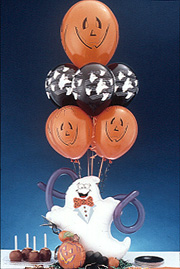 Ingredients Ingredients
Preparation 1) To make the base, cut a circle out of cardboard. (Can use a compass, or trace around the outer edge of a trash can.) Cover with mylar shred. 2) Helium inflate the 11-inch and 16-inch "Jack-O'-Lantern" and 11-inch "Ghosts" balloons and tie to ribbons. Gather all four of the 11" "Jack-O'-Lantern" balloons in your fist and pull down tight on the ribbons to get all four balloons even and resting on your fist. 3) Repeat step 2 with the four "Ghosts" balloons and snuggle them into a layer of the "Jack-O'-Lantern" balloons. 3) Air inflate the "Ghost - Two Faces" and the "Pumpkin - Friendly Face" shapes, the curly 260Qs, and the miniature balloon pumpkins, and cool glue to the base. To make the curly 260Qs, tightly wrap an uninflated 260Q around an object approximately 1 1/2" in diameter (such as a pole or broomstick). The tighter the balloon is wrapped, the smaller and tighter the spiral will be. Fully inflate the 260Q with air and knot the end. Slip the inflated balloon off the pole and cool glue to the base. To make miniature balloon pumpkins, air inflate a Mandarin Orange 321Q/Bee Body balloon to 2"" and tie. Hold the inflated balloon in your left hand with the stem pointing to your left and the knot pointing to your right. Place your right index finger on the knot and push the knot all the way through the inflated balloon. Grasp the knot firmly with your left hand and carefully remove your right index finger. Twist the balloon several times at the point between the knot and the inflated balloon. Push the knot into the balloon and release it. |
Strawberry Basket Balloon Recipe
Strawberry Basket
Balloon Recipe  Ingredients Ingredients
Preparation To make the strawberries, double stuff the Polka Dot balloons inside the 11" Ruby Red. Slightly under inflate with air. Inflate the 260Q balloons, twist together in pairs, and glue to the tops of the strawberries. Place the strawberries in a ribbon-trimmed basket and glue in place with a cool glue gun as shown. Air inflate the 6" Ruby Red Heart balloons, tucking them into any gaps, and glue in place. If using the basket as delivery, personalize it by adding a helium-filled Microfoil design. A card to go along with this delivery might read: "Thanks so berry much." "I love you berry much." "Have a Berry Sweet 16th." "Roses are red. Violets are blue, Strawberries are sweet and so are YOU!" (If you look at our Ice Cream Cone and Christmas Tree balloon sculptures in our consumer section, you will see that clusters are used frequently in balloon decorating. They are used to form the key elements n balloon decor: columns, arches, and swags. From these elements, the foundations for an unlimited number of designs can be created, including people, animals, fruit, balloon walls, candy canes, etc.) DOUBLE STUFFING Double stuffing is taking two latex balloons of the same size but different colors or printed designs, and inserting one inside of the other before inflating.
(When finished, the inner, knotted balloon neck can be concealed by the outer balloon neck.) Design by Linda Bruce, CBA. Photos courtesy of Balloon Images magazine, a Qualatex publication. |
會場佈置教學
Accessory
 |
||||||||||||||||||||||||||||||||||||||||||||||||||
 |
 |
|||||||||||||||||||||||||||||||||||||||||||||||||
 |
||||||||||||||||||||||||||||||||||||||||||||||||||
 |
||||||||||||||||||||||||||||||||||||||||||||||||||
 |
||||||||||||||||||||||||||||||||||||||||||||||||||
 |
||||||||||||||||||||||||||||||||||||||||||||||||||
| 6 | 7 | |||||||||||||||||||||||||||||||||||||||||||||||||
 |
||||||||||||||||||||||||||||||||||||||||||||||||||
 |
||||||||||||||||||||||||||||||||||||||||||||||||||
 |
||||||||||||||||||||||||||||||||||||||||||||||||||
| 9 & 10 | ||||||||||||||||||||||||||||||||||||||||||||||||||
| 8 | ||||||||||||||||||||||||||||||||||||||||||||||||||
 |
 |
|||||||||||||||||||||||||||||||||||||||||||||||||
 |
||||||||||||||||||||||||||||||||||||||||||||||||||
| 12, 13, 14 | ||||||||||||||||||||||||||||||||||||||||||||||||||
| 11 | ||||||||||||||||||||||||||||||||||||||||||||||||||
 |
||||||||||||||||||||||||||||||||||||||||||||||||||
| 16 | ||||||||||||||||||||||||||||||||||||||||||||||||||
| 15 | ||||||||||||||||||||||||||||||||||||||||||||||||||
 |
||||||||||||||||||||||||||||||||||||||||||||||||||
 |
||||||||||||||||||||||||||||||||||||||||||||||||||
| 17 | 18 & 19 | |||||||||||||||||||||||||||||||||||||||||||||||||
 |
||||||||||||||||||||||||||||||||||||||||||||||||||
 |
 |
|||||||||||||||||||||||||||||||||||||||||||||||||
| 20 & 21 | 22 | 23 | ||||||||||||||||||||||||||||||||||||||||||||||||
 |
||||||||||||||||||||||||||||||||||||||||||||||||||
| 24 | ||||||||||||||||||||||||||||||||||||||||||||||||||
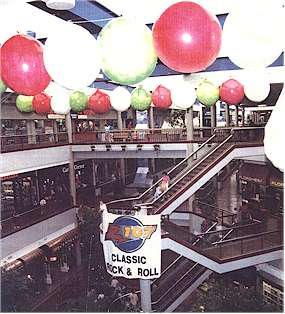
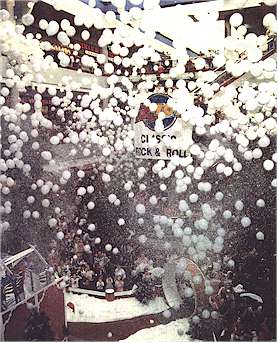
Explode
"CLOUDBUSTERS"
'There are 17 +- photos on this page....it will take a moment to load."
THE EFFECT:
HOW YOU GET IT :
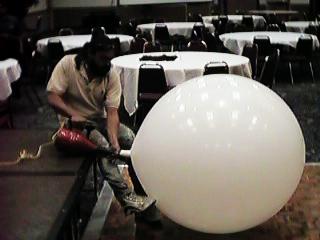
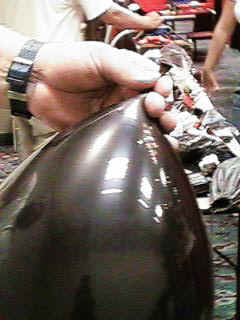
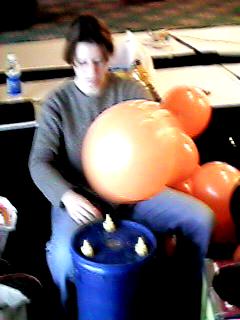
Over inflate your balloons (in this case, a Qualatex 4') to stretch it (if it's got a defect, you want to know now !) It also makes it easier to re-inflate later.
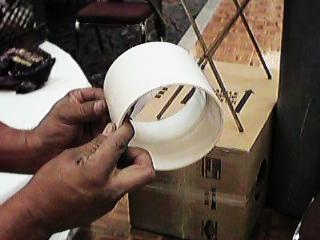
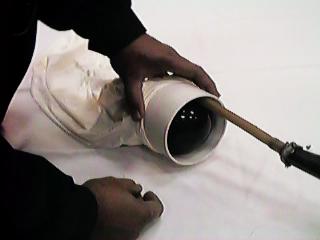
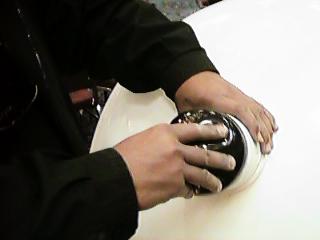
This is a common PVC plumbing fitting (4 1/2") Print this image and show it to your hardware guy. It's actually a sewer pipe coupling.
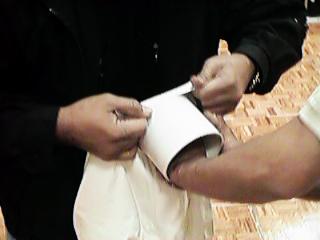
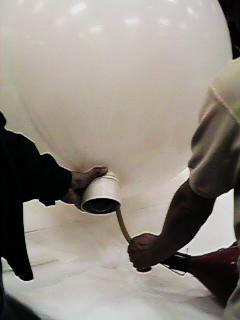
This is a two person task. Stretch the entire neck with both hands as far as you can. The second person will insert the fitting as shown above, using primarily downward pressure. Get the entire neck of the balloon onto the fitting.
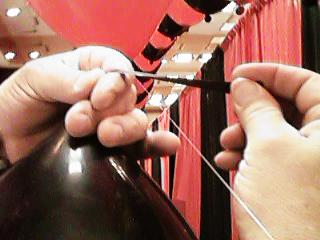
Next, attach a piece of surgical tubing (or something similar) to your air source.
( That's Ed....one of our students from Saipan )
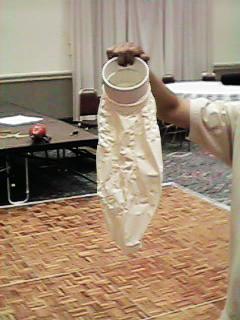
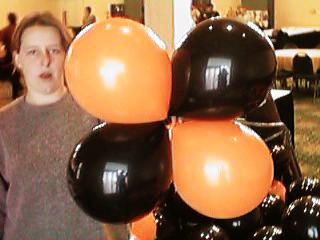
After inserting the tubing, insert a PERFECTLY SIZED 4 1/4 " balloon.
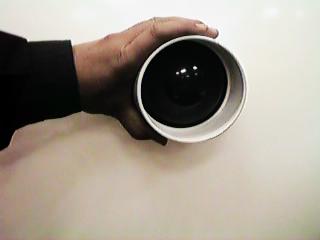
Inflate to 60% or so. The PERFECTLY SIZED balloon will block the flow of air. It should rest on the inner edge of the ridge.
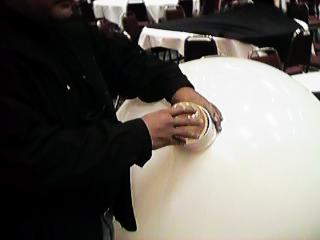
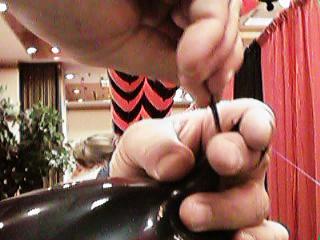
Continue to insert balloons using a slight "screwing" motion. Insert each balloon beyond the ridge. If you lose to much air, it is easy to re-inflate and go again.
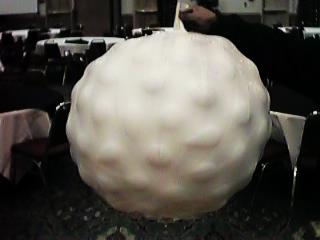
We often put as many as 150 in each.
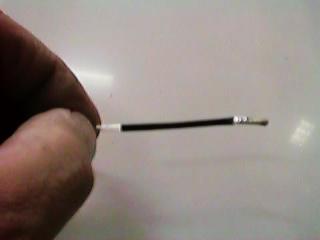
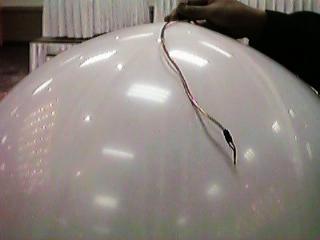
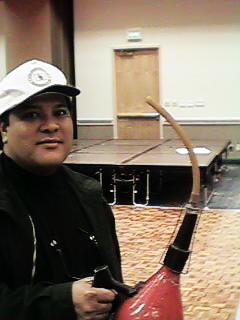
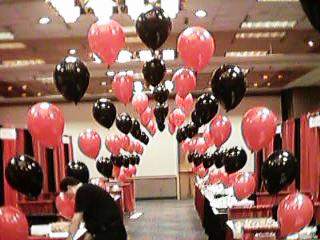
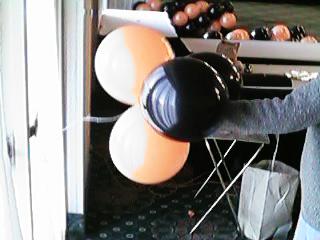
This is an electric match. It has two small wires that will be attached to a length of lamp cord and then to the balloon using a piece of clear tape about 3 " long. Make sure the matchhead is in contact with the balloon and at least 1 foot below the neck area. The electric match has a white line on one of it's wires. The lamp cord will have a rib on one wire ( the other will be smooth). Maintain consistent "polarity" by always connecting the white line wire with the ribbed wire.
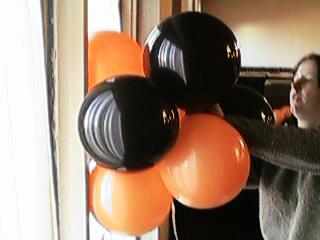
You then connect other balloons to the same lamp cord, We have had best results when we connect no more than 4 balloons per power source. The power source is a 25.2 volt 2 or 3 amp transformer that is then plugged into the wall. You can use a switch set-up or just insert the plug and BOOM !! Confetti can be added (but the venue may not love you) as well as certificates, money, etc. Be aware that you will be dropping this on people's heads. We don't recommend making these from larger balloons because big chunks of latex can be painful !
Cloud
Cloud 9 Cluster
Balloon Recipe
Preparation
Decorating Suggestions and Tips To attach ribbon, tulle or other decorative swags, slide ribbon into lower balloon cluster. Pull ribbon through and cut to desired length. To create a canopy, first make the desired number of Cloud 9 clusters and position them where appropiate. For canopy groupings with a central cluster, use clear 16" for the middle of the arrangement. Pre-measure the amount of ribbon or netting (or both) needed between clusters to create the desired swag effect. Feed ribbon through the lower balloons in each cluster, leaving about 1½ feet of ribbon tail to hang below each cluster. Then feed all ribons to center cluster and let the ends drape through the middle. This completes the canopy arrangement. Securing Cloud 9 Clusters can be done in several easy ways. The photo on top demonstrates how helium-filled balloons are secured with monofilament lines anchored to the floor or table. Another way is to suspend air-filled Cloud 9 Clusters from the ceiling with a clear filament tightly attached to the knot of the top center balloon in each Cloud 9 Cluster. Also, you can knot the filament around the bottom cluster to suspend the Cloud 9 Cluster upside-down. Be creative! Experiment with different quantities of Cloud 9 Clusters, colors and swags. Clusters are best created with a single color balloon, but can be grouped with clusters of other colors. Also, for added texture in large groupings, try using colored 11" balloons. Let your imagination go to work! |
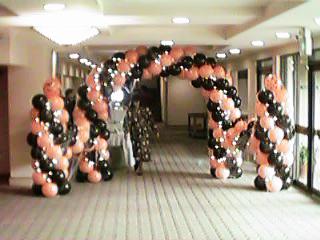
Single Arches
SINGLE ARCHES (String of Pearls)
1). Begin holding the balloon in this position 2). Stretch the neck and wrap around the line

3). Complete the "two finger tie" and space the balloons evenly along the line. Don't slide quickly or they will burn.
This is a simple process and as always the trick is speed and uniformity. Use an auto-sizer and a stick to measure spacing.
Spiral Arches
SPIRAL CLUSTER ARCHES (AND COLUMNS)
This page has a lot of images and may take some time to load. They are low resolution images and are not meant to be for anything but instructional use. Besides, I'm a lousy photographer !!
Begin by over inflating (stretching) the balloons before sizing them in the "holey box".
Consistent sizing is an absolute must !!

Tie 2 balloons together to form a "duplit". Use your forearms and thighs to aid in the tying.

Twist together 2 duplits to form a :
Four balloon cluster.
After tying one end of your string (twine, fishing line etc.) to a solid object, wrap the string several times into the cluster. The other end of the string is free. Make sure to leave several feet of unused string for tying later.
It takes some practice to get the 2nd cluster properly situated. Some people find using a wall to be helpful. When the second cluster is in place as shown above, wrap the string around the 2nd cluster making sure that the clusters are pulled firmly together.
While pinching the string with the balloons in the center, wrap at least once around each color to prevent loosening later.
The rest of the clusters will go on quite quickly....make sure to push each cluster firmly (with consistent pressure) into the cluster before it. DO NOT SLIDE THE CLUSTER AGAINST THE STRING !! It will burn the balloons and create a pinhole that will cause the balloon to deflate right after you leave the building !! Press on the cluster, pinch it to the string and wrap it.!!
When you reach the end, simply hold a loop in the line and pass the line back through it to secure the end of the unit.
Jesse has prepared a "head piece" for the top of a spiral cluster column.
After setting it on top of the column, he will wrap the string into the clusters to hold it in place.

Now, to prepare the frame, he is attaching a piece of 1/4 inch aluminum rod to a balloon stand using duct tape.
With the second stand attached in a similar fashion, Jesse holds the frame above the spiral while Charlotte pushes it gently down into the balloons.
With the frame fully inserted, the stands can be placed upright and Voila !! An arch. It is easy to move about and quite durable. Not to worry if you break a balloon or two :
Repairs can be made simply by tying a new balloon (properly sized) onto the remains of the broken balloon. Sometimes it helps to cut away most of the dead balloon. This tie may take some practice.
The finished product complete with lights, cobwebs, and spiders.
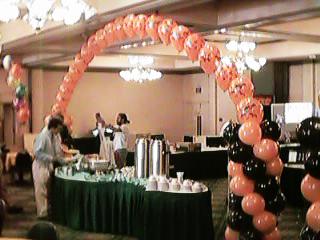
One of many uses for the columns.
There are many variations on the standard arch. We have found this method to be reliable and very fast. If you have improvements on this procedure, e-mail them to me. We hope that this has been of some help to you.
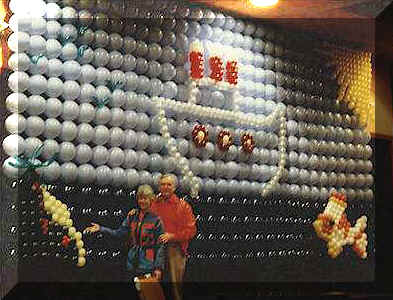
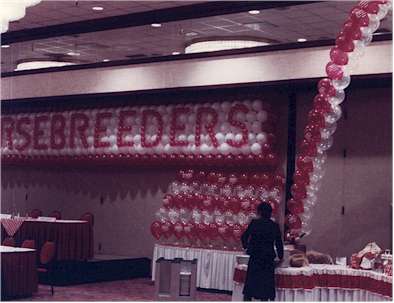
Wallinst
CUSTOM THEME WALLS
Ingredients : Balloons, rubber cement, and a few feet of fishing line.
Step 1. Design it on paper. If it's going to be "inlaid" or a combination of "inlaid" and "overlaid" be careful in the designing because the "inlaid" portion will dictate the overall size and proportions. In the beginning you may find it easier to deal with "overlaid" designs on simple backgrounds. The picture above is a good example of this style. Design the inlaid portion on 1/4" graph paper (1 square = 1 balloon). Warning: The tendency of these things is to grow and grow. Make sure it will fit in your intended location. Practice with a small chunk and measure the distance covered per balloon. Determine how many balloons you will need.
Step 2. Inflate the balloons almost to the bursting point and allow them to relax to a point of about 1/2 full. For 11 inch balloons this would be no bigger than about 8". You will find that they will be very durable after this process. Any size balloon can be used to build the wall depending on your needs. Obviously you can get much greater detail out of 5" balloons. Warning: Sizing must be perfect. Use a Holey box.... auto inflators are not needed.
Step 3. Cut some strips of cardboard about 10" long and 1 1/2" inches wide. Cut with the grain of the cardboard.
Step 4. Pour about 1/8 cup of rubber cement (available at any office supply) onto a glass or ceramic plate. Warning: Rubber cement is flammable.
Step 5. Position yourself on the floor next to a wall so you can use the wall and floor to help you get started in a strait line.
Step 6. Use the cardboard strips to apply rubber cement to the side of a balloon in a more or less circular pattern just slightly bigger than a silver dollar. A small amount is plenty, evenly distributed so that drying is rapid and uniform. The balloon is sitting on the floor with the stem pointing up. The cement is halfway down the side. You then press another balloon up against it (cement is not needed on the second balloon) in the same position using the wall to get started in a strait line. After you have a line of 10' or so, begin the second line. ( if you are making a long wall, build it in manageable and transportable chunks, and put it together close to the installation point) The second line is critical. Attach the first balloon of the second line to the balloon above it, and then attach the second balloon to the one above it. With your patch of cement on one balloon or the other, position the 2 new balloons so that the "diamond" formed in the gap is equal on all sides and stick them together. This may sound complicated but with just a little practice, you'll be amazed at how fast it can go.
Step 7. Put on the overlay items, (usually made in a similar fashion out of 5" balloons) sometimes it's best to affix the overlays as you assemble the "chunks". If you have someone with very small feet they can walk in the "diamonds". Although you may break a few balloons along the way, (they are easily replaced) you will find that these walls are surprisingly strong and durable. We recommend prefabing the chunks and overlay pieces no more than 4 days in advance and keeping them cool and in the dark. You'll find that it is not at all expensive to rent an enclosed truck to haul the "stuff" to the venue.
Step 8. Rig it. This specific type of glued wall is best for hanging next to a wall. With minor changes they can be hung in the middle of a room and made to look good from either side. You will need one tying point for about every 6' of wall. These tying points need to be positioned so as to allow the wall to hang flat and even. Key to this is to have the outside rigging points just slightly (6"-12") beyond the limits of the balloon wall itself. Run fishing line (25 - 30 lb. test is fine) through your rigging points and back down to the top portion of the balloon wall. Tie the wall (using the stems on the top or second line) to the lift lines. Slowly take up the slack on the lift lines as a couple of people gently lift the wall. (This process takes several people. We have always grabbed a few volunteers from nearby.) It only takes a few seconds to get the wall into position and level. Tie it off. Simply cutting the lift lines makes it easy to dispose of after the event. This is easily done by the venue staff and can help avoid you returning to break down the deco.
ALSO : You can fill the "diamonds" with glued 5" and achieve a nice effect.
Try to avoid places where the wall will be "backlit".
The photos below are of walls made with the "glued in the crotches" technique. It is a good way to have less "showthru" spaces. It is also less flexible and therefore more fragile.
I hope these instructions are useful to you. This is my first attempt at writing out this sort of thing. Please e-mail me with your comments and suggestions. Let me know if you need clarification on any step. I expect you may soon improve on these techniques.
Mitch wrote:
My question on those instructions, is: What you're saying in effect, is
a) build it backwards Line up against a wall put a balloon against the wall, rubber cement it on side, attach another balloon next to it
continue until at end of section build 2nd row, cementing EXACTLY in same places continue until at desired height
Then decorate it on top with the names..??
Response: I think you've got it. It will take some practice to get the right amount of rubber cement for quick drying. If you are doing an inlay, remember that you are building it "reversed" since the stems are up. What you will see as you build it is kind of a "mirror image". After you design it on graph paper, Turn the graph paper over and look at it from the back side as you build it……when you turn the wall over, the letters will be correct. Make a small one for practice ….it gets easy soon. Watch to see that the diamonds are equal on all sides and it will look great.
Decorating
260造型教學
Making a balloon Piglet
by Greg Dailey
- do a head ( a little less than 4 inches) and a set of arms (the same size) using a pop twist.
- use a broken balloon (blown to 3 inches) as ears by tying it to the nozzle of the head.
- Blow up a red to around 14 inches and twist it into 4 equal parts with an inch and a half of space between the 2nd and 3rd bubble fold in half and tie the slack to the nozzle.
- remember all the left over pink? take that and start wrapping it around the arm till you are sure that it will not let any air get out when you cut the rest off. Do so. now you just have his head and arms.
- reinflate left over pink you cut off to five inches and tie it. twist in half and place it on the red balloon as shown in the picture.
- fold the red putting the loops (noted A & B ) over piglets head ( like suspenders )
- draw on a face and shirt stripes with marker ( marks A lot works the best. and you should have picture 6.
Angel
ChriSMas Wreath
Elf
Reindeer
SantaHat
Snowflake
Snowman
造型設計師訓練教材
PART1
How latex balloons are made
260's are hard to make. This is how the mechanical action of making the 260 affects the final product.
Making a 260 involves dipping a mold (the same shape as the inside of a 260) into liquid latex. Once they're dipped in liquid latex, they are not allowed to cool. The dipped forms go through a vulcanizing oven, the nozzles are rolled, the balloons are washed, and then they're allowed to return to room temperature and pulled off the mold.
How the latex runs on the mold as you pull it out of the liquid affects the eveness of the wall of the balloon. As you pull the mold out the viscous latex is going to run a little or a lot but it is going to run.
If the mold hangs straight down, the wall of the 260 is thinner at the top, thicker at the bottom. The nozzle will be weaker and fatter, the end of the balloon will be stronger and thinner. If the mold hangs straight down as it dries the balloon will blow up straight.
If the mold is turned over as the latex runs, the wall is more even from end to end but one side is a little thicker than the other. This 260 balloon will blow up with a curve. The drip that collected on the end of the mold as it came out of the latex runs down one side a little way.
When you blow up a 260 you can tell how it was made. I assume the older balloon making equipment let the mold hang straight down. Mechanically it is less expensive. To make balloons that are more even from top to bottom a manufacturer has to invest in fancy and expensive equipment. To make a really good 260 the mold would need to spin as it turned over. This would give the best chance at an even walled 260. Twisters are a niche market. No one has gone to the expense, yet.
The quality of the raw latex, how well it has been cleaned, the amount of vulcanization, the type of color and finish, the kind of powder, the changing temperature and humidity during manufacturing all combine to make every batch of balloons different. How well the manufacturer balances the elements with the tools he has determines his consistency.
How the rolled lip on balloons is formed
Each balloon mold is the shape and size of the uninflated balloon. For example, a balloon mold for a round balloon is shaped like an inverted light bulb. The molds are arranged into rows and dipped into liquid latex in assembly line fashion. The latex at the top (thin) end of the mold becomes the "lip" when it is rolled down (toward the wide end) by a device which looks like a small motorized brush. As the rows of molds progress down the line, they pass between rotating, cone shaped brushes that are positioned horizontally, one on each side of each row of molds, pointing at the approaching molds. The brushes turn in opposite directions and are positioned so they touch the molds on each side. The point of the brushes start rolling the lip, and the lips continues to form as the row of molds moves along the line from the point to the larger end of the brushes. This occurs while the latex is still uncured, just before it is vulcanized.
Color issues
Balloons are made one color at a time. After stripping off the molds, they are counted by weight with special precision scales (different colors have slightly different weights) then packaged. Most entertainer balloons are packed 144 to a polybag.
For assorted colors, a batch of equal quantities of the colors to be assorted are tumbled together, then counted (by weight) and packaged. Because of the tumbling process, there will not be an exact division of colors in each polybag. In fact, you may have received assortments which seem to have too few or too many of certain colors. If you need a specific color, it's best to buy a solid color bag. If every assortment included a hand counted precision mix, the handling cost would make the assortment too expensive.
I don't assume to speak for Qualatex. but this is how I've decided to think about the pricing.
It seems logical that not mixing colors would make for one less step in manufacturing but there is more to it than that. I understand the difference in price to be due in part to the price of the coloring agent. Some colors are more expensive than others. The Standard Colors of 260Q (White, Pink, and Light Blue) less expensive than the Jewel Tone Colors. Solid bags of White, Pink or Light Blue are the same price as a bag of assorted.
A product that you sell a lot of can be priced lower than one that you sell a little of. Consider assorted 260Q's and solid 260Q's separate products (Separate bags, separate storage, separate inventory) and look at volume and pricing. They can afford to lower the price of the Jewel Tone (a large part of the assortment) to the Standard Color price because of volume. You could look at getting such a large percentage of Jewel Tones in the assortment at the Standard Color price as a deal. Or not.
- Pearl Tones.
- Pearl tone latex is created by adding crushed mica to the latex. This process makes the latex more brittle, and less twistable. If you want to see proof of this, you have to look no further than at Tilly Pearl 130's. So, for now, there is no real chance of getting pearl 260's.
- Gold/Silver/Metallic 260's
- Metallic latex is made in the same way as pearl latex. See above.
- Agate 260's.
- Agate balloons are made by dipping the mold into latex twice. A double dipped balloon cannot be inflated very easily, much less twisted. Proof: A 321 is made by dipping just the tip of the balloon into the latex twice.
Making balloons at home
The man who invented and patented the Geo, Ron Prater from Indiana, made all his prototype balloons at home, and vulcanized them in his kitchen oven (of course, his dad was a chemist at Pioneer Balloon Co, so you could say that there was some balloon making knowledge in the family to start with...). I have a newspaper article (that was reprinted in a clown magazine) which discusses this.
Regarding making balloons at home - I've watched the hand dipping process and it's a snap One good person with a few hundred dollars invested could make a gross in about 12 to 16 hours. At that rate, the cost would be prohibitive. - Marvin
Printing on latex balloons
Printed latex balloons are inflated while the printing takes place, screen printed, then deflated, drummed in rotating industrial dryers to shrink them back to "like new," and packaged. This is why printed latex balloons are so much more expensive than unprinted balloons.
I just called Pioneer and they do not imprint on non-round balloons like the 260's and 350's because they are too small. Perhaps though, independent printers can do this for you.
How foil balloons are made
The concept and technology for the "metalization" of plastic sheeting that has given us foil balloons comes directly out of the NASA Space Mission. By the way, all of us sculptors should stop referring to foil balloons as Mylar (a trademarked name for a certain type of polyester film) balloons. The balloon industry refers to them as "foil" balloons, because they are made of nylon sheet, coated on one side with polyethylene and metallized on the other. It's evidently so much harder to make balloons out of aluminized Mylar (and probably so much more expensive) that nobody does it.
Balloon Terms
The Name Game
- The name of balloons change with who is selling them. The person that names them for the
manufacturer may be the inventory control person, the promotion person or the inventor.
The reseller is going to promote the balloons and use whatever word he thinks will sell or
describe them best. Animal, Twisty, Pencil, Airship: the names may have had a specific
meaning to start with, but they have picked up wider definitions or been dropped from use
over time.
I started using the first letter of the manufacturer after the 260 to help describe the balloons in my catalog. I think the term '260Q' was first published in my catalog.
Rather than describing each type of balloon, here is a quick explanation on how to interpret a balloon's name.
Long skinny balloons are initially identified by a two-part, three- digit, number (example: 260). The first digit indicates the diameter of a fully inflated balloon in inches. The following two digits refer to the length of the fully balloon inflated (also in inches). So, our 260 example is two inches wide and sixty inches long, when fully inflated. (Well, in theory this is what it should be, in actuality you'll notice a large variation. Even within the same package you'll find that different colors inflate to different sizes.)
In addition to the three-digit number, a letter is usually included in the name of the balloon. This letter will generally stand for the first letter in the name of the balloon manufacturer of the balloons. However, some manufacturers will use the letter to describe how thick the balloon is (as an indicator of strength and difficulty to inflate).
A list of long, skinny balloons would include: 130, 245A, 250D, 260Q, 260A, 260E, 260P, 280D, 312S, 315S, 350Q, 360, 360P, 418S, 524S.
Those balloons not classified as 'long and skinny' are identified by a single number that refers to their diameter, in inches (example: 6-inch heart). These types of balloons include rounds (your standard 'party' balloons), hearts, and geo's.
Balloon types: by number
130s
- Tilly 130 balloons: These are great! Teeny tiny little balloon animals!
- The 130's aren't the sort of balloon I expect to use a lot. They're not easy to blow up, but it can be done without pain.
- I got some Tilly 130's this weekend. I REALLY like the 130s. I have not had any trouble blowing them up.
- The Tilly are not Qualatex quality. You can feel the difference.
- I like the "feel" of the Tilly rubber, too.
- Twisting them takes absolutely no effort and they can take quite a bit of manipulation. In fact, they're almost as easy to manipulate as pieces of rope.
- I'm not real happy with the quality of the Tilly balloons, they're very inconsistent. Many came deformed, there's no consistency of weight across colors... so the workability varies with color, and they're much harder to inflate than Qualatex balloons). However, I won't stop using 130s.
- The 130T's are great. It's good to work them a little soft. They are wonderful for detail, decoration, and miniatures... those are things adults appreciate. Possibilities are blindfolds on ninja turtles, small flowers on hats, lassos in a cowboy's hand. I also like using them on costumes I make. Jewelry is a nice touch. They're really fun for giving a balloon animal a balloon animal of it's own.
- If you can inflate them without a pump they're great for small areas or waiting in lines to get into someplace. They get attention, but because of their shape, I've also found them to be quieter to twist... so they don't tend to be disruptive. They've now become my balloon of choice for leaving with the tip in a restaurant. (If I'm not working or looking for work, I don't want the attention that a squeaking balloon will get.) I love 'em.
- The 130's are fun but I'd hate to inflate a gross by mouth. The number of balloonists who can inflate one 130 by mouth is about the same percentage as the number of non-balloonists who can blow up a 260Q. Technique helps a lot - getting the air to go into that little nozzle is nearly as hard as getting the air pressure needed to blow it up. You can get a 130 over the nozzle of a PumpO. Kind of bounce on the PumpO and it will inflate the 130.
- I use 130's for a variety of things. Anything you make out of a 260 can be made from a 130! One of my favorite things to create with a 130 is "Hairbear". This is a teddy bear face, no neck and a short, chubby, roll-through body, probably about 1 to 1 1/2 inches long, followed by two small fold twists. Pinch some hair in the roll-through to hold it in place...voila, "Hairbear"! Little girls love this, big girls do too! Older girls like them pinched on the front of a sweater or blouse! You can make any animal like this and pinch it onto somewhere....for boys I make teeny scorpions that pinch onto their tee shirts.
- Compared with 260's, they provide some "extra" balloon at the end. I find them easy to experiment with, because I can inflate them enough to do all the bubbles and still have extra balloon at the end. When I'm comfortable with the general method, I can switch to 260s for final refinements. (I should also mention that Prestige balloons are just a little bit longer than Qualatex, and I miss those extra inches on some of my fancy twists).
- They're excellent balloons for trying new sculptures, because they give you extra play-room. I experiment with them, then refine the technique for 260s. I fell in love with them when I was learning the unicorn with the tail that curls over the back so that the end of the balloon can be used for the horn -- no worries about running out of balloon! They're great for learning things like the kissing teddy- bears, too. 130s are good for making balloon sculptures for other balloons to hold, and baby versions of 260 sculptures.
- The cool thing about 130s is that I can put animals in flowers, palm trees, etc., and the relative proportions are about right.
- I make balloon hats for my balloon animals using 130's.
- I use the 130 a lot. The miniature poodle is always a big hit. They're also good for making bees or butterflies to add to flower bouquets, and make nice flowers to add to a bouquet. I don't do it much, but the poodle under glass with a clear 260 and a 130 is a great looking balloon. They also make good leashes, hats or other additions to standard 260 figures.
- You can make anything with the 130 that you can make with a 260 - swans, dinosaurs, lions, tigers, monkeys and teddy bears. Young girls and women of all ages love the tiny sculptures. The smaller figures are great to add to 260 designs - especially hats.
- 130s make great stems for geo blossoms. I've always used 260s and the fact is, the stems are too thick. I've mostly used 130s to make small animals to put into my trees or to hang from hats. Blossoms and 130s make for a quick, attractive bouquet to add to another figure.
- Most of what I do with them are extras, or accessories to other sculptures. I use the
palm pump to blow them up. Here's some of what I have tried:
- baby animals with the parent animals
- a tight spiral for a car phone antenna
- Bracelets or earrings
- little animals for the pneumatic tubes at the bank drive-up windows (don't forget a business card!)
- First of all, I like adding a humming bird to a flower. I make the beak a little long, then on the green 260 I make a tulip twist to attach it to the blossom and put the humming bird beak inside the tulip to make it look as if it is sipping nectar from the blossom. I also like to make a lady bug bracelet out of a 130 and put it on the stem before I twist the leaves. If I could figure out how to attach a 130 bee to a flower I would try that too.
- I once used a 130 sculpture on a birthday present instead of a bow. It went over quite well.
- I also add pop twist series to my 130 sculptures to make them stand on their own and still get the same final proportions. This is due to the fact that the 130s are proportionally longer than the 260s. I have made decent poodles and horses, and a unicorn. However, I can't make the kissy lips on the horse type figures without popping the 130s. Otherwise I would use them to hold my business card or tips between the lips. (The 130s just can't take the same amount of abuse as the 260Q.) But they still can be used to hold your business card or a folded bill.
- I use 130's a lot in restaurants when I leave tips. When I make a swan I make a little sailor hat out of the money and put it on the swan's head. If I make a wiener dog, I put a bow-tie (made out of the money) around it's neck. If it's a bear, it holds the money in it's paw.
- I often find 130's that are fused as the tips. They make wonderful kissing swans (which look just as nice in the 130 format as 260) and the attachment of the "beaks" makes for a real kiss/heart every time!
- I just got my first gross of Tilly assorted 130s. They're neat. I find, at first glance,
that the rubber seems to be lower quality than I'm used to. After inflating one smoothly,
I find it has lots of bulges, as if I'd used a pump or inflated it in a lot of small
breaths (especially the greens and yellows). Kind of like the old Ashlands, only more so.
They also squeak an awful lot. They are only slightly harder to inflate than 260Qs.
The colors are pretty good, although the palette is limited (sky blue, yellow, red, light green, dark purple). They twist nicely, and have lots of extra length to play with in proportion to the usual 260. The size of the resulting creatures is really nice, too. They fit comfortably in one hand, and seem to be more stable than similar creatures made from a 260. I'll definitely have fun playing with these.
260s
- The 260 is the standard balloon size used by balloon twisters.
- Qualatex manufactures a 260Q: 2 inches in diameter and 60 inches in length - in theory... in actuality, and 260 is closer to 1 1/2 inches in diameter and 50 inches long.
- The following colors are included in the Qualatex standard assortment: Purple, Pink, Ruby, Orange, Black, Dark Blue, Light Blue, White, Yellow, Green. Other colors include Brown, Violet and Clear.
- The Orange 260's harder to blow up than the rest of the colors. I've grown to love the fact that orange 260's are harder to blow up. This teensy problem is lessened by the fact that they are sturdier than all the others colors. There are times when I wish they all were as sturdy as orange.
- I bought some Q balloons a few days ago and found that the latex within 1/2 an inch of
the nozzle was quite thin, relative to the rest of the balloon.
What to do with welded (260) balloons
- When I find two balloons "welded" together I always make Siamese puppies.
- I blow up both sides, made a parrot out of each balloon and ended up with two love
birds.
What to do with those clear 260 balloons
- Other than "pregnant" animals, what do you use them for ? There are lots of uses for clears. A light saber. A stealth airplane. An invisible anything. The glass case for a 130 poodle. All printed in past issues of True Inflations.
- Clear is the best color for seeing things inside the balloon. Things inside a balloon are interesting. If the thing inside moves it creates more interest. That is what putting a hi-bounce ball inside a 260 is about. It has changed from a model to be looked at to a toy.
- Royal Sorrell showed me this. Take a 260 and make two meatballs inside of it, then shoot them out and use them as eyeballs in googly eyes for a cartoon character balloon. Put the 2 balloon balls into a clear 260, then twist it so there is 1 ball per 2" clear bubble and used them to make eyeballs that "jump around like popcorn." Very handy for when you run out of superballs, or want a certain color eyeball. To achieve a similar effect, Tom puts 2 superballs in an uninflated clear 6" heart balloon (through the nozzle) and then inflates and twists the balloon in half so there is 1 ball per clear bubble (lobe of heart) on each side. Twist the "googly eyes" in anywhere you need a pair of eyes.
- Tom showed a group of twisters how to make a "Poodle under Glass." Insert a 130 into a 260 (this would also work with a 260 in a 390... say, does anyone know of a Canadian company making 390's? The book Great Balloons makes mention of them so they must exist... but it would probably work with a shortened 260 in a 350). Inflate the 260, then inflate the 130 without letting the 260 deflate. Then make a figure, twisting them both at the same time. Looks AWESOME!!!!
- Jody Braxton in FL. showed me a poodle with bones. I use the idea to make a Marvin with an X-ray gun zapping Daffy. Inflate a white 130 inside a clear 260 and twist to suit.
- Make Animal Ghosts with clear balloons
- Does anyone put 130 sculptures in clear balloons? I've tried but it's really tough. I even tried putting an untwisted 130 in and twisting it like a ship in a bottle thing.
- The glass goose or a crystal unicorn.
- A fluorescent light bulb. Proudly hold a fully inflated white balloon high in the air and proclaim that it is a fluorescent light bulb. In answer to the blank looks you get, answer "oh, it's over your heads."
- The clear balloons look like condoms and cause a number of clowns/twisters to be embarrassed to use them. That's the twisters' problem. Most crowds take their cue from the entertainer. I always act totally innocent in family situations and let the rest of the audience police it's own level of sexual innuendo. It is amazingly different in different parts of the country. Working for drinking adults is totally different.
280s
- I DETESTED the Tilly 280's. They were pale (bad colors), weak, and horribly, horribly squeaky!!! I tried them once and only finished the bag because I forgot to get restocked one weekend and I was desperate. BUT, my distributor told me that a lot of people loved the Tilly 280s, so I guess that it's all personal preference.
- They just give you some more slack when twisting. Given the quality they're not really worth it. I'd use them all the time for the extra length, if they were better to work with.
321s
- Qualatex manufactures a Q321B, which is more commonly known as the Bee Body. It is available in the same color assortment as the 260Q. (see Bee Body, below)
350s
- Qualatex manufactures a 350Q: 3 inches in diameter and 50 inches in length when inflated. It is available in the same color assortment as the 260Q.
- At IBAC, I was told that the reasons Pioneer makes a 350Q (as opposed to the 390Q that we'd love to have) are manufacturing related. Evidently the latex vats currently in use were designed for the length of a 260Q mold; the 350Q is all we can get without Pioneer investing in lots of new equipment (Notice that a 350Q has approximately the same uninflated length as a 260Q). (see Airship below)
- Great 350 ideas include: 350 airplane (uses 2 balloons) with 260 pilot/stick . Also makes a great hat. Fred Harshberger's Weeble in a tube. Use the 350 for the tube. Use a 260 for the weeble. (See T Myer's Ball In Balloon book for the weeble concept) Lorna Paris' Electricity Hat. I use 350s for the antenna part. I also like the proportions better when I use two 350s for a horse (or other 4 legged animal) and make the rider out of 260s. My 350 flower requires 4 balloons. But, it's HUGE and sells for $4 or more easily.
- My tips have tripled at TGI Friday's since I've been making the big multi-balloons. I take more time at each table. While I am making the figures, the people see how much work is involved and keep putting dollars in. Yes I don't get to everyone quickly. Yes the waitresses keep coming over telling me which table wants me. Yes I make less balloons per hour. But the fact is that everyone eventually gets a balloon and my tips are bigger. A lot bigger.
360s
- These large balloons can be seen from anywhere. Your sculptures have to remain much simpler, though. They're good for a lot of multiple balloon figures. I think I posted my 2 balloon horse a while back. The fatter balloon makes that work better.
- If you put two 360s together, you can make anything you make with a 260. There is nothing like a teddy bear made out of two 360s. You get a full-sized teddy bear. Add a 6" heart, and you've got a $2.00 balloon (minimum). They're bigger, and the recipient feels like s/he's getting more bang for the buck. I find the 360s easier to inflate and twist than 260s.
Balloon types: by name
- Airships
- Animal Balloons
- Bee Bodies
- Custom Shaped Balloons
- Foil Balloons
- Foil Gift Wrapping
- Flying Saucers
- Geos (Donuts and Blossoms)
- Giant (Latex) Balloons
- Glow in the dark balloons
- Hearts
- Hot Water Bottles
- Inflatable Women/ Men
- Jell-O Balloons
- Knobbies
- Latex Gloves
- Mickey Balloons
- Novelty-Shaped Latex Balloons
- Pencil Balloons
- Punch Balloons
- Round Balloons
- Self-inflating Balloons
- Spaghetti Balloons
- Spinners/ Spiral Balloons
- Squiggly Worm Balloons
- Talking Balloons
- Twisty Balloons
- Water Balloons
- Weather Balloons
- Whirly Balloons
- Yo-yo Balloons
Airships
- A balloon that blows up around 6-8" long and 3" in circumference.
- They look like blimps. Some manufacturers actually label them as Airships.
- In general, an airship is shorter and chubbier than a standard 260, however a 321 (bee body) is not an airship (I think because of the tail), basically they look like short fat versions of 260's. Think of a blimp as an airship.
- The non-260 balloons aren't a substitute for learning the craft, but they open all kinds of other creative options once you're grounded in the fundamentals.
- I use them for rocket races: fold a piece of paper in half, draw a rocket on it. Inflate an airship inside, race it down a length of fishing line (either the rocket or the line has to come apart long enough to get it on the line).
Animal Balloons
- Generally speaking, a term for balloons made specifically for twisting, 260s, 130's 280's. As far as I can tell, the phrase 'animal balloons' would be slightly better than the slightly derogatory slang of 'twisty' balloons, just about comparable to the term 'pencil' balloons.
Bee Bodies
- These balloons are small and round-ish with a narrow point on them that forms sort of a stinger. Probably the most under used balloons in my collection. I just make bees with them. There's a cute little duck you can do with them too.
- You can also make a cute hummingbird with a Bee Body balloon.
Custom Shaped Balloons
- Bruce Walden has a technique for custom shape mylars in which, he actually cuts mylar sheets or scraps of mylar balloons and seals them with a heat sealer. An example would be Teeth and Claws for a Giant mylar dragon he had created and the mylar fish sculptures.
- At IBAC 1996, several competitors MADE their own *balloons* from mylar sheets or reconfigured existing balloons to suit their designs... both types of creations were done throughout the use of a standard household iron!
Foil Balloons
- The concept and technology for the "metalization" of plastic sheeting that has given us foil balloons comes directly out of the NASA Space Mission. By the way, all of us sculptors should stop referring to foil balloons as Mylar (a trademarked name for a certain type of polyester film) balloons. The balloon industry refers to them as "foil" balloons, because they are made of nylon sheet, coated on one side with polyethylene and metallized on the other. It's evidently so much harder to make balloons out of aluminized Mylar (and probably so much more expensive) that nobody does it. An important point to remember is that the effective diameter of a foil balloon goes DOWN as it is inflated (only it's thickness increases). A fully inflated 18" foil balloon only covers about a 14" diameter of flat surface. A very hard foil balloon will not cover as much as a very soft foil balloon.
Foil Gift Wrapping
- Forget about twisting. Buy a heat sealing machine, find a mall before Christmas and go
into the business of gift wrapping presents in balloons. Special pillow shaped foil
balloons with beautiful printed designs are available and are an incredibly fast way to
wrap gifts. You spend seconds rather than minutes per gift and it's totally unique and
novel (read "$$$"). Opaque 16" latex balloons printed with "Do not
open 'till Dec. 25" are also available, as is the stuffing equipment used to fill
them. The profit potential is unbelievable.
In this kit, the balloons are a 2 chamber foil-balloon packaging system where the gift is lodged in the inner chamber, and surrounded by the inflated outer chamber. You place your gift inside, seal it yourself, and then inflate the outer chamber through a small straw. Christmas patterns, 2 sizes, 5 balloons for $9.95 (possibly with additional shipping charges).
Flying Saucers
- A flat, round balloon with a nozzle coming off the edge at an angle. It spins as it deflates.
Geos (Donuts and Blossoms)
- Made by Qualatex. Geo balloons inflate to look like donuts or segmented blossoms. (kids love GEO balloons). Blossom geos come in 6-inch and 16-inch sizes, Donut geos come in the 16-inch size.
- Too expensive to use for much of anything. I usually don't use geos in crowds because of the cost involved.
- The geo makes a fast flower with a 260 flower stem and leaves.
- I fell in love with geos after the first flower I made with the blossoms. Yes they cost mucho, but I usually buy enough at a time to get a discount :) I also get an average of $1.50 for an 18 cent item on tips. People love them. On average, I use about 1/4 gross of these on a very busy day. I have used as much as a gross in a day (I also made almost $500 that day, so who cares? :)
- I use them mostly for flowers. Yes, they are an expensive flower, but they are much faster for me than a 5 or 6 petal 260 flower. Plus, most people have never seen them, and they add to the astonishment of your audience. I have also sold bags of pre-made flowers to department stores in the area, and they hand them out to the first 500 customers on big sale days, or use them for special a thank-you for their staff. (Think White Flower Days at Bullock's and Macy's)
- White ones make a quick saucer section for the starship enterprise,
- Geos are fun to put on wild hats; make a helmet hat with several spirals, leave a tail on the spirals and push a poodle tail through the Geo to hold it on the spiral.
- I use the green Geo for the Ninja Turtle on a Stick. I also use the green with a blue or other bright color stem, and call it a Warhol Flower (nobody gets that one).
- A 6" Geo Blossom makes a great heart if turned inside out. After you turn it inside out, adjust it so there is the same amount on both sides (or your heart will be lopsided). It can even be hung from the top: blow it up and the part that was the sides of the donut hole makes a little tunnel and you can thread a ribbon or whatever through there and hang them.
- When turned inside-out, the 16" Geo Doughnuts make a much better looking heart than the 6" or 16" Geo Blossoms.
- At the last IBAC, Marvin told us that he thinks inside-out, 16" Geo Doughnuts look more like hearts than do 11" heart balloons! He has made arches out of helium-filled inside-out 16" Geo Doughnuts by tucking the nozzle of one into the latex "bridge" that forms between the lobes of the previous one. No monofilament required! Another "Pure Sculpture" to use Patty and Royal's terminology.
- Geos are great for the Energizer bunny rabbit, one of my most requested balloons, was submitted to Laughmaker Magazine by Paula Large, Lyle Balcom & Jerry Darkey. It uses one 6" geo and one pink 260 and one blue 260. Inflate Geo and tie off. Inflate pink 260, leaving a one inch tail, and deflate two thirds, thread through geo and re-inflate, and tie off. This leaves you with a pink 260 through the geo. Make simple bunny head at knot end, wrap front feet around geo, and make body, hind feet, and tail at other end. Draw sunglasses on head using knot for nose. For the kicker inflate two inches of blue 260. Squeeze half of the air to the tail of the balloon, tie two knots in the middle of the balloon and tear or cut balloon in half, between the two knots. Tuck each "drumstick" into the place where the hands go through the geo.
- The Myers have a good saxophone made with a 260 and geo by blowing up a 260 leaving a 6 inch tail. Four inches from nozzle, make two ear twists, side by side, repeat four inches down, two times. put the geo at the end of the balloon, thread though tail, then make a one inch poodle tail, to hold it on, then wrap nozzle of geo around last set of ear twists.
- I've been playing with making a Donald Duck using a geo for the hat and the Daffy duck in white with a blue body.
- I heard Ralph Dewey is teaching this in his new class: Turn a Geo inside out, then
inflate. Stop inflating when you see a cute little kitty head. The ears will be rather
tiny, and you may have to grab them and pull them out from under the latex
"bridge" that forms in between them. The front and back of the kitty head are
flat and featureless, so you'll have to get out your marker for this one.
   /\_/\
  { @.@ }
   \_~_/
     Y
It is the only kitty-head I have seen with pointed ears. Then attach a standard animal body. If you want to hide the joint where you tie on to the body, you can make a leash or collar. Another way of hiding the joint and creating a collar is to tie together the knot of the head and the knot of the body. Now do a small tulip twist in the body. Presto - you have hidden the joint and it doesn't ruin the look of the model.
- I frequently find a small chevron shaped cut ``>'' in the side of many of the Geo blossom nozzles. I don't know if it's a manufacturing problem, but it sure is annoying for a balloon that expensive.
- I use the clear geos with clear 260Q's on my double-barreled shot-gun as smoke rings on the blast.
Giant (Latex) Balloons
- It is impossible to find balloon sizes between 16" and three foot in the U.S. (i.e. 20 or 24 inch round balloons). However, in Europe or Australia I was able to get 20" and larger round balloons very easily.
- I know there are a lot of distributors for giant balloons, but it is difficult to find one that will sell to individuals. I found a distributor for 3 foot balloons in Portland, OR.
- I don't recall any manufacturers in the U.S. that make latex balloons bigger than the five foot rounds from Qualatex. In fact, many of distributors I order 4 or 5 foot latex balloons from get these balloons from outside the U.S., so I feel it best to look at manufactures in Europe or Asia. My experience with large weather balloons are that they may not be rugged enough for outdoor display usage. (see weather balloon section, below)
- Over 5' I use vinyl instead of trying for latex. This company also will do artwork on round, airship or blimps. I have used him for 10' rounds and airships for company promotions, and have found him to be good to work with.
Glow in the dark balloons
- Mr. Lovik in Washington makes glow in the dark balloons. He is well known as one of the top ventriloquist figure (dummy) makers in the country, and also makes glow in the dark balloons.
Hearts
- These inflate into the shape of a heart. Very handy for some types of sculptures. Qualatex makes two sizes, 6" and 11". I use them for heads, or sometimes I just give out hearts. People usually think I've done something with a round balloon to make it a heart. Since I usually do this as a magician, I don't mind the deception.
- I honestly mostly use them just as they are... people really do love getting a heart. I will usually inflate a heart and use the line to a lady... as I'm reaching the balloon out towards them, "I would love to give you my heart", then pull back just as they reach out to take it and say "but please promise me you won't break it". It always gets a warm smile, and gets the audience on your side.
- Go for the jewel tones. They cost more than the packages of white, red, and pink, but I like the color variation. I find them very worthwhile to have around.
- I sometimes make insects with hearts. For a fly, twist one lobe. Then with one 260 make a set of wings (a figure 8 ). By twisting one of the lobes you get a nose on a face. BUT, turn that nose skyward and add a figure 8 and you have the makings of a helicopter. Really under inflate them and they make the cutest little fish. Three hearts tied together makes a Shamrock.
- I use hearts for helicopters, a heart in a heart with the teddy bear on the outside, heart hats, googly eyes, heart wands, etc. Do you know how to mend a broken heart? With "ticker tape". T. Myers has several good books, and Captain Visual has a book: Heartbreakers. Also on the back of one of the True Inflations are some cute ideas for hats for your heart face made with 130's. The use of a semi-inflated heart balloon for the eyes of a fish is a wonderful effect. This could also be combined with some 5 inch helium filled clear balloons on microfilament as fishy air bubbles. They waft in a breeze to add a hint of realism.
- I only partially blow up a heart. Makes a really cute cat. The unblown up portion becomes little cute ears. Then just draw on the face. It's wonderful.
- I have created a balloon bow tie from two heart balloons and one 260. The Bow ties I have seen are 2 hearts tied together with a short piece of inflated 260 wrapped around the knot and tied. The remainder uninflated 260 was tied in a loop to go around the neck. (I first heard of this from Roger Siegel in Chicago.) A ribbon or string works better. Make it polka dot by sticking on self adhesive dots from an office supply store. This also makes a great hair bow for a girl. A bigger bow tie is the same center but instead of hearts or around the hearts use a large loop of 260 for each side of the bow. It can be bent at severe angles by pinching the balloon at the bend. Make each loop resemble an "M" on its side to give it that bow tie look.
- Dress up your fishing poles. Use one 6" heart of any color for bait by blowing just a little bit of air into it, tie it off and squeeze the air back toward the knot. It looks like a tiny fish ( the rounded points of the heart are the tail fins). Tie this onto the uninflated 260. Then you can say that you have baited their hook for them. If you want you can put a big fish on and have the bait hang inside the bigger fish or you can leave it with just the bait.
- The "Magic Heart" trick. I first saw this presentation/patter done by Mike Decker on one of his videos. By calling these "magic hearts" I create an expectation that there is a "trick" to what I'm about to do. I'll ask a little girl if she wants a magic heart on her hat/twisted wrister/teddy bear. I tell her that she'll need to help me. I take a 6" heart from my pocket, and blow it up slightly, until it looks round. Pause and let them all see it. While I'm blowing it up, I'm holding it behind my hand, so that it's never seen uninflated. (Alternatively, start by folding the balloon so they don't see the heart shape. It makes it look like you're holding a round balloon.) I never tell them it's a round balloon. I let them decide that from my actions. When you do magic (and as far as your audience is concerned this is magic) it's better to let them come to certain conclusions on their own than to point them out. If you make a point of mentioning it's round, you're drawing undue attention to it and they might question that fact. I show this tiny balloon to the crowd, and explain that I can make this balloon turn into a heart, with a little help from the child. Then, I ask the child if I can borrow her finger. I have the child push her finger between the lobes of the heart. You know where the correct spot is, because you can look for the two drips that mark the tops of the lobes. The child does not see these, and has no clue. Then, with the child's finger still in place, I slowly blow up the balloon. There's no need to rush it. You can do it slowly and get a big reaction. When I'm done. I show the balloon to the audience, and praise the child for making a great heart. This *Always* impresses the child. It becomes a great "Me-Too" item, as every other child wants to make a magic heart. It almost always fools the parents too. It is all in the presentation. The child is convinced that THEY have done magic.
Hot Water Bottles
- When I was a kid I saw a guy on TV blow-up a hot water bottle until it burst. Now that's lung power :-)
- Someone remembers from their childhood seeing someone blow up a hot water bottle on TV. I don't know who did it in the past, but I know Todd Robbins, magician and side show specialist, recently did it on TV and also at the '96 SAM (Soc. of Am. Magicians) national convention. (A joke was made about the guy who was trying to blow up a turtle balloon...)
Inflatable Women/ Men
- Inflatable dolls are made from vinyl/ plastic. Because of their weight and capacity, they will not float when filled with helium. It is best to inflate the doll with air and use 36' helium balloons to float it. You will need to experiment with the doll and the balloons, to give you the number of balloons required to lift it. Factors you will need to consider are how many dolls you will need to inflate and how long you need them to float! Be careful of when ordering the dolls, some are very explicit in their anatomy! This is one centerpiece you will not get back after the party!
Jell-O Balloons
- A bad idea. A very bad idea. Stick to Water Balloons.
Knobbies
- A Carnival balloon that is 5 to 6 inches in diameter and roughly 60 inches in length. These balloons are available through Rainbow Balloons . They make great dragonflys!
Latex Gloves
- I've known for ages (as have, I'm sure, we all) that blowing one of these up a little
makes something like an udder (anyone wanna make a life-size cow?), but I'd always
wondered:
- How big can they be inflated, and
- If inflated fully, do they look like a big hand?
Well, I "borrowed" a set of sample gloves here at the hospital, and now present my results:
- They inflate quite large, actually. I used an "extra small" size glove, and before exploding it was at least 16" x 30".
- No. Just before popping, it did *not* look like a hand. More like, say, a mitten, with 2 inch uninflated tips of the fingers.
- When my son broke his arm the doctor blew up a rubber glove and with marker in hand changed it into a chicken. We had to go to another hospital to have it set by a baby doctor and he blew up one too and made it into a turkey.
Mickey Balloons
- Four styles of really neat Mickey and Minnie mouse heads in microfoil are also available.
- Because of the Disney license, the balloons all have some form of imprint on them. They can not be purchased plain. They CAN be imprinted, but this requires the authorization of one specific person at Disney, and can only be imprinted for a Disney related event. Another note, they are really expensive. I mean REALLY expensive, so be prepared.
Novelty-Shaped Latex Balloons
- At one time Pioneer was the US distributor. Pioneer stopped distributing them a few years ago and Gummiwerk advertised for a new US distributor but I never heard of anyone picking up the line. It's a shame too because their large round balloons (up to 1.6 meter) are great. Some of those shapes, like the (grosse naese) big nose come in very large sizes. One thing to consider with these types of shapes is that they take a little practice to learn to inflate successfully.
Pencil Balloons
- Generic term for 260's, 280's, 130's, 360's, etc.... You should probably substitute 260 where these are mentioned.
- Any balloon that is generally pencil-shaped i.e.: long and thin.
- Pencil balloons is a term used by companies who sold balloons to the public. They are usually 260's, but could be any long skinny balloon. As a twister, you would not buy them because they are small Quantities of cheap, over-priced balloons.
Punch Balloons
- A punch balloon is a thick walled latex balloon with a rubber band attached. Push your hand through the rubber band and bounce the balloon back and forth.
- Some people put in a teaspoon of sugar or rice inside, and then blow up the balloon. Makes a great noise and the kids love it!
Round Balloons
- Your standard "party" balloons. They are identified by a single number that refers to their diameter (example: 9-inch rounds). A clown friend, Yummy from Tucson showed me how to use 5" pearls blown up one and a half inches, tie three together, and put them in the arms of a bunny rabbit, Presto - Easter Bunny. If you play with the shape of the 5" balloons a little, you can shape them just like eggs.
- Smiley face balloon: now available in 5" These are great to have on hand for the kid who is afraid of balloons, and they look great on a hat. They make a great "Happy Stick." Put a Smiley on top of a "Twisted Wrister" - a single full 260 folded in half and wound around itself.
Self-inflating Balloons
- Now there's an idea...
Spaghetti Balloons
- "Spaghetti" balloon seems to be a 'slang' term for 130's and 260's. Generally speaking, it is a term for balloons made specifically for twisting, 260s, 130's 280's. (geo's and hearts etc are not specifically made for twisting).
Spinners/ Spiral Balloons
- 'Spinner' and 'Whirly' and 'Spiral' were terms used for Ashland's 260W. It was held sideways right after the mold was dipped causing one side of the 260 to be thicker. As it inflated it naturally spiraled. The method they used was just a guy holding the mold sideways for what he thought was right. The quality of the balloon and the amount of spiral varied a great deal.
- There used to be a balloon that would curl automatically when you blew it up; when you let go of the balloon, it would spin as it flew away.
- There used to be a balloon known as the 260W (for whirly-bird) that had extra latex on one side. This balloon curled as it inflated and would spin as it deflated. They were made by the Ashland Rubber Company. I called the company who bought their molds and they are not making them. 'Spinners' refer to the old 260W's.
- The mold was turned while the latex was still wet, causing uneven wall thickness.
Squiggly Worm Balloons
- I just bought a package of Squiggly Worm Balloons (12 balloons, pack #5140, Made in Mexico by Unique Industries Inc., Philadelphia., PA) for $1.80 at a party supply store. They inflate to a little over 2 feet long and have a body diameter the size of a 350, with a pair-shaped "head" about the size of a fully inflated 5" round. At the tip of the head is an antenna which stands erect but does not increase in diameter upon inflation. Each balloon has a printed happy face on it. Because the head (the nipple end) inflates larger than the body, these worm balloons inflate "backwards". Also, the ribbing on the 3" diameter section is helical, which gives a very interesting visual effect for the person doing the inflating!!! I like these balloons *a lot* !!!!
- My only suggestion in inflating the worms is be careful. The "head" has a tendency to pop during inflation.
- I have seen, but not purchased, a larger version of these worm balloons. They were packaged in pairs and displayed in a supermarket for $2.00 a package.
- They already have a face on them (although I like to improve on the eye, by making them bigger and adding eyelashes). I made a (great) butterfly with one. Inflate the balloon almost all the way, where the wings meet the body I put two ENORMOUS ear twists (both facing the belly of the Butterfly). I attached two 260 hearts as wings. They stick out beautifully, because of the ear twist placement.
- I like to make a "Huggy Bug". Inflate a 260Q so that it looks like two arms. (Twist a 1" bubble followed by a 6" bubble. Fold twist the 6" bubble. Then, do the same thing on the other end of the balloon). Now inflate the "worm". Attach the 260Q to the "worm" a little below the head. Now, you've got a great, 2 foot tall creature ready for hugging it's owner 'cause it's arms stick and it looks so cute. I suppose you could put little legs on, too, if you wanted.
- A worm in the hand is better than... er, well... a slug, I guess :-)
- I called Unique, Kim said: minimum orders for 1st order is $200 (MC/V/check, or credit
reference, fill out, and then they'd return. $1/per package.), subsequent orders must be
at least $100 (Three orders total).
I then spoke to Debbie Bear, she said: Maybe they can do a bulk package, if someone (a retailer) says they'll order a lot (like in the thousands). Her reasoning was that there isn't a demand for them. I tried to explain the there could be, if the cost weren't prohibitive. She said she'd drop it in the suggestion box. And we all know what that means...
Talking Balloons
- Remember the "talking balloons"? They had the plastic ribbon with ridges on it and when you ran your fingernail down the ribbon the balloon made a sound like it was saying words. The Incredible Balloon Machine Company that makes the Balloomers stuffing and the puffPAC mylar wrapping machine offers them. Their number is 1-800-748-6995. That is the only place that I have seen that offers them yet.
Twisty Balloons
- "Twisty' balloon seems to be a 'slang' term for sub-standard brands of 260's. It does not refer to any/ all balloons that can be twisted... it's a term mostly for the knockoffs. Generally speaking, the term for balloons made specifically for twisting, 260s, 130's 280's. (geo's and hearts etc are not specifically made for twisting).
Water Balloons
- Balloons filled with water instead of air. Usually very thin- walled, round balloons are used.
Weather Balloons
- Totex is one of the worlds largest makers of weather balloons. All of their balloons are sprayed into a rotating mold rather than dipped and are of very high quality (and price). In addition to weather balloons, they also make a line of balloons that are a chloroprene/ latex blend and come in several colors. These balloons are called "AB Balloons" and unlike weather balloons are designed to be tethered.
- They are a wholesaler of balloons they do carry an 8 foot giant Chloroprene and a small selection of giant meteorological balloons is a wholesaler of balloons they do carry an 8 foot giant Chloroprene and a small selection of giant meteorological balloons.
Whirly Balloons
- 'Spinner' and 'Whirly' and 'Spiral' were terms used for Ashland's 260W.
- See the 'Spinner' section, above.
Yo-yo Balloons
- Yo-yo balloons are thick-walled, small, round balloons that are filled 1/2 and 1/2 with water and air. There is a rubber string attached to the nozzle so the balloon bounces up and down like a yo-yo. I saw a service organization selling them for $1 a piece as fast as they could make them.
- You can buy Yo-Yo balloons directly from Suzuki latex, but their minimum is pretty high. (5000?) . . The clips are invaluable - don't try to make more than 10 without the clips.
- I have been doing the yo-yos for a couple of years, . I have also put the 2' glow sticks into them, and tried to get $2.00. Sometimes they sell great, other times - not so well. The additional problem with the glow sticks yo-yo is that you can't make them more than about an hour in advance.
- When we have sold them, we have filled a great big tub with them, and set it on a low table, so the kids could pick out their color. We also fill some with more water for little kids (it bounces easier with less effort on their part), and some with less for bigger kids (less chance of the elastic breaking when they throw it around). There is also a 4-color cardboard display unit that you can buy from All American - it's nice.
- You can make these up weeks in advance and store them in a cool place. The key to selling them seems to be to play with them as you're standing there. Get some into the hands of the carnival organizers, and let people see them being played with. They'll come rushing to find you. Also, they can be imprinted, which would make nice goody bag stuffers for party entertainers. Or, you could get them imprinted with the name of a store or mall, and use them as an add-on sale to your Grand Opening clients.
PART2
The allure of balloons:
Drawing Power
Intrinsic Value
Size
Other Uses For Balloons
Tie Me up, Tie Me Down
Balloon Business: Quick-Fixes
Emergency First Aid
Money Issues and Barter
Novelty Items
Twisting Other Materials
Drawing Power
I travel extensively through the interior of Papua New Guinea visiting very small villages. Most of the people in these areas saw their first white man within the last 30 years! What an 'ice-breaker' balloon sculpting has been! I am received warmly and appear to be trusted instantly! Even the chiefs insist on the biggest, most colorful hats! I spend at least 3 - 5 hours at every village making hats and animals.
Balloons have helped me to approach and speak with natives when traveling abroad. (Once I attracted a mob that was broken up by a man with a machine gun. That taught me not to get out the balloons unless I had the time and resources to make one for every kid there.)
The drawing power of balloons has always amazed me!
- Physical characteristics - Latex balloons grow, shrink, and change shape almost as if they have life. Objects in nature aren't a static size. Most of the man made objects we know of are a fixed size. A foil balloon looks to me like a bag. Even when full, it doesn't look "right". There are wrinkles in it. It doesn't shrink when the gas leaves it. It just flattens. A latex balloon always looks like it's the right size (as long as there's some air in it). The latex stretches to adapt to its contents. A latex balloon is always smooth, no matter it's size and shape. What other objects are that smooth *and* flexible (and smooth after being flexed)? Most importantly it looks so simple. (Paper is another item that seems so simple and basic to me that I'm fascinated by what can be done with it. Paper and latex even come from the same place (kind of).)
- To quote Devon Snyder, "Nothing fills a space with shape and color quite like a balloon." Or the Swedish fruit sculptor who said "It's the roundness like that of the female form, that attracts people ......"
- Size to Weight - A balloon is so light for its size that it seems to defy gravity. The larger the balloon or group of balloons the more amazing this effect becomes. A balloon's air resistance and elastic skin add to it's seemingly unnatural properties. When hit it does not go far and it nearly disappears when it breaks.
- Try telling a non-balloonists that an 11" round balloon, fully inflated, has just under 4 square feet of surface area! Then ask them if they know of any other decor medium that offers as much color intensity and visual energy and features as much surface area for so little money.
- Emotional connection - Balloons are associated with good times. The more the merrier. They are commonly used by advertisers to symbolize fun.
- Fragility - They are easy to break and require special care. Giving something personal attention makes it more valuable to the giver. Fragile also implies fleeting, A balloon by nature is not going to be around very long (or if it is, it will look a whole lot different than it did when first made). This is, from a marketing point of view, a great benefit because there is always product need. The twisted balloon adds even more to this fleeting product because you may be able to find a balloon quickly, but you cannot always find someone to twist it up for you.
- Danger - A balloon pop startles people. It can start your juices going to make for a moment of 'fight or flee' response.
- I spent 10 years working at Soledad State Prison in California. I finally started a clown club called Clowns for Life whereby I trained a group of inmates to apply makeup, do balloon twisting, magic, etc to entertain at the visiting rooms. It went over so well eventually they got to do gigs on the streets for different groups. It amazed me to see these guys sitting on their bunk and trying to scheme up some new type of balloon instead of trying to find a way to harm their fellow inmates. Definitely had a positive effect in their life.
- You are right about the balloons making great rewards. After each lesson I give a balloon to the students, and they love them. It is also a neat way to get rid of all my excess balloons I end up with around the house! Several of my students have even started twisting and bringing me balloons at the lessons!
- I am in the military and recently returned from Italy where I twisted for as many kiddos and adults as I could find. And I saw lots of tears flow, many of them mine as I realized that these darn balloons did something I was unable to; communicate. I found that a universal translator comes by the gross, along with an equal number of smiles!
- Dr. Bruce writes: I couldn't agree more with this. I had a similar experience in Kuwait City, everyone was kind of avoiding the big guy in the uniform, then I pulled out a 260 and was suddenly surrounded by kids, I knew about three words of Arabic and they knew no English, but a good time was had by all.
- I know this is a "me to", but I found the same in Germany, and Korea.. I speak some German, and picked up on Korean, but it was the "Visual" of the balloons that made the connection. A "picture" being worth a 1000 words is right on, only it's a 3-D balloon "picture". Can you see the wonder in the eyes of the children as you hand them their balloon? Are you moved to the verge of tears when a sweet kid runs back to give you a hug? Do you make a balloon, anyway, for a gentle child whose parents won't or can't chip in a buck? Can you see yourself ever getting tired of doing balloons? Are you in it only for the $$$$? The answers to these questions should tell you if you've made the wrong choice. I've done a lot worse for a lot less. My only wish is that I get to die with a 260Q in my hand. I hope my last breath, in this life, is drawn to inflate a balloon. On his tombstone it read, "He died with a balloon in his hand...a happy man." I would do this for less $$$, but I'm glad that I don't have to.
- One of the greatest things I like about entertaining with balloons is that I am so busy enjoying myself and causing others to enjoy themselves that I always forget about any cares in the world.
- I had my dress rehearsal today with my second graders. We did the play, Harvey Potters Balloon Farm. They acted out the parts while I told the story. When it came time for the little girl to pick the balloons that were growing on the farm, the other children wouldn't give them to her. *sigh* I'm glad it was just a rehearsal. I had to promise them I'd make them all balloons to take home after the cast party.
- Ya know, sometimes you may only get to do one kind of balloon once in your life, and it will be worth it. The 3-year old birthday boy today insisted on a getting a seat belt balloon. So I did it. He had the brown strap, the waist belt, and the best part was he lifted his arms up in just the same motions like he was getting in a child's seat. It was so cute!
Intrinsic Value
- The question of how much value you are adding to the balloon is an interesting one. It
implies that you are adding value to the balloon, not the other way around. I think this
is true as soon as the audience thinks they will get a balloon.
It is a possession and instant gratification thing that is very strong. If they think they will get a balloon and don't they are disappointed, no matter how entertaining the show is. In fact, if the audience has lined up for balloons, things that slow down the line become an irritation. Like taking a long time making something special for one person when 30 people are waiting or repeating bits that may have been funny the first time but this is the third time and they have been in line for 20 minutes and they are about to miss their bus. They want the balloon.
- If an entertainer wants to use balloons as an entertainment the balloon should be used as a prop. Something that adds value to the entertainer. If he makes the mistake of giving a balloon out for no good reason he has crossed the line in the mind of the audience and they will start to line up for their balloon. An entertainer needs to be very careful of how he uses balloons and keep in mind the difference between a prop and a handout.
- Personally, my thoughts about ballooning are that if you bring a smile to the eyes of the people you serve, you have served your purpose. Be it by mouth or by pump, the main thing should always be that mutual exchange I've heard Ralph Dewey frame so well. The joy one gets, when the eyes of the child LITERALLY seem to glow with wonder, cannot be measured. The look on their face, as we hand them their balloon. Anyone who has not yet experienced being touched to their very core when their wonder filled eyes meet ours, has not yet lived. I love it when mom's & dad's tell them to "Say thank you!" and I get to tell them "They already did. You just didn't hear it." I hope my last breath on earth is drawn to inflate a balloon! If I'm too ill, I'll use a pump.
- Theory of the fully inflated balloon
"The more space a balloon occupies, the more valuable it becomes." I can talk about this for way too long. It's about: A leash on a poodle so the balloon is too big to put into a shopping bag. The value of making the customer the star with a balloon hat. The value of lots of stars in a crowd. The value of color and motion in the air. The huge effect one twister can have on the 'festivity' of a festival. Giving the customers a choice of Big, Fast, Easy figures. Trading multi-bubble figure twisting time for fewer twists and more balloons. Using a pump makes 'more balloons' less work than 'more twists.' Being generous with balloons helps make customer be generous to me. - And now, a list of ways to add value to balloons.
- Personalize - Involve the customer in the balloon. Give the customer choices of shape and color. Offering figures that are symbols of love and security (Hearts, Teddy Bears, Puppies) can help insure a personal and emotional response.
- Choose something you know to be personally important to the customer. Writing a kid's name on his balloon or making the IBM logo for a convention personalizes balloons.
- Twisting - The twisters ability and speed are amazing to people. Like a juggler. What will the final product look like causes curiosity. Like a construction sight.
- Size - the bigger it is the more valuable it is and the more interest it creates.
- Detail/Original/Art - Adults appreciate detail/original/art more than kids.
- The Experience - This varies by the person and the situation. It can add a great deal to the value of the balloon. It can also detract from its value.
- Teaching - Teaching kids to twist helps them with manual dexterity, self esteem, and
even structural engineering (right Mark?).... Right! Even better than an Erector Set.
Large sculpture design requires consideration of framing and support.
'Round' balloon artists use 11" or 9" balloons attached to lightweight aluminum rod or conduit frames (or netting attached to such frames) to create 'round' balloon sculptures, including bird cages, Eiffel Towers, city scapes and many more.
Royal and Patty Sorrell's IBAC sculptures were self-supporting. An impressive aspect of their Dragon (see photo section) was that it was all twisted latex: no balloons attached to netting draped over a metal skeleton. Here, form was truly in harmony with structure. This sculpture stands about 10' high and has no framing and no monofilament. The only glue is holding the gossamer fabric to the wings, this fits our definition of a 'pure' sculpture. (There are round balloons inside the dragon to fill him out and support the exoskeleton... if he were hollow, he would collapse under his own weight.
- I love it when...
... a child is told say thank you and the child looks you in the eye and gives a tight-lipped baby style kiss right on the lips of the balloon animal you just made.
... you meet up with kids from another country who have never seen a balloon hat or animal before and YOU are the one who gets to show them this wonderful art for the first time.
... a child brings back a balloon that you made for her over a month ago... and for some reason it is STILL in perfect condition, well, as perfect a condition as it can be after THAT long.
... a child comes in after not having seen you for at least a year and STILL knows what you look like.
- We visited Bali, Indonesia. I was fortunate to be taken to a rural part of the island by
my guide. He took us to his village and to his home where roughly 60 relatives live on his
parents' land. He was the only one who spoke English. My husband and I put on a
juggling/magic show and then I twisted balloons.
There was no sense of possessiveness or "That balloon is mine." I'd get a request for a hat or a dog by one child, but very soon it would be in the hands of another, with no tears or discussion. Two boys were sharing a sword, passing it back and forth and giving each other ideas with it.
Everything was going very well. Then one balloon POPPED!! Lots of exclamation of surprise, but I went back to twisting. Pretty soon I began to realize that most of the balloons had disappeared. I caught site of a young boy, running off with as many balloons as he could carry. Turns out he was storing them all in a special room - to protect them and save them all for later.
It was very difficult to make them understand that most of these balloons were transient items and best to be enjoyed in the present moment.
Size
- My rule-of-thumb for cuteness is: Big when it should be little, little when it should be
big.
e.g. "Look at that giant teddy bear! Its sooo cute!" or "Oh wow! A tiny, little, balloon poodle! Its sooo cute! I want one!" - There is no doubt that small is cute and different. Imagine you had a room full of kids and a pile of pre-made figures. The figures ranged from small and detailed to a 13 balloon Bullwinkle, all of them just as nice as you could make them. There are as many figures as there are kids. Without saying anything about the balloons let the kids take turns choosing a figure. Do you think size would enter into their decision? Would the last 25% of things chosen be above or below the average size?
- I think they value large above small in general. That is one reason a dog on a leash is so much more valuable to the kid. It is more valuable to me because it waves around to make color and motion, promoting me.
- I've discovered that so far as kids are concerned, the bigger the better. About half the adults I work with can appreciate a small difficult sculpture but most seem to prefer bigger stuff.
Balloons in "pop" culture
On television
Commercials
- I saw an advertisement on television for Claussen pickles and they had an actor who was dressed as a French artist with a beret and identified him as a balloon artist. He was holding a basic yellow dog and tossed it off camera. Then he began to work with a pickle holding it up as a mustache etc. I only saw it once on TV and will look for it again in the future.
- There's a 260 tied in a loose knot to represent intestinal pain in a current Maalox (Mylanta? one of those gastric squelchers) commercial.
- Seen on New Year's, 1996, a Visine commercial that starts with a huge crowd counting down to the midnight hour and frantically waving 260's? It's just a quick flash at the beginning... stay glued to your TV, or else you'll miss it! (of course, stare straight at the TV too long, and then you'll need the Visine too...)
- There's a great water faucet commercial where two little boys spend most of the time filling a huge (at least one foot in diameter) round balloon with water. The end is a cut-away to two small, adorable little girls playing quietly outside on the sidewalk. Their screams are too late...as the boys draw near with the giant water balloon...
- I saw a commercial on ESPN: "ever wonder what goes on in an NHL locker room between periods?" The camera shows a team of hockey players making balloon animals...
- There is an ad on TV for Tony's pizza. They show a mime doing some twisting, a swan, etc.. and then at the end he does a red Tony's pizza man, which comes to (animated) life.
- Have you seen the Toys R Us commercial featuring a Mylar Balloon Release!!!! Ok, so it was only 5 balloons, but it was very scary to watch. They were Pioneer's "Welcome Baby" foils... I cringe every time I see it.
Shows
- A commercial for the "Tim Allen Show." He had grown big and was towering over the earth when he grabbed hold of a blimp and twisted it into a dog.
- I still think that some of the funniest balloon twisting stuff done on television is the stuff Benny Hill used to do! Classic!
- Mike Decker was strutting his stuff on a program called "How do they do that?" Wednesday night, he went through how to make a three twist dog, a heart, and putting bubbles into a balloon. He also showed some of his more complex models, the Thomas the Tank Engine was brilliant.
- I caught The Late Show with Dave Letterman Monday night -- the blizzard in NY had cut Dave's audience down to about 90 people (from about 450). After a couple of jokes, Dave says - "This is like doin' a birthday party. Everybody here like balloon animals?"
- Seen on David Letterman, a sports fan with a braided balloon hat is taunted by Letterman.
- One time on Mr. Rogers' Neighborhood, he visited a balloon factory where the balloon molds were dipped and the nozzles rolled a little etc. It showed the manufacturing and packaging of the balloons (round ones).
- There was a "Murphy Brown" episode a few years back where the ultra-straight-laced anchor Jim Dial got stuck with making "balloon animals" for Murphy's son's first birthday party (attended by UN delegates, no children). He made, as I recall, a snake, a worm, and, twisting two balloons together in a helix, "married snakes." I don't remember if he inflated the balloons himself, but if he did, he had no trouble with them.
- Aired Feb. 6th Mystery Science Theater: Who was that guy on "SHINING TIME STATION"? He had a bunch of 260's on his back made into a back pack. Also had two helmets connected together 3 feet apart with a round clear balloon dangling in the middle. Balloon gloves were given to the children wearing the hats along with a clip-on nose balloon. The idea was to punch the center round balloon and knock off the others balloon nose. Also shown was a balloon earring. The entertainer was Alan Gooen, "Gooen's Balloons" (sp?). There was a recent article on him and his performer wife, Annie Hickman, who have a Balloon and Bug show (She's got fantastic bug costumes), in either Laugh Makers or Balloon Magic magazines.
- Last night I saw a segment on the TV news about a new government report entitled "Trouble in Toyland." At the press conference announcing the report (which focuses on dangerous toys for little children), they stated that in 1994, 12 children died from choking on balloons. The man behind the podium even popped a round balloon to demonstrate that while you think of a balloon as too large to get into the mouth, it is the balloon fragments which cause the choking hazard. The camera then panned to a kid playing with the fragments and putting them in his mouth :-( The big gripe about balloons in the report was that many balloon manufacturers were not complying with a federal law requiring bold warning labels on balloon packages.
- I have seen on Nickelodeon a kids game where they had a clown try to teach some audience members how to twist a simple dog. The clown had a clear balloon with an orange bubble inside it for his demo.
- I saw an episode of Night Court where Judge Stone decided to make balloon animals for everyone in the courtroom. Mac, the clerk, decides that the noise made by the balloons is too much for him. So he lines all the balloon dogs in a row and pops them with a pen. A scary look in his eyes accompanies his task.
- I was watching the PBS kid's show "Shining Time Station" (it features the "Thomas the Tank Engine" clips) with my son this weekend. This particular episode was about conflict resolution. One of the "visitors" to the station was a balloon twister! Not a clown or magician or juggler, just a twister. The kids talked about him early in the show, and he showed up at the end. Unfortunately, I wasn't able to catch the name... One thing he did was what he called a "nose", and later an "earring". It looked like two donuts side by side, connected only at the centers. It looked a bit like a yo-yo. This way, he could pinch the donuts together on one side, and it would spread open on the other side like a spring clothespin. He could then clip it on to a nose, ear, or whatever; it would then hold on by friction. The donuts appeared to be about 2-3 inch in diameter. For the earrings, he had added a few dangling 260's with 1 inch bubbles in the end (like poodle tails).
- I caught sight of a clown (That's Mister Twister - from Santa Cruz!) on Maury Povich. "Twister" the Clown was holding one of those wonderful little hearts on a racetrack that T. Myers is so often depicted with. He didn't do any more twisting, but he was on because he used to feed his own money into parking meters to keep others from getting tickets. (he got a ticket for it, eventually the city council overturned the law that said that only the driver of the car could feed the meter, so that he wouldn't have to be fined). He was a twister by trade, and his service to the community was to save parked cars from the meter maid. At one point he held the pole up, heart at eye level, curved it across his body, in front of him, as he pointed through the opening of the heart, at the audience and said: "I can just feel the love in this room" a neat romper-room effect.
- Ok, maybe not real balloons, but on last weeks episode of the TV show "ReBoot", episode "Talent Show", there was a computer generated clown on a unicycle juggling Nuls (shapeless computer generated blobs). The clown then stopped, tried to blow the Nul up like a balloon, tied it off, and twisted it into a basic dog. Then it took several Nuls, and with terrible squeaking, twisted a large dinosaur made of Nuls.
- I saw balloon animals on "Saved by the Bell." They were in college, and Screech was trying to liven up a fraternity Rush event by making balloons animals. He made some poodles, parrots, and a bunch of other four-legged animals!
- One of the last episodes of "Taxi" has Elaine's boyfriend (Wallace Shawn, the
'inconceivable' genius from "The Princess Bride") trying to impress her two
kids. One of the stunts he tries is making balloon animals. He pulls out a couple 260's
and starts trying to inflate one while making small talk with the little boy. He huffs and
puffs, trying to inflate the balloons, all the while trying to seem cool and collected. He
eventually gets about a 2 inch bubble inflated, and ask the kid 'OK, what's your favorite
animal, a mouse {puff} or a rat?' The kid says 'a mouse' and Arnie ties off the balloon
and hands it to him with a flourish.
"Now," he says to the little girl," what's your favorite animal?"
"An octopus!" is her answer.
"Aw, give me a break, kid!"
"OK, then, a snake!"
"A snake? I like you!" and he doesn't bother inflating the balloon, just ties it off (yes he ties it off anyway) and hands it to her. Good bit. - Dale Carlson a balloon entertainer in California recently did a job for Paramount Studios where he decorated with balloons and made balloon hats for a scene in the NBC TV show Wings. The episode is called something like "Roy's Birthday" and the scene with the balloons is a birthday party at a Chuck-E- Cheese type of restaurant. A table full of balloon animals and a clown in the back ground as seen on "WINGS" aired 16 Jan. 96.
- Cap'n Denny was seen on Mark Kistler's Imagination Station. Imagination Station is a nationally syndicated drawing program for kids. It was the "Big Bug-eyed Birds" episode. He, and his army of balloon animals, saves the city of Looneyopolis from the attack of the giant balloon dog!
- Seen on "Ned and Stacy". Ned was dressed up as "Bronco Leonard the Rodeo Clown" for a child's birthday party. He introduced himself to the kiddies, and then proceeded to pull two pre-inflated 260's out of his bag. Then he squished them together and moved them around a lot (not really twisting them). One balloon popped and he said "one less leg" and gave it to the birthday child saying it was a "Chernobyl Dog". Then he pulled 2 more balloons out of his bag, did basically the same thing with them, and called it "a hairless sailor named Toby". The whole show revolves around Ned's dry humor. It was pretty funny, especially for a Twister!
- Footage from the Wedding of Grace Kelley to Prince Ranier of Monaco. As they were exiting the church, there was a release of hundreds of white balloons.
- The balloon drop at the Republican National Convention was coordinated by Treb Heining, CBA. He holds the world's record for balloon drops (Republican National Convention, 1988). San Diego area QBN members inflated 50,000 9 inch balloons, and filled the 93 bags used in the drop. The bags also contained confetti, which was dropped when the bags were opened. The drop bags were rigged to the 30+ foot ceiling. The lines were pulled by QBN members, who sat in the catwalks above the convention floor. There was a lot of concern by the media that the ceiling was too low for a balloon drop. WRONG!! The drop was timed to the music, and was designed to last 6 minutes. The bags were released slowly, to stretch out the effect of the drop. While I was watching, I saw a lot of 260's and 350's being waved. I don't know who did those. On Wednesday night, I also saw a LOT of balloon hats, and hearts of sticks and stuff.
- Balloon sighting: on the local news, one student decorated her graduation mortarboard with a parade of poodles, to help her stand out in the crowd. A new 'twist' on the usual HEY MOM sign, and it got her on TV.
- Firm n Fair writes: I was fortunate enough to be able to give a small balloon sculpture to Katie Couric on THE TODAY SHOW live on national TV and, as an added bonus, plug the name of my company. During a break ,she asked me if she could wear the 7 foot balloon hat I had made when the show returned from commercial .( how could I refuse) I put the hat on her and she wore it for 5 minutes, commenting to the audience, as well as Willard Scott, how beautiful it was. In turn, Willard raved that it was the biggest balloon hat he had ever seen. As they were talking the camera panned up and down the hat twice! ...I am now a lifelong fan of this show ;) I might not get any work out of this, but it's exciting to know that your work was seen by millions.
- Seen recently on our local evening news: Two central Illinois teenagers decided to attach a beer can with their names and address glued to it, to a bunch of helium-filled balloons. At first, their balloons got caught on some wires, and they knocked them free with some rocks (bright, shining intelligent Illinois youth). After that the balloons sailed upward, got caught in the jet- stream, and were found at a military base in Maryland 15 hours later.
- I was watching 'Have I Got News For You' on Friday and the following question came up in
the Odd One Out round: Which is the odd one out between Richard Branson; Larry Walters; a
duck, a sheep and a chicken; Pre une Ecklang (?spelling?)
I didn't have a clue either. The background information is:
- Richard Branson has flown balloons across the Atlantic and attempted to fly one around the world.
- Larry Walters was the guy who in 1992 tied large helium balloons to his garden chair in an attempt to hover above his garden.
- A duck, a sheep and a chicken were the animals sent up by Montgolfier in his first balloon.
- Pre une Ecklang is a Thai husband who was 'Bobbited' by his wife. She tied his detached member to two helium-filled balloons. (The quote was that she was charged with causing actual bodily harm, and he was charged with exposing himself to a passing aircraft).
So the odd one out was Pre une Ecklang as the others had all been up in balloons, but only part of Pre had.
- Brit Anders writes: I'm in Knoxville, Tennessee and I've just finished taping 2 shows of Club Dance. It's a country dance show. I was able to get several of my balloons on it, as well as a short interview. It'll be airing on The Nashville Network (TNN) in August, 1997.
- There was a scene in Due South, Episode: The Duel, that featured a twister. The main action revolved around the removal of an exploding push chair from a crowd of Mums and Tots watching this clown who was twisting what looked like dogs under a kind of gazebo.
- On America's Funniest Home Videos, there was a clip of cute little kitty laying on it's back as it playfully batted at a toy dangled above it, in this case, a 260. Cute, yeah right. The kitty pops the balloon with its claws and runs away in terror.
In the movies
- There's a scene in Benny and Joon where Johnny Depp romances the (slightly) mentally imbalanced Joon with a song made by controlling the high pitched squeal emitted from the 'loon (by letting the air out of a round balloon slowly).
- I rented the movie The Favor the other night. There's a brief scene at a children's birthday party. Mr. Lucky (a clown) quickly careens on a unicycle, throws out some clown scthick, and twists. He bestows the birthday girl with a balloon hat, twists a couple of dogs, and hands a phallic balloon to the single lady watching from the sidelines. My favorite is still Parenthood.
- I saw "Happy Gilmore", a great movie, very funny and very silly. They made the sport of golf in to ... well I'll let you see it, but on the golf course, at one part the crowd was holding 260's.
- Killer Klowns From Outer Space is a modern B-movie/spoof. I LOVED IT!!! In one scene, one of the klowns makes a balloon dog on a fully- inflated 260 balloon leash, in order to track down someone he's looking for. There are barking noises and everything as he takes off on his search. This is not a film for kids, but it's a great 'bad' movie, with a cast of no-names that whose faces you'll recognize but you'll have no idea where you saw them before.
- The movie Mannequin, Andrew McCarthy plays the sculptor who can't keep a job. One of his brief jobs is as a balloon artist for kids parties. All he makes is a dog but then he gives the brat birthday boy a huge helium balloon and the kid gets carried away. The company name is Flights of Fancy - catchy name.
- The Mask - the main character makes balloon animals in one scene. Watch the balloon animal part in slow motion as his black balloon morphs into a Thompson submachine gun with 50 round drum magazine and a pistol grip forearm. Now that's a VERY cool trick!
- There's a parade scene in Mr. Holland's Opus, complete with quick flashes of three stereo-typical clowns. One has a bunch of round balloons, and one flashes by on a bike, with a red 260 rabbit mounted on the handle bars, long ears rakishly swept back in the breeze.
- The movie Mr. Saturday Night is worth seeing for the seamy side of the balloon-twisting life of a party clown.
- There is a Steve Martin movie where he makes balloon animals? I believe balloons played a big role in Steve Martin's early comedy acts.
- I think the best movie with balloon twisting in it is still Steve Martin's balloon man stint in "Parenthood". The movie is hilarious and one of his better ones - any one who has not seen should run, not walk, to the nearest video store. He comes out as the Wild Party Machine because the Gun Slinging Balloon Man went to the wrong party. He does some simple and fun balloons (your lower intestine) and rides off in a 'cavalier' way on a horse with a grand exit.
- Shakes The Clown. It's one of my favorite movies. It's a parody of what it would be like if clowns were still clowns when they went home. Shakes (Bobcat) and the other birthday clowns hang out at the Twisted Balloon saloon between gigs. The rodeo clowns hate the 'pussy birthday party clowns' and the birthday party clowns hate mimes. Shakes does everything imaginable at birthday parties (good & bad). It's a must see!
- In some made-for-TV Lifetime movie. Susan Dey with bleach blonde hair, a bad perm, and awful make-up, stalked a guy through a carnival, with some cop stalking her...typical stereo- typed carnival. Weird camera angles, flashing lights, clowns, people screaming, and...one clown twisting a balloon. Susan musta been stalking in circles, because although she wandered seemingly everywhere for a very LONG time, that same clown twisted that same green balloon, standing in the same place, in and out of the whole darn scene. (never did see what the animal was, and once it magically changed into a yellow balloon)
- The Movie "The Cutting Edge" is about a Pairs Figure Skating team. There were tons of round balloon decor shown during the competition scenes. A wall of balloons made from columns was the backdrop to the interview area.
- Also, I don't know if it qualifies as a balloon sighting or not, but earlier my kids were watching something or other where I overheard someone getting all excited and yelling, "Auntie Em, Auntie Em...it's a twister!". Don't know what it was, but I was glad to hear a balloon sculptor finally getting some praise.
- In the movie "Austin Powers, Man of Mystery", very close to the end you will spot a Unique Squiggly Worm balloon.
- Cheryl (CBA) and Frank (CBA) Pappalardo of Balloonatics in Downers Grove, Illinois did the fantastic balloon canopy for the movie My Best Friend's Wedding. If you have not seen the movie- it is worth it to see the balloon tent canopy!
- My Best Friend's Wedding: a large number of people from the Northern Illinois QBN were on the crew. There were about 115 of us there to inflate 5,000 pastel pearl balloons... we also had to do many air filled ones to lie on the tennis court. We started at about 3:15 AM and had to be finished by 6:00 AM, but we finished way ahead of time... cause we're sooooo fast! We got to hang around to watch the filming... it was a GREAT experience and I was so glad to have been asked to participate, but Cheryl and Frank deserve ALL the credit.
In print
- I ran across a snippet of an E. E. Cummings poem:
it's spring and the goat-footed BalloonMan whistles far and wee - The San Francisco Chronicle has an article about Mr. Twister (Cory McDonald) from Santa
Cruz being paid by Downtown San Jose merchants to feed expired parking meters in their
area. The merchants believe that the presence of the meters and the $23 tickets
discourages customers when they can go to shopping malls and park for free. The have a
photo of Mr. twister in his clown makeup and the 260 balloons are visible on his apron.
''True to his name, he twisted long balloons into heart shapes for anyone who would give
him a little change for the meters. The business group gave him about $100 for the job --
most of which he planned to deposit in meters.'' San Jose has a law that makes it illegal
to deposit coins for other motorists. However that law is not enforced. Mr. Twister
achieved some notoriety when he was cited in Santa Cruz for feeding meters ahead of the
meter maids. The article says that Santa Cruz revised its law after it became the butt of
jokes nationwide for giving Mr. Twister a $13 ticket for feeding other people's meters.
Late-night television host Jay Leno quipped that Mr. Twister was likely to do more time
for his offense than O. J. Simpson. Rock band Soul Asylum announced itself as ''five guys
in support of Mr. Twister'' during a Santa Cruz tour stop.
"You Can U"
- This is from the 2/9/96 Charlotte Observer. Each Friday, they run a "You Can
U" with a Beakman and Jax segment in the comics section. It deals with an explanation
of a child's science- related question of the week. This weeks question: "Why do
balloons pop and why do they make a loud sound" (sent in by a child with the
appropriate last name of Huff).
The response deals with how a balloon breaks. The explanation: "Here are two big words: tensile cohesion (TEN-sill co-HE- shun). They mean *stretchy strength*. Balloons break when they get expanded beyond the limits of their stretchy strength."
Then they give the kids two experiments (demonstrations) to do at home: blowing up a paper bag until it pops (to illustrate air compression and the related explosion), and what appears to be the needle through the balloon gag. Here's their run through:
"You Need: Balloon. Bamboo Skewer. Blow up the balloon and tie its end with a knot. Find the spot at the top of the balloon that is darker in color. Gently twist the skewer into the very top and out near the knot at the bottom. If you're careful, the balloon will not pop."
"The Balloon is made from latex, a substance that's built like long stretchy springs. When these springs get stretched too long, they snap and the balloon pops. The top and bottom of the balloon are like springs that are relaxed and are not pulling away. Everywhere else on the balloon, these *springs* are stretched tight near the limit of their strength-near the limits of their tensile cohesion."
Isn't science neat? The entire bit may be on their Web site: http://www.youcan.com
- There is a children's song entitled "Balloons, Balloons, Balloons." A reporter
for a local paper did a bit on me and used a verse from it at the beginning of the
article. It goes like this:
I have a friend I see in the park,
The man with the pretty balloons.
He's always cheery from dawn until dark,
The man with the pretty balloons.
He has red ones, blue ones,
Shiny bright new ones,
Cute ones that whistle a tune,
And all the day long
He keeps singing this song,
Balloons, Balloons, Balloons!
- 6/5/96
Dear Abby:I was surprised when it was announced in my church newsletter recently that an event was to conclude with the release of hundreds of balloons into the sky. It took some doing to explain that what goes into the sky eventually comes back down to earth.
I'm not an active environmentalist, but I have been involved with my daughters Girl Scout troops for 10 years. We teach the girls to recycle, conserve and take care of Mother Earth.
Balloons released into the air often travel many miles before returning to earth, and their effect on wildlife can be deadly. Animal eat the balloons, which cause internal blockage and eventual starvation. They also get tangled up in the strings and, unable to free themselves, die a slow and painful death because they can't reach food or water. Also, balloons are not biodegradable. These colored bits of shriveled plastic you see littering the beaches are going to be there for a long time, if they don't get caught in some fish's throat first.
I read in my local newspaper that some states - New York, Connecticut, Florida, Louisiana, Tennessee, New Jersey, Kentucky, Virginia and California, have enacted laws specifically to curb or eliminate the release of balloons.
Abby, if you print my letter, you will be educating many readers who do not realize the potential harm they are causing when they release those pretty balloons. It would be so much better to keep them, and deliver them to a nursing home instead.
Friend of the Environment
Burnsville, MinnesotaDear Friend:
I'm delighted to help you spread the word to my many readers who are committed to preserving our environment. We all should be.
- I was reading an obituary in the New York Times, a fellow named Steven Slepack had died. They called him a balloon virtuoso. He was known for twisting balloon animals in Central Park. He would blow a balloon up with a single breath and would offer to pay $100 to anyone who could match him. He would work to the beat of 1920s jazz. Apparently in the 1970s, he made a trip to San Francisco where he taught his craft to Steve Martin. He charged a dollar a balloon and could make enough in a couple of days to support himself and his wife for weeks.
- Just saw a news feed about a company in Florida, Eternal Ascent. They offer an ingenious way to spread the ashes of a deceased pet... the ashes are placed in a 3 foot latex balloon and after a long, tearful adieu, the pet owner reluctantly releases the balloon, where, according to the reporter, it climbs to 5000 feet, at which time the balloon freezes and bursts, spreading crystallized ashes over the tear laden land below! Hmmmmmmmm...... if it works for pets... why not Aunt Bessie, too!!
- I just recently received a wonderful sticker catalog from a company called Rewards Unlimited of Omaha NE Their stickers are very bright, big and fairly well priced. They market to doctors, dentist and bank types but they have some stickers that may be of interest to you. One is a small cluster of balloons with happy faces, the sticker say "Super Fantastic & Terrific", another has a bunch of round and heart balloons with a smiley face on the Red heart balloon. They also have single balloon stickers with goofy faces, and they offer custom imprinted stickers!
- I found a balloon-oriented Mom's Day card from American Greetings. It has this picture
of a sheep under a hairdryer reading a magazine. The top of the card reads: "I was
going to buy you one of those expensive hairdryers for Mother's Day. . . " Open the
card and there's a purple balloon inside:
"but this is all I could afford!
Instructions:
- Inflate
- Hold above head
- Release air slowly
Happy Mother's Day"
- The June/July issue of Rental Management contained an article entitled "Balloons, inflatables take off." The article was basically a push for Rental Centers to tap into the balloon market as an additional source of income. It lists an array of potential uses and buyers of balloons. The article touches on helium balloon sales and deliveries, as well as the rental of large inflatables. It is accompanied by pictures of a balloon 'rattle', heart sculpture and a wall of Birthday microfoils. The article ends by saying, "Whether purchasing a few inflated latex balloons or renting large inflatable items, there is an almost unlimited customer base for inflatable products. And all are prospects for other party item rentals and disposable goods carried by party rental stores."
- January 6, 1997 issue of Computerworld on page 38, there is a letter to the editor from David Faught about a balloon twisting cartoon they published previously. They reprinted the cartoon with the letter, which I thought was pretty cool. The letter does mention Mr. Moss's excellent Web site.
- I saw an article in the Good Times newspaper (Santa Cruz, CA area) for Jan. 30, 1997. It is called "Balloon Hat Sightings Around the World." Twister Addi Somekh, 24, and photographer Charlie Eckert, 27 traveled around the world together... Addi would make various balloon hats and have people wear them while being photographed. The article shows a photo of a man in St. Petersburg, Russia, wearing an elaborate woven balloon hat. Addi is a professional balloon twister who studied at the University of California at Santa Cruz (UCSC) from 1990 to 1994. He met Eckert at the Mardi Gras in New Orleans last February. . They have exhibited at galleries and coffee houses.
- In the "The Great and Secret Show" by Clive Barker, evil forces cause the secret dreams of the townspeople come to life. One boy's imaginary friend is a 'balloon man', a scarlet creature made of balloons.
In the (record) books
- The Northeast Clown convention holds a speed balloon contest during its annual convention every year. The rules stipulate you have 3 minutes, each animal made must have three distinct twists (dogs are the usual/fastest), and balloons cannot be pre-inflated. The record is currently held by Jon Hubbard 'J the Clown' of Salem, Massachusetts. He can inflate and tie 23 three-twist dogs in 3 minutes. This contest is one of my favorites and is held in front of an audience and the judges. Although J is no longer able to reach his record of 23, he can consistently do 18 or 19 in three minutes - watch those fingers fly!
- During the WCA clown convention/San Diego (1986?) the parade-ability competition was held at the Seaport Village shopping area. All clowns were invited to help construct the world's longest balloon dog. Each clown added a 260 to the original 'head' balloon. It went on an on and on; it was attached to lamp poles and such along the way. I cannot recall exactly how long it was, but I would guess at least a half mile or more.
- A claim has been made to Guinness and (I think) was published in one of the World Books. Lon Cerel of Rhode Island claims to hold the worlds' record for fastest balloon animals. I'm do not know about the twisting methods, or if inflation was included in the time. He uses this title in all his promotional material.
- Speed Twisting Contest (location, date of event unknown) Cost $25 must pre-register. A team of three: 1 twister and 2 helpers. One person will twist the balloons - everyone must twist a 9 twist poodle Balloons supplied. The team with the most poodles wins $500
- I want to establish record lists for various 'disciplines' in speed twistingt: Please send me your record claims. For record verification. There is no need to send all the material required to verify a new record, if you break a world record at a balloon convention, etc.
- Worlds' Record
From the San Francisco Sunday Examiner and Chronicle 9/29/96: Harrah's Reno is challenging all clowns to a competition naming the world record holder for balloon animals. Know any? Harrah's is sponsoring the 'First Annual Balloon Twist Off' Sunday, October 6, with contestants making as many balloon animals as possible in a five-minute period. The winner takes home $500, and his/her accomplishment will be considered by the Guinness Book of Records. The 'Twist Off' is one of the many features in downtown Reno's FIREFEST 96, "Reno's high desert hoop-la," October 4-6.
On the street
- I have a friend here in Vegas whose license plate is "POPART".
- My license plate says "ITWISTM"...get it ... I Twist 'Em!
- Camp Ti-BAHQ - - (twisters involved in the balloon HQ)
- Talk about a balloon sighting! We stumbled onto this product in the last couple weeks.
Our youngest son is in diapers. A connoisseur of the disposable product line, and a young
twister, he pointed out (demanded) the package on the grocery shelf that featured balloons
in the illustration. Disposable diapers with (round) balloons with ribbons printed on
them. The balloons have smiley faces on them *that disappear when the diapers are wet!*
Way Cool!!! You don't have to do the "damp finger test" anymore, just check to
see if the balloons are "happy"!
"FITTI" brand disposable diapers by Associated Hygienic Products LLC of Duluth - The Super Nintendo game "Secret of Evermore" has a thing about balloons. At the beginning of the game, the main character goes into a haunted house and list a few things he sees. A balloon animal is one of them! Later on in the game, a guard gives a list of things you can't do in the town park.. one of which is "NO balloon animals"!
- 80's pop song by Nina: 99 Red Balloons,
- I saw the funniest bumper sticker in Santa Cruz. It read, "Mr. Twister, feed my meter!"
- The Governor of Alaska appointed Jim Brown the Balloonist Laureate of Alaska.
- I just (12/11/96) received at KTOO-FM (the public radio station where I work) a CD entitled A Rubber Band Christmas. It's got 14 selections from Rubber Bells to Rubber to the World, all primarily performed on rubber bands with additional accompaniment using staplers, rulers, a soda can, paper clips, masking tape and more. Their number is 1-888-RUBBER-8. Hope it puts a little bounce in your holiday season!
- DARWIN AWARD WINNER FOR 1997 ANNOUNCED
The Darwin Awards - an annual honor given to the person who did the gene pool the biggest service by killing themselves in the most extraordinarily stupid way.The 1997 winner: Larry Waters of Los Angeles - one of the few Darwin winners to survive his award-winning accomplishment.
Larry wanted to fly. He purchased 45 weather balloons and several tanks of helium. Each weather balloon, when fully inflated, would measure more than four feet across. Larry securely strapped the balloons to his lawn chair. He anchored the chair to the bumper of his jeep and inflated the balloons with the helium. He climbed on for a test while it was still only a few feet above the ground. Satisfied it would work, Larry tied himself in, along with his pellet gun and provisions.
Larry's plan was to lazily float up to a height of about 30 feet above his back yard after severing the anchor and in a few hours come back down.
When he cut the anchor cord, Larry streaked into the LA sky as if shot from a cannon. He didn't level off at 30 feet, nor did he level off at 100 feet. After climbing and climbing, he leveled off at 11,000 feet. At that height he couldn't risk popping any of the balloons, lest he unbalance the load and really find himself in trouble. So he stayed there, drifting, cold and frightened, for more than 14 hours. Then he really got in trouble. He found himself drifting into the primary approach corridor of Los Angeles International Airport.
A United pilot first spotted Larry. He radioed the tower and described passing a guy in a lawn chair with a gun. Radar confirmed the existence of an object floating 11,000 feet above the airport. LAX dispatched a helicopter to investigate. Night was falling and the offshore breeze began to flow, which carried Larry out to sea. Several miles out, the helicopter caught up with him. Once the crew determined that Larry was not dangerous, they attempted to close in for a rescue but the draft from the blades would push Larry away whenever they neared.
Finally, the helicopter ascended to a position several hundred feet above Larry and lowered a rescue line. Larry snagged the line and was hauled back to shore. As soon as Larry was hauled to earth, he was arrested by waiting members of the LAPD for violating LAX airspace. As he was led away in handcuffs, a reporter dispatched to cover the daring rescue asked why he had done it. Larry stopped, turned and replied nonchalantly, " A man can't just sit around."
Let's hear it for Larry Waters, the 1997 Darwin Award Winner.
Other Uses For Balloons
- I very often use balloons to solve small problems by using them for rubber bands and to tie things, etc.
- 260's as hair bands - take a 260 (or two) and tie the ends this can be used as a head band or as simple elastic to hold hair in a pony tail.
- I needed to hold up my bathing suit cover, so I tied it up with a 260.
- A small loop made from a piece of 260Q or the rolled end from a larger balloon works well to keep old, tired Velcro in place.
- I do gift wrapping with 260's. I use a 260 for the "string" that goes around the package and then make a flower, or boutonniere in the middle of the package. If the package is for a child, I made a balloon animal and then run the 260 through the legs of the animal so it will be fastened to the package and will stand up. They are really a hit with my family and friends.
- Tie onto objects for color-coding.
- When I arrive somewhere and notice that I've been driving on fumes, I tie a 260 to the steering wheel to remind me when I come out, to make my next stop the gas station.
- Use a 260 as a garden tie. It lasts about 2 months and holds without cutting into the bark or restricting growth.
- For holding bills, I make a garter for my sleeve out of 2 260's, each tied nozzle to
nipple. I fold a $20,a $10, and a couple of $5's long-ways. These I hang off one balloon
and tuck them under the other, one going up, the next down, and so on and so on.
Balloon Business: Quick-Fixes
- Quick draw pump strap: Tie one 260 in a loop and use another to attach it to the end of a balloon hand pump. Put loop around forearm and adjust so that when arm is lowered, pump drops into correct hand position. Just let pump dangle below arm while twisting sculpture. When needed just drop arm, and grab pump. No reaching into pockets or setting down on table.
- Four to six 260's work as an emergency replacement for the Pogo return mechanism (surgical tubing).
- I love using broken balloons pieces to tie up a bag of balloons (so they don't spill).
Emergency First Aid
- Last night, a kid slid into a chair and started bleeding. I made an impromptu bandage with napkins as gauze as uninflated balloons tied around his leg to hold it tightly in place. Not quite as dramatic as ER, but it did the trick.
- I work with scissors "A LOT" and every once in a great while I slip & snip. Most often it's my finger. I inflate a 260Q all the way full, insert the wounded digit in, as though I were making a tulip or hook twist, only from the nozzle end. Making sure the balloon covers the cut, I then pop the remainder away. The balloon will stay at the finger joint you take it to, even while you keep working. It not only doesn't get in the way like a band-aid can, but it applies pressure so as to stop the blood flow. "PLUS" it keeps your body fluids contained as a bandage never could, stemming the fear of the possible spread of disease.
- 260's as Dental Floss - Just stretch the 260 and you can get that nasty bit out of your teeth with ease. I just used this method after a run in with corn on the cob at a company outing recently (just make sure the clients or kids don't see).
- Several times at different amusement parks I've used a 260 as a last minute eyeglasses
strap, made up while waiting in line for the thrill rides. Works great.
Money Issues and Barter
- 260's as money wrappers - at the end of a busy day busking, I sort the ones into stacks of 25 and tie them up with a 260. The ladies at the bank always get a kick out of it!
- This weekend I had a lot of cash with me while kayaking; I didn't want to leave the cash in the vehicle. But taking money on the river usually means putting it in a dry bag and taking a small risk of losing it. So, I rolled up $300 and put it into a 260Q, let the air out and tied the end so that I could carry it in my splash jacket! At the end of the day I was soaked, but the cash was still dry.
- I once traded three balloons for three bananas.
Novelty Items
- I found another use for balloons in a parents magazine. You take one round balloon, cut off the end of the nozzle and fill the balloon with sand. Take two more balloons, cut off the entire nozzle of each and stretch them over the first balloon. It makes a nice tight ball, perfect for juggling. Works great I tried it!
- I've been making my juggling balls like that for some time now. I like them better than
most of the juggling balls I've used in the past. The best part is that I can get the size
and weight the way I like them. I've found that I like the feel and weight of crushed
walnut shells for filling. (You can find crushed walnut shells in some pet stores as
bedding for bird cages.) They aren't as strong as cloth balls, and the latex will break
down, so they have a limited life span. On the other hand, they're cheap enough to make
that I haven't found this to be much of a problem. I'm never concerned with them wearing
out and breaking, and I give away a set to everyone that I teach to juggle.
I use two balloons instead of three. I'm not sure the third balloon will make much difference.
- My daughter used 3 balloons to make balloon juggling balls. She cut a couple of holes so the other color showed through for a better design.
- An empty 260 works well for the return rubber band on a yo-yo balloon or a round (punch ball) balloon.
- I use 260's to hang mobiles. That way they bounce around, but don't break.
- Fashion doll belts and accessories.
- Flotation device! Wrap 30+ 260's around your legs, arms, waist, chest, neck, and head! It gives enough buoyancy to have a second person use you as a raft!
- The kids needed water balloons the other day. 260's work, too!
- There are examples of a Christmas themed "stained glass window" made with balloons in a back issue of IMAGES. It was done by cutting out holes in a sheet of foam board into a pattern, and inflating round and 260 balloons inside the holes. The result was a panel that could be back lit to look like stained glass.
- There is a technique for making lettering that involves foam board and 260's. It is called "lacing". They use 260's to create the shape of the individual letters. Instead of tying them off at the right length, they cut slits in the foam board, and tuck the remaining length of 260 through the slit, behind the board. This makes the 260 look as if it ended in a blunt line, rather than tapering off to a rounded end. There was an example of this shown in IMAGES, where they created an IBM logo. It looked great.
- How about treating 260's as short, thick thread, and doing some tapestry weaving?
- Braid for youth group friendship bracelets.
- Bicycle handlebar streamers.
- And of course, the ever popular... Bronx cheer noisemaker!
Twisting Other Materials
- Twisting Paper
I was wondering how many other people make figures out of straw wrappers or napkins. I was introduced to the idea before I got into ballooning, and just recently started to go wild with the possibilities. Straw wrapper figures are made by twisting the straw wrapper length-wise (until it is a nice long string) and continue to twist it until is starts twisting up on itself. Then you finish up twisting where it was twisting by itself (so you now have your straw wrapper string in half in a helix form). This (in balloon terms) is your blown up balloon.To make a simple dog you would: Start at the looped end, pinch a small section for the nose, and unravel a small section of the helix behind it. With the loop that forms from the unraveled section, twist two ears. Then make another unraveled loop further down the helix and make two front legs. A third unraveled loop will make the final back legs, with the tail being the remaining section.
I have found that McDonald's straw wrappers are the best for animals (they are a little longer and more durable than the generic white ones). This is one of my favorite restaurant tricks and usually gets a good reaction. You make something that gets a smile with trash you would normally throw away. For bigger animals, a long thin strip of napkin also works.
Tie Me up, Tie Me Down
PART3
Blowing up a balloon - tips for round and non-round balloons
- How much air does a fully inflated 260 hold?
- Why blow up a balloon by mouth?
- How to blow up a balloon by mouth
- Special effects
- Tying Knots
How much air does a fully inflated 260 hold?
              pi * diameter * diameter * length
260Q Volume = -----------------------------------  cubic inches
                           4

A fully inflated 260Q is really 1.75" in diameter, and 50" long.

               3.14 * 1.75 * 1.75 * 50
260Q Volume = ------------------------- = 120.3 cubic inches
                           4

1 cubic foot = 12 * 12 * 12 = 1728 cubic inches

                             120.3
260Q Volume in cubic feet = ------- = 0.07 cubic feet
                             1728
The problem is getting it in there in the first place!
Why blow up a balloon by mouth?
The part of the true magic of the balloon is in the blowing. It has a person's breath trapped inside, to give it life. A pump does not take away the magic of balloons, but blowing them up by mouth adds to the magic.
Have you ever seen a mouth inflater at work? It adds an incredible amount of excitement to an event, even if he/she is far away. It is kind of like action and color in motion.
There are balloon pumps that make this task somewhat easier. If you are interested in balloon sculpting as just a hobby, a pump can be a great asset, however I strongly urge anyone who plans to use balloons in an act to learn to blow them up with his mouth. It looks much more impressive than using a pump and means that there's one less item to carry to shows. That doesn't mean that if you're twisting balloons for an audience you should avoid pumps. If you're inflating more than a few balloons a pump can be a very handy tool.
There is also a case for being able to blow by mouth when the need arises! There isn't anyone who hasn't seen or been in the situation of having half the shift to go and a long line of anticipating moppets when the pump snaps, jams or otherwise thumbs its nose at you.
When I inflate a balloon by mouth, it takes 1 - 2 seconds. People are usually impressed by how quickly I inflate and tie off. It doesn't interfere with my patter very much at all. If you do shtick while you're inflating, you're probably taking more than one breath to blow it up, which makes it more difficult.
The mouth inflation method is the most convenient for me and I'll stick with it. I recommend trying it. I think the impression you make by being able to blow the balloons up by mouth is worth more than being able to talk to someone for the 10 seconds it takes to inflate the balloon. It just takes practice...remember keep those cheeks in!
I have a Pump-0 and a Pogo pump, but I have yet to find anything that gives me the freedom of inflating by mouth.
Blowing balloons by mouth gives me two very important benefits. The first is the above mentioned freedom. When I am doing a large group (indoor or outdoor) it gives me a chance to circulate and mingle and this is much better for me than standing in a single place for long hours. The second benefit is perhaps the strongest. The interplay between the group and myself about the ability to blow-up 260's is worth the effort to practice the blowing. It's a great way to handle hecklers, to challenge the big strong macho guys, and to make your performance remembered by everyone.
I always have a banter going on with the audience; even when blowing the balloons up I'm making faces or doing a take on a member of the audience. I feel that you can not have this kind of intimacy with your audience when you use a pump. (Hey, you can't get much more intimate, you just gave them some of your spit.)
I have a pump but blow up balloons by mouth mostly. I like to make faces when I blow up the balloons. One face is me out of breath. The other face is that the balloon is going to explode. Usually my comment is like "this color (what ever it is) will usually EXPLODE!" before I proceed to blow it up. I use this routine in twisting as well and it helps in two ways. If the balloon explodes, no one is surprised and I just get another one. If I make a mistake and a part of the sculpture deflates or explodes, I just say "Well I was afraid of that." and continue.
I can blow up two balloons at a time with my mouth, plus flash inflate. You can't do those with a pump.
I blow by mouth. Not only is it impressive for the parents and any others who have ever tried to blow these things up, but it gets the balloon up in the air which is good for visibility (in restaurants, etc.). Plus not having a pump is one less thing to haul around.
The audience expects a twister to blow the things by mouth and the kids love to be tickled by them as they are being blown. If you can blow them up by mouth, you can more effectively engage an audience and adults by challenging them to blow the balloons up themselves. It's quite a laugh to see them try!
There is a difference in the feel of balloons blown up by mouth and by pump. Pumped balloons are tighter and of a larger diameter than mouth inflated balloons. It is probably due to the fact that mouth inflated balloons contain warm moist air from your lungs while pumped balloons are full of air at room conditions.
From years of experience I would agree that humidity makes a big difference in the feel, resilience, and workability of balloons. They also seem to squeak less when blown my mouth than when they're pumped with drier ambient air.
How to blow up a balloon by mouth
FIRST read about the health complications of mouth inflating balloons.
Then, put on some safety glasses before you try any of this!
When you first get started you will probably be tempted to stretch the balloon. You may find that it helps some, but more likely, you'll just change the shape of the balloon and possibly weaken it enough in some areas that it will pop when you start twisting. Stretching the balloon is useful if you want to fill it a little differently, like with a bulge in the middle, but that's about it. The more they are stretched or weakened, the sooner they'll pop. The best way to fill the balloon is with one large breath without pausing. The fewer breaths it takes to inflate the balloon, the smoother the balloon will look and the easier it will be to work with. Unfortunately most people can't do that.
Hold the nozzle of the balloon in your mouth and pinch the balloon about one inch away from the nozzle. Just hold the rolled nozzle (collar) between your lips, not your teeth, I always tell people to hold the balloon with the palm outwards, back of the hand above the mouth and shielding the eyes. I've had balloons blow up in my face many times. About half the time there's some warning -- the balloon will blow up with a kink in it, or inflate with decidedly variable flow, or behave strangely in some respect just before it goes. Not nearly always, though. If I didn't always wear my glasses when twisting, I suspect I'd have gotten slapped pretty good at least a couple of times. As it is, I just get a stung cheek once every night or two.
After being snapped in the eye once, I changed my inflation procedure. I hold the balloon between my thumb & index finger, palm out. I place my index finger against my nose, causing the back of my hand to be protecting my eyes. I let the index finger and thumb of my other hand to glide down the balloon, while inflating, "feeling for imperfections". If one is felt, I stop and check it out. I still get popped, but not in the eye, and it has certainly decreased getting snapped as much as before. Also, aim the ballon down and away as you fill it. And I notice that, of the hand in my face, the middle, ring, and little fingers are almost in my eye. Don't mess with your eyes! I still worry a bit that a balloon might blind me. The minimum I suggest to those who mouth inflate is wear glasses (even if you need to put plain glass in there). Also, twist away from the face since the balloons can also pop afterwards.
Blow into this small section of the balloon and try to form a bubble. While blowing, stretch the section of balloon you are holding a small amount (grab the balloon about 2 inches from the nozzle and stretch it outward another inch or two). It's much easier to fill the rest of the balloon if you have a small bubble to get you started. After forming this small bubble, pinch the nozzle closed so no air comes out, and take a deep breath. Now, if possible with one breath, fill the balloon. Use stomach muscles and not cheek muscles. Puffing up your cheeks and blowing from your head will only succeed in making you dizzy and possibly hurting your eyes and ears.
Tip for those who just can't start the silly things: Carry a palm pump to start the balloon and blow the rest.
The idea is to blow through the small opening you form with your mouth around the balloon. One common mistake is to blow hard while letting the cheeks fill with air. Doing so will only build pressure in your mouth. Also, remember to breath through your nose. Blowing into the balloon isn't a good reason to forget about breathing, and hyperventilating isn't the best way to be reminded.
If you find that it hurts to blow up the balloon you are probably blowing too hard. Relax and blow a bit softer. When I started I'd persist until I went red and got all these pretty stars in front of my eyes. I'm sure this isn't good for you; a bit of 'relax' 'focus' 'gentle' Zen-stuff from the masters would have done me the world of good. If you really can't get the hang of it now, use a pump and try to blow it up with your mouth later. It isn't worth hurting yourself. The fun part is the twisting anyway.
The one big problem I had when I was learning to inflate by mouth was blowing too hard and keeping my mouth closed! I would get trememdous pressure, but it couldn't go anywhere.
From where I sit, as a professional entertainer, in both the music world and family entertainment, blowing a balloon by mouth is not a problem. When it is done correctly, with the correct technique, there is no damage to be done. It is only slightly more back pressure than playing most wind instruments. This is not just an opinion, but backed from 20 years of university teaching and professional performing on wind instruments as well as 15 years as a twister. The biggest problem arises when the technique to blow the balloon up by mouth is wrong. When this happens, you can most definitely hurt yourself. As a trained musician, using correct diaphragm technique and embouchure (French for the way you form your mouth for playing an instrument), I can tell you that I have never experienced a problem. Early in my twisting days I hadn't yet been taught the correct way to 'start' the balloon and regularly had headaches and other problems. I learned the proper technique from The Balloon Video from Flora & Co in Albuquerque. Ever since that time there has not been a problem.
It does take some practice to get it down so you don't pass out. The most important point is that you push the air out of your lungs with your diaphragm, through your mouth and into the balloon. Squeeze your cheeks tight! (no, not THOSE cheeks). Your cheeks should never puff out; if they do, they will surely be sore! If you feel like you're blowing too hard, you are. Relax. It takes a lot less effort than you realize. Sometimes just blowing more gently is all it will take to fill the balloon.
I understand that are many newcomers (and old hands) that get frustrated by the dizzy feelings and the light headedness when first blowing balloons. In my experience (8+ years) balloon blowing is just like every other new thing in our lives. In order to become good at it you must practice it. You will gradually increase your capacity by blowing balloons every day. This is a good way to practice your twisting and to experiment with new figures. The key for me was to blow balloons every day. Try this for a month and see if your capacity increases. Now I can do 600-700 hundred balloons in day with very little discomfort.
You will also find that you'll get dizzy if you try too hard and long. Slow down, pause between attempts. Give it up for ten minutes and come back. Once you get better, you may still find you get dizzy now and then, or get a headache after doing many balloons. Again, practice will help both of these. Any time you do a lot more blowing than usual, you are likely to have these problems. Even now, if I skip for a few weeks, I'll get a mild headache after an hour or two of inflating balloons.
Not blowing into the balloon is the most common mistake. Blowing very hard will tend to close the balloon opening and result in your cheeks exploding before the balloon inflates. It's learning how to focus your breath INTO the balloon that will suddenly make it easy.
A hint I found for blowing up balloons more easily is to:
- Pull on the balloon slightly
- Start blowing, not too hard, but firmly
- Slowly release the pull on the balloon - at some point a bubble will appear, and the rest is easy!
Blowing balloons up is simply a physical feat. There's some technique, eg., not letting one's cheeks puff out, and blowing into the balloon (not squeezing the nozzle too hard with one's lips), etc., but mostly it's just brute force. Pulling just a nudge's worth when starting to inflate the initial bubble is a good idea, but mostly I think it just helps one concentrate into maximizing effort for an instant (like the kihap yell in martial arts).
Unfortunately, just attempting to blow a balloon up is like walking up to a set of weights and trying to bench press 180 lbs. Not too many people can do it. Working up to it is the key.
Your diaphragm, cheeks, and lips all have muscles that must be built up to handle mouth inflation. Remember those cheek muscles especially. If you let your cheeks puff out when inflating balloons, they'll get incredibly sore and painful. If you can't keep them in just using your facial muscles, try using your fingers (holding the balloon like a cigarette (British style) and wrapping the hand around your cheeks to hold your cheeks in -- it works for many people.
I recommend pre-inflating balloons with a pump, fully deflating them, (try doing this again once or twice) and then reblowing them by mouth. Then try to blow them up by mouth. Once you can do that easily, then try just inflating a little bubble in a balloon and working from there. Once you've got that, then try inflating it entirely by mouth.
I learned to blow a 260 by first blowing a bag of balloons up one at a time with a compressor and then letting the air back out. This stretched the balloon enough that I could inflate them by mouth . I have been doing this for a couple of years now and in a pinch I can blow them up without pre-inflating them. I have the process down to an art and can pre-inflate a bag in about 20 minutes. I like pre-blowing because I weed out the defectives and the balloons are easier to blow by mouth when I'm working long hours. I have found that pre-blown balloons do not seem to be any weaker than fresh balloons. Plus, the pre-blowing process weeds out the weak ones or the ones with pinholes and helps if you need to sort colors. I have had other twisters observe me at work and ask why I have so few pops.
If you can't blow up pre-inflated balloons, then get an easier balloon to inflate (350s are very easy, for instance. Tilly 260's are easier to inflate than the 260 Q's).
Also, practice with different colors. Different colors are often noticeably easier or harder to inflate. With Qualatex 260's, clear seem to be the easiest; orange seem to be the hardest. Also, cold balloons are much harder to inflate than warm balloons, so practice on warm balloons.
Personally, I learned on relatively easy to inflate Ashland 260A's about 12 years ago. Once I could reliably blow one of them up, I got a gross of 260Es and started trying to blow those up. After about six or eight weeks, I could reliably blow up 260Es (which are about as hard as Qualatex 260Qs).
About 1/3 to 1/2 of the people who try Ashland 260A's and 245A's can blow them up in their first session; most of the rest can master it the next day. Practice with them a while. You can blow good balloons and have fun, but they'll pop more easily than heavier balloons. Once you're comfortable with them (e.g., can blow them up in one breath), then try getting some Ashland 260Es or Qualatex 260Qs. They're heavier and will take more abuse while twisting, but are harder to blow up. It took me about six weeks from being unable to inflate an A to reliably inflating Es.
Above all, don't get discouraged. It took me about 1/2 hour just to get my first 245A (a green one) started.
Like exercise, I'd also recommend lots of short efforts. If you can't inflate a balloon at all, working on it for more than five minutes won't help anything. Just work at it for a minute or two, and then put it away for a few hours. Once you have the strength to do it occasionally, start working on building up your reps. Once you can do a modest number of reps, then do something a little tougher and work your way up gradually. As with exercise, you need both the strength to inflate, and the stamina to do it on demand repeatedly.
How should I practice? A couple of balloons a day? My first try is usually the best and I get worse after that. Do a few a day. Most importantly, stop when you start to feel pain. If you're that determined, you'll get it. This is probably the hardest thing about ballooning.
once a long while ago, someone asked if there was an exercise to help you inflate 260. Here's a thought. Whistling! I am a chronic whistler and recently noticed that after doing a bunch of balloons, my whistle was wilted and wouldn't work. The cheeks, the diaphram and the lips are all intrinsic to both actions.
Take up a musical instrument! I've played the trombone for a long time and (not to brag) blowing up 260Q's is pretty easy. I find that it's about 80% technique and 20% diaphram. Next time you're in the library see if you can find a book on playing instruments. I'd look for one on brass and look in it for topics about your embouchure (pronounced \.a:m-bu.-'shu.(*)r\ ). There's lots of info there!
You can tell if you're doing it right if your face and cheeks DO NOT get tired. In fact, I find that my diaphram starts to get tired after about 5-6 hours where my face and cheeks still feel fine.
I blow my balloons up by mouth although it did take a little practice. I believe in the diaphragm theory. I also do a lot of singing and teaching which helps with the diaphragm. There is an exercise to strengthen the diaphragm for singing and I guess it would be helpful for those learning to blow up balloons. I'll try and explain it.
Firstly make sure you are using your diaphragm the average person breathes only a third of the air required for a full breath, they only use the top part of their lungs.
- Put your right hand on your chest about three inches above your shoulder, then your left on your chest about three inches below your right.
- Take in a natural breath, hold in for a couple of seconds then exhale through your nose.
- If your upper hand moves in more than the lower hand then your not using the full capacity of your lungs.
O.K Lets try this exercise to strengthen your diaphragm:
- Take a deep breath, hold for a couple of seconds and exhale slowly.
- Do it again but when you let the air out make the sound of a long extended eeeee. Your tongue should be arched and the tip touching the bottom teeth.
- While making this sound push up with diaphragm (think you are lifting a heavy weight, straining to pick it up) and try to send that sound right up to the top of your head.
- See how long it takes until all the air is gone from your lungs.
Do this maybe twice a day in 5 minute sessions. You will find that when you let the air out slowly it will last longer and longer this is because your lungs are filling up with more air and getting stronger.
260s can be blown up without a lot of effort if you use the right muscles. I've left more than one trumpet player dumfounded because they couldn't inflate a 260 after seeing me inflate 3 at once.
I need to note that many have been purporting the diaphragm theory regarding inflating balloons. The diaphragm, when it contracts, moves downward (inferior) to create a vacuum, which draws air into the lungs. Expiration happens naturally as the diaphragm relaxes. Forced expiration occurs with the contraction of some of the intercostal muscles. The diaphragm is an antagonist to some of the intercostals, and vice-versa. To forcefully exhale, the diaphragm must relax a lot. I cannot accurately say whether the diaphragm retains a degree of tone to achieve the pressure necessary to inflate a 260, but I can say it is not the diaphragm that is majorly used to inflate them.
130's are difficult to inflate by mouth. Marc writes: I do routinely inflate 130's by mouth. I started working out a few months ago, especially aimed at my stomach muscles. It made all of the difference.
Whatever muscles are involved, I think they are "the same" muscles as used when playing an air-flow musical instrument (especially brass, such as trumpet, but also singing!). I have a degree in music and never had trouble blowing up balloons. I've seen other musicians pick it up quickly, too. We have learned to "use our diaphragms," but perhaps that is a misnomer.
There is one issue of concern for those who receive balloons from people who inflate the balloons by mouth and that is germs. While they are impressed that you can inflate the balloons without a pump, they also are not happy to see their child sucking on the balloon in the same place you just had your mouth! In fact I know of one balloon worker who was inflating by mouth and got sued. One kid who received an animal later came down with pneumonia and had to be hospitalized. The parents claimed the balloon worker had inflated the balloon by mouth, and had coughed a few times at the party. They served him with a subpoena, put him on the stand, asked him health questions and got a list of parties the balloonist did 2-4 weeks prior to the plaintiff's party. They found that some kids from the parties had become ill afterwards, and the balloon worker was nailed as the carrier! The balloon worker lost the suit, and was ordered to pay all medical bills, pain and suffering, etc...
I've learned a few things about balloon inflating over the last few years and since we are on the subject, let me just share some of my wisdom with you all.
- Always blow into the end with the hole. As it happens, many on this list are constantly complaining about holes in their balloons. I have found, however that without one it takes me upwards of a day to get the darn thing inflated.
- Remember to tie the knot -AFTER- you inflate the balloon. Getting this mixed up is going to make it difficult to inflate. See #1 above.
- With the fingers that are holding the balloon close to your mouth, don't pinch too hard. Pinching too hard is akin to tying the know of #2 which leads to #1.
- On the other hand, when giving the balloon that little tug, you want to pinch that end real hard. Otherwise the balloon snaps up and hits you in the nose. Can hurt, but it also might get you a few birthday gigs. Caution - give your brain a rest - don't think too hard about which hand pinches hard and which hand doesn't. You'll hurt something for sure.
- If it hurts, buy a pump (or you can do like my kids do and get someone else to blow up the balloons for you!).
- Watch out for the point of no return. This is the thing you see in cartoons all the time. You blow and you blow and just when you think you've got the darn thing all the way full it decides to deinflate, right back into you. You fill up with air and go bouncing down the street. (Not a pretty site and it hurts too!).
- "Don't forget to stop blowing when the balloon is full." Explosive decompression upon over-inflation results in loud initial noise, followed by "duck call" like noise from continued exhalation through balloon remnant. Similar to #4, loud noise can be painful, but then again, duck call may result in birthday gigs (or being attacked by over-amorous water-fowl.)
Special effects
Blowing up a balloon backwards
(Filling it up at the tail (nipple) and ending at the mouth (nozzle.) This is useful for a sculpture like an elephant where you want a long thin trunk and a thin tail or if you're going to be making a lot of twists and you need room for the balloon to expand on each end. There are several ways you can do it.
- Stretch the balloon as much as you can while inflating. That is hold the nipple of the balloon in an outstretched hand while blowing into the nozzle. This is sort of difficult to get the hang of and it's a lot harder to get air into the balloon.
- Stretch only the nipple end of the balloon a little before inflating. By stretching one spot on the balloon you're weakening it at that point. That spot will naturally get inflated first since the air will be stretching some latex that's already been stretched. Once a bubble is started it will continue to fill from that spot.
- Wrap your fingers loosely around the balloon leaving only the tail free.
A combination of 2 and 3 allows you to get the most control over how the balloon gets filled.
Blowing up balloons from the middle
To blow up balloons from the middle, prevent the air from going anywhere else. Simply stated, if you want a balloon to inflate from the center, you place one of your hands above and the other below the center of the uninflated balloon while air enters it and inflates the center portion. You then let the air out, and set the balloon aside until you are ready to use it for a special effect. The pre-stretched portion will then readily inflate when applying air to it.
One quick but effective bit I've been doing (learned from the Dan Garrett video, Kid Show Konivery, a variation is in the first issue of Balloon Magic) is removing a bubble from a balloon. The first time when you get the balloon out (prestretched and preinflated with just a small bubble in the middle) you also palm a 2" balloon bubble of the same color (see "meatballs" section for several ways to make these) blow up a bubble in the balloon (which having been prestretched should inflate in the middle). When the bubble is the same size as your palmed bubble, pinch the nozzle and make a comment about how they're not supposed to blow up that way (hold the balloon in the left hand the palmed bubble in the right) bring the right hand over to the bubble place your palmed bubble on the balloon bubble and allow the balloon to deflate and show your bubble, it really looks like you pulled the bubble off the balloon
Altering the shape of the balloon
Controlled variations in thickness
Get a 340 and stand on the tail of it as you stretch the nozzle up to your mouth. The more you stretch the balloon the thinner it will blow up and the harder it is to inflate. With a smooth single inflation you can make a flamingo's neck and a fat end for the head. This is an effective shaping technique but have a big, soft chair behind you to catch you when you pass out.
The Pump 1, PumpO or Pogo can make thin sections. These pumps give you a free hand to control the balloon as it inflates. The Pump 1 and PumpO can do anything in terms of inflation control that anyone can do by mouth (except maybe sneeze or spit). If you cut the nozzle off to make the air hole bigger you can do the instant inflation. You can stretch the balloon 2 arms length from the nozzle to blow the whole thing up thin and long. That's hard to do by mouth.
Puffing a poodle tail and making antennas/feelers
Here's how to inflate a small bubble at the end of an uninflated section of a 260, which is often used for poodle tails and antenna or feelers on insects and crustaceans.
DO NOT SUCK A BUBBLE ONTO THE UNINFLATED NIPPLE END OF THE BALLOON!
The wall is thicker at the nipple end (due in part to the presence of a latex "drip" on all Qualatex 260Q's) making it a little harder to inflate than the rest of the balloon. So, it helps if you weaken the balloon _at_the_nipple_end_ by stretching it locally (a couple of good, strong sideways & lengthwise stretches - not a bunch of weak ones) and then wrap your fingers around the length of uninflated balloon that you wish to keep uninflated, so they act as a support. Force air into the nipple end by squeezing the existing bubble at the nozzle end, which causes the nipple end to "magically" inflate.. Check out the instructions in the guide, under blowing up a balloon backwards. Same idea.
The following is the method I use (& teach) for moving a small amount of air inside
a 260 i.e.: "The Poodle Tail Move" used for making the poodle tail. It takes a
Liability (& potential hazard - sucking on the end) and replaces it with an
"Effect", making it an asset:
- Twist the bubble at the base of the tail to separate the amount of air you want to move to the end of the balloon (if the whole bubble moves, the hind legs may unwind). Loosely making a fist, wrap the little and ring fingers of the right hand around the bubble you have twisted (like a "finger palm" in magic). The lower edge of the little finger pressing against the first bubble (next to the hind legs) will keep it from unwinding when you let go with the other hand. Wrap the middle and forefinger of the right hand gently around the un- inflated portion of the tail above the bubble. Do this gently, like you would around a paper drinking straw; enough to hold it and keep the bubble from edging upward when pressure is applied, but not tightly enough to collapse the straw.
- You should have a 1/2 inch of balloon still exposed above your right forefinger. Now press firmly with the little and ring fingers, and the bubble of air should travel to the end of the balloon, without stretching the middle portion of the tail. Now pinch closed the "tube" with your forefinger or the side edge of your thumb. With your left hand squeeze the new bubble at the end of the tail, to stretch the latex so that the air does not go right back to the base of the tail.
- You can squeeze it with the left thumb and forefinger, or "bop" it with the palm of the left hand. If you have a long "tail" you wish to traverse, as on a jesters hat, you can wrap the necessary number of fingers of the left hand around the "tube" until you have only the last 1/2" exposed. With practice you can leave out twisting the original bubble, but I like the accuracy/control it gives me.
- Normally I use patter as I work on the poodle building up to the effect. "...yes, poodles are fun. They have that silly haircut. We'll make this poodle for you complete with the silly haircut!" (nearing completion, working on hind legs) "...of course the important thing on a balloon poodle is to have just enough air left at the end... (twisting base of tail bubble) ...for the little poof at the end of the tail... " (getting grip for the move) "...right HERE!" (point to the uninflated 1/2" sticking up above right fist) "OOPS!...I guess we ran short of air. Could you help me? Have you ever blown out the candles on a birthday cake? Could you blow AT this for me?" (hold the balloon in front of them, a foot or two away, and as they blow, do the move.) "Thanks!" (now squeeze/bop end ). Note; the reference to blowing out candles gives a clear image to them of blowing AT, not into. If you prefer you can blow at it yourself, or make a magic gesture.
- Another cute "bit" is to blow into your left hand and "throw that air into the tail end. Also if the child is a little balloon shy, you can ask them to blow air into YOUR left hand (you can demonstrate, "like this..."), and then transport it over to the tail. This method seems to work quite well for most people.
Just before you do the final bubble for the poodle's tail touch it with your D-Lite (having it light up as you touch the balloon). The bubble will pop up glowing. The effect is pretty cool. When I tested it on my friends, I got quite a few Ooh's and Aah's.
After twisting the poodle I'll point out that it doesn't have the "poofed" tail. "I know! I'll use my 'air gun'!" Having said that I make a "gun" out of my hand (make fist, point index finger out and extend thumb up) and "shoot" the tail of the dog (let thumb snap down like the hammer of a gun while squeezing the bubble to make the poofed tail). I'll sometimes do this without saying anything and when the "customer/child" seems surprised, I'll ask if they have never seen "an air gun" before. It might be funny to shoot it twice with no effect and the 3rd time hold the poodle with the gun hand and shoot at the thumb of the empty hand. As if you thought you were doing the same thing - The magician in trouble situation - When you realize your error, the poodle tail is there and you have done it, TaDa. (Pop up the tail when you shoot the third time.)
When putting the ball on the end of a poodle tail, give the tip a few good stretches to weaken the skin and squeeze the inflated part at the other end. If you don't allow the bubble to just lengthen out, a round bubble should pop out at the end. (Nothing new so far). Now the trick - as you squeeze the bubble with one hand, stick the tip of the opposite thumb in your mouth and make a show of blowing on it. It looks like you're inflating the bubble by blowing through your thumb. It always gets a laugh from the adults, sometimes a kid's eyes will bulge out to match the bubble, and you *don't* have to suck on the balloon.
I prefer blowing on the actual tail itself, and while blowing (I guess it is more of a puff of air), squeezing the bubble and making the tail appear. The goal, obviously, is to make it look like you inflated the tail while blowing on the outside of the balloon.
I get a great response from both the kid and their parents.when I tell the kid that they have to help by blowing on the tail "like it is a birthday candle." As they blow, squeeze up the bubble. I find everyone wants the poodle after the first one. Just be sure not to have it pop up too close to the face. I had a balloon pop when I "poofed" the tail. Part of the balloon flew into the child's eye. The mother of the birthday child removed the small piece out of the child's eye like you would remove an eyelash. Nothing came of it except I am now more careful and am glad I carry liability insurance. Also another thing. Make sure the child does not blow into your face. I hold the balloon to the side so that doesn't happen. Before I started doing this, I caught everything they had to pass on to me.
Don't suck on the end to get a bubble. A very easy way is to make a quick twist... leave a bubble that's about the size the tail pompom needs to be, and gently hold the uninflated part of the balloon so that it can't inflate, but air can move in it. Then, give a squeeze to the new bubble you just made with your free hand, the air should be forced to the end of the tail. Pinch the tail with your fingers and give the end bubble a quick squeeze, to keep the inflation, and voila! a non-damp puffy tail
When you suck the bubble on a balloon you are definitely going to leave lots and lots of spit all over the outside, and if you set aside the unsanitariness of that, you're still left with a spit-covered balloon, not the most appealing of thoughts. When I first learned balloons, I was taught to suck on the end, but have since learned how to do that twist and squeeze method. I find the twist-n-squeeze method to be more appealing aesthetically as well as quicker and more efficient. If you suck on the balloon you could have it pop and go down your windpipe and die. Also, if kids see you do it, they will do it. As you squeeze the air into the tip of the balloon, have a child blow on it and up it comes like magic. I always pinch the end of the balloon and snap it to expand the latex. Then I put my hand around the middle part of the tail and force the air into the end that I stretched (pinched). I always have the kids blow on the end of the tail and they think they did it magically. Always gets a good laugh!!! :)
The last time sucked a bubble on the end of a poodle tail was the *last* time, because two of the boys who saw me do it immediately put their swords in their mouths (balloon swords, of course!). The fact that it is such a neat effect makes it irresistible for kids to try out. The least they'll get is all the germs you've picked up from the multitudes of tips handed out by your phlegmatic customers!
I've stopped sucking poodle tails because it encourages children to put the balloon in their mouth. Especially when, as often happens, they squeeze the bubble off the end and want to put it back. They then tend to try to do what they saw the twister do. On many occasions, when I've made a poodle for a child, they squeeze the dangly tail bubble, and it goes away. They then do what they saw me do -- hold the middle of the tail and squeeze the bottom. It doesn't usually work, but at least they don't stick the balloon in their mouth. Some years ago, I used the suck technique and I would see kids doing the same thing to re- inflate their creatures' tails. Unfortunately, kids are kids and do what they see other people doing, even (especially?) if they're told not to. I don't twist if I'm sick, but it still seems a poor idea to (even indirectly) encourage kids to share my germs. Finally, the squeeze technique is more surprising & entertaining.
I used to like "sucking" the tail of a poodle too until I was almost a victim. Back in 1987 or so I was working at our Festival and had a lot of people around me watching and waiting. I sucked the tail and it gave away and went down my throat!!! I ran to the nearest trash can and stuck my finger down my throat. It was very very scary and believe me that was the last time I ever tried that!!! Luckily I am here to tell about it. Now, when I am doing a show, I have the kids take an oath - saying that they will not put the balloons in their mouth. Of course the parents hear it and they watch too. This is something we can't be too careful about.
A variety of methods have been presented here. What I use depends on whom I'm doing it for and how many times I've done a "bit". I like to change things so that the people stay entertained.
Curly-Q's
Wrap a 260 around two fingers and make sure it doesn't twist or overlap itself.
    _   _    _
 __|_|_/ /__/ /__
(_____/ /__/ /___
(____/ /__/ /____
    /_/  /_/  | |
               @
As I inflate the balloon, I keep moving my fingers inward so that I keep the curl straight. I inflate it a little slower than I do a straight balloon, but keep a steady stream so that it has a consistent width.
I wrap my balloons with the nipple near my palm and the nozzle at my fingertips. Does anyone do it the other way?
The pre-inflation method is for those who inflate with lung power. Pre-inflate the 260 straight, then deflate it before wrapping it around your finger to make the curly-Q. It's hard to blow up otherwise.
Mouth inflating a 260 spiral is more difficult than a straight 260. I was absolutely floored watching Anthony Mackey inflate 260 spirals at IBAC. What I would give for his set of lungs...
Once you get the hang of it, you can go for the single finger method and make the very tight curls. It does take some practice, which is fine, since you will improve with every one you make.
The tighter you can wind the balloon, the tighter the spiral (Up to a point).
Problem - I need to know an easy way to make a spiral out of a 260Q balloon. I have tried, blowing it up, letting the air out, wrapping it around my 2 fingers, and then blowing it up again, but I get half way around, and the spiral stops and won't let any air into it... If I let it go a little bit, to let the air pass, it doesn't turn into a spiral, it just looks like some odd crooked thing.
Solution 1 - You get a twist when the uninflated balloon slips off your finger. To keep this from happening you need to lead the bubble as it inflates. The position of the wrapped fingers in relation to the inflating bubble is most important. Watch the balloon inflate and move your wrapped fingers in a small spiral as the balloon spirals. It is a knack, but this is a good way of thinking about what you are trying to do.
Solution 2 - A 260 gets wider as you inflate it, but it also gets longer. If you don't apply tension (a stretch) when you wrap the balloon around your finger, the length increase (upon inflation) will cause the wrap to loosen. When this happens, the balloon will twist about itself, closing itself off and preventing you from getting any more air in.
Why does this happen? Well, as the balloon is inflated, the axial length (or height) of the spiral increases. This puts the balloon in torsion, making it want to twist itself. To visualize this behavior (which is what makes coil-springs work) find a garden hose with a stripe on it. Coil the striped garden hose on the ground, making sure that the stripe is straight (not twisted). Then grab the last coil of the hose with both hands and lift it up, keeping it parallel to the ground. Watch what happens to the stripe on the hose that lifts up as you raise and lower the top coil. If this interests you further, look in any book on helical spring design for the grisly details.
It's not necessary to pre-inflate the balloon before making a curly-Q if you are using a pump. Making the curly-Q with an un-inflated balloon seems to make the curls stronger (I think it has something to do with the rubber not getting stretched out straight first, then curled). For super tight curly-Q's, inflate curled, deflate, wrap around finger again, re- inflate.
I use a T. Myers Pump1. I take the 260 and wrap it around my first and middle fingers fairly tightly about 4 times. I hold the tip at the 1st knuckle of my first finger and usually end half way round the inside of the hand (back of the hand pointing towards your face as you inflate). I then inflate, making sure to keep the spiral even by moving my hand enough to let the balloon expand in place. This works like a charm, but it took a few times to get the hang of it. As always, make sure that the balloon doesn't twist or you will hear the loudest *POP* you can imagine.
I have tried just wrapping it around my fingers, and trying to blow it up with a hand held air pump, but that is nearly impossible.
The Pump 1, PumpO or Pogo can make spirals. There is no need to preinflate the balloon or to wrap the balloon around more than one finger. These pumps give you a free hand to control the balloon as it inflates. If you are out there trying to make lots of spirals with a 2 handed pump, you are working hard with a wimpy tool. There is complete information on inflating a spiral in the book, "Balls N' Balloons".
Marvin Hardy's book, "The 260Q Decorator", says "Spirals are easier to form when another person holds the tip of the balloon to the pole." Since then, he's found an easier way: At IBAC, Marvin demonstrated a very nice method of inflating spirals: He uses a clothes pin attached to a piece of 1/2" or 3/4" pipe, mounted on a camera tripod. Marvin clips the 260 nipple in the clothes pin, applies a little tension and wraps the balloon in a helix around the pipe, maintaining the tension. He holds onto the nozzle, and inflates with a compressed air source. Then unclips the balloon and ties it off.
Try wrapping them a little looser around your fingers. I have been doing it for about 8 years. It just takes practice and a lot of lung power. T. Myers does it with his pump by wrapping it around 1 finger. When you blow them by mouth you need to wrap them around 2 fingers - but not tight!!! It's really fun when you get the knack of it.
Uses for the Curly-Q
Curly-Q's are often made when someone asks for a snake. If you want a tongue for your snake, leave a bit of the nozzle uninflated during the preinflation.
Lazy S Spiral
Try making the Vulcan "Live long & prosper!" hand sign. Using this hand
configuration, grasp the nozzle of the balloon between the thumb & index finger. While
stretching slightly, wind the balloon back and forth around the two finger groupings as
per the illustration below. The nozzle should end up in the center, at the top, between
the middle & ring fingers. BLOW! Add in your favorite twists & garnish w a Sharpie
to your heart's content to make a snake any man-child would be proud to have.
                   nozzle
                     |
                     |
           / \  / \ \|/ / \  / \
          |   ||   |(O)|   ||   |
          |   ||   |___|___||___|
          |   ||   |_____________]
          |___||___|___|   ||   |
         [_____________|   ||   |
      __  |   ||   |___|___||___|
     |  \ |   ||   |_____________]
     |   \|___||___|__/   //   /
     |    [__________/   //   /
      \   |   ||   |/   //   /
       |  |   ||   |   //   /
       |                   /
        \                 /
         \               /
          \_____________/
I have found that placing one spiral on the end of an umbrella handle/ critter leash/ whatever makes it easier for the kids to get a grip on the creation. You can also fasten it to their wrists more easily.
You can release a Curly-Q at shoulder level where it will spin around like a pinwheel basically in one spot in the air. You can usually snatch it back and re-inflate it again 2 or 3 times. Hum as you blow up a Curly-Q. Tell the kids that when you let it go it will sing and do "The Twist." If it explodes, say that it was "pop music."
Spirals
See Curly-Q's
Multiple balloon inflations
My best "trick" with balloons is inflating two in my mouth at once....On a good day, I can inflate as many as five (if they're all lined up just right). It really isn't harder to do than 1 balloon, you just have to line them up right and take a couple of breaths, instead of one. It looks very impressive and gets OOH'S and AAH'S from even the most skeptical, especially if they're in the process of trying to inflate one.
I can inflate 5 260's at a time. For multiple inflations, it is all how well you can get them lined up in your mouth. I use my front teeth to gently grip them and then tug a bit to line the balloons up. then just focus and go.
When I blow up three, I place the nozzles in my mouth one at a time, just inside my lips, all touching. I then grasp them between my index & middle fingers of my left hand(I'm right handed.) snug, but not tight, palm inward. I let the nozzles leave my mouth while with my right hand, I hold the nipple ends out, slightly pulling so that the nozzles come to rest against the inside of my left hand's fingers. Sorry if this sounds redundant, but if I go over it in detail, I'll be sure not to miss any pertinant information. PUCKER UP!! Place the left hand against your lips VERY tightly. I mean VERY TIGHTLY!!!!!!! and Blow!
Mine usually start to inflate one at a time too. It seems to add to the overall efect."Poof! Poof! POOF!" At this point, I hold my looks of pain. "Never let 'em see you cringe." As I let the air out of the balloons, I reach up with my pinky of my right hand and tweek the inside of my right ear, while tilting my head right, closing my right eye, fluttering my left eyelashes, AND opening my mouth, stretching my jaw so as to pop my ears as if in a high-rise elevator.
The Flash Inflate or the Blast Method:
I thought I saw a magician blow a balloon real fast and asked him about it. He of course denied it, but knew of the technique. Seems it was developed in Japan since they don't like to stick things into their mouths. While trying to explain it to the rest of the group I attempted to demonstrate. ONE SMALL PUFF and the entire balloon was inflated. To say it was fast is a bad understatement... It was as close to magic as ballooning can get. It was just there!
One warning, this did hurt my cheeks the first few times when learning. I have a hard time controlling how much I inflate so I limit this to making monkeys and swords.
Whatcha do is literally use both hands to pull the mouth of the balloon open. It doesn't spread all that far, but you have to stretch it open as far as it will go. Now you have to pretend like you are going to play the trumpet (or blow a pea shooter), purse your lips and use the tip of your tongue to plug it. Build up pressure behind the tongue then snap the tongue back so the pressure can escape. (of course you have to be holding the mouth of the balloon to your mouth at this particular time) If it works you don't see the balloon inflate... it just IS inflated. It makes a neat whooshing sound.. adds to the over all effect.
One gotcha I found is it only works on never before inflated balloons. I've tried inflating balloons, letting the air out and trying again just for practice but it just won't inflate properly the second time.
Nose inflation
Three balloons inflated at once is almost always followed by a "nose job." Just when they think they've seen it all, I take one of the three (preinflated) & blow by doze! sniff, sniff. The grand finale comes when I twist up a dog with said balloon and ask someone to check & see if pooch's nose is cold, cause I think it might be sick. Now that's sick!!!!
As for the nose job, I think it's more technique than trunk (though I do have a rather big one). With my right hand, I rest the nozzle on my thumb, hold the rest of the balloon in my palm with my fingers closed around it. I flare my right nostril and place the nozzle at the very front of this flare. While placing my thumb against the nozztril, which is now in my right nosle. Wait a minute! I think I'm getting a bit mixed up. Anyway, holding it all together with nose, nozzle, & thumb on the right, with any digit from your left hand close off your left nostril & blow!
Up Your Nose with a Rubber... What???
Who says humans are smarter than animals? Frank Olivier swallows a balloon, makes it come out of his nose, and then blows it up out his nose. The way to learn this balloon trick is to sniff the end of a piece of dental floss up your nose, then when it hits your throat cough it out your mouth. Then tie the dental floss to an animal balloon and use it to pull the balloon through your nasal passage.
I saw someone do something like this at this last year's IJA (Int'l Jugglers Ass'n) convention in Las Vegas. Frankie Olivier performed on the Renegade Stage one night. He started by inhaling a bit of dental floss up a nostril (maybe an 18" piece). Then he spit up the end of it (out the mouth). Then did a short "nasal floss" demo, tied the nostril end of the floss to a balloon and fished that through, nipple end first. Then inflated the balloon, tied it off, and did the trick mentioned (squeezing the nozzle end to inflate the nipple end). Grossed the audience out pretty good. It was awesome!
On a tape from Steven's, Todd Robins does the weirdest thing I ever saw with a balloon. He blows it up about 2 inches. He then takes the tail part proceeds to stick it in his nose!! He reaches into his mouth and pulls out the tail. He then squeezes the air in the part hanging out of his nose and has it inflate the part hanging out of his mouth!!! This would KILL on the birthday circuit!!!!
Tying Knots
After inflating the balloon, you may want to "burp" it by letting some air out of it before tying a knot. This softens the balloon a bit. An important point to keep in mind is that burping the balloon will not make it shorter if you've inflated it too much. It will only soften it.
When I inflate 260's and 130's, I just make a little bubble about an inch or so from the nozze and release the air in that bubble so I'll have lots of room to tie the balloon.
David Hamilton was at the Iowa State Fair a couple years ago and used all one-handed knots in his show, as well as a simple 3-twist one-handed dog. After the show I asked about the knot and he showed me his method. Keep a long nozzle when you inflate, and before releasing the end from your mouth, wrap the nozzle around your index and middle fingers. Then roll the end of the balloon with the wrapped nozzle off the end of your fingers with your thumb, making a knot. It's the same principle as tying a knot in the end of a thread when you sew on a button.
Marvin showed me a trick that helps prevent raw fingers when doing lots of tying. Start with the balloon a little further away from the tip of your index finger than you normally do. Roll it towards the tip of your index finger with your thumb, causing the nozzle to twist and become round like a piece of rope. When you get to the "roll the end of the balloon with the wrapped nozzle off the end of your fingers with your thumb," this already round, twisted nozzle rolls down your finger... with the greatest of ease.
And speaking of tying knots, you can do various slapstick bits related to forgetting to tie the knot, tying the knot on the wrong end and tearing the balloon in half and giving the halves to the kid (which then go zooming off)
Pearlized and metallic balloons are more difficult to tie than standard balloons and are rougher on the skin which is probably why you had sore fingers your first job out.)
I tape up my fingers with Sport tape to prevent excessive skin wear and tear (ouch). It's great to protect the cuticles!
I keep first aid tape in the tool box for my son who has this problem with fingers hurting.
To avoid or reduce finger pain and speed up the tying, practice tying balloons by wrapping them around your finger nail area and not up at the knuckle.
I suggest clear tape wrapped around the areas where you are most likely to hurt your fingers, before you start tying, of course. It helps a little.
Are your fingers getting raw and blistered from tying or are the joints in your fingers getting stiff? A solution for raw fingers is to take medical or duct tape and tape up your tying fingers before you start a big project. You need tape that is sticky enough to stay on your fingers, but not too sticky that it rips off your skin when removing.
For sore, stiff fingers, you may want to purchase the first QBN video where they present a good technique for tying. (too difficult for me to explain, probably easier to watch it). Start learning the professional techniques now, especially before you start training a crew (ie family members). If they learn it the right way the first time, you will be very thankful as it's much easier than trying to break old habits. Tying balloons into duplets gets much easier with a little practice.
Also your fingers will build up strength through repetition, (that doesn't mean they won't still stiffen up they day after a HUGE job).
I have just become aware of a balloon knotting device, I don't know how old it is. It is a hard plastic device that slips over the fingers with an extension coming out of the palm of your hand. I bought some last week and my crew absolutely loves them. I first saw this device at IBAC 12. It was demonstrated at one of the booths at the Trade show across the street. Unfortunately, I haven't been able to figure out how to use this when I want to tie a ribbon into the knot of the balloon so I can "slide & size" the ribbon length. Otherwise, it's a great hand saver, but not as quick as the "over the thumb" method for me.
At a ballon show in London I saw a firm, ZIBI I think, selling gizmos to help tie balloons so I got one to try out. It's basically a grooved, tapered stick with a split in the end, and takes a bit of getting used too. I personally don't think I'll use it often, but have had times where my tying fingers are getting sore where it would then be useful. May be useful for anyone who finds tying a problem.
PART4
Blowing up a balloon
- Why blow up a balloon with a pump?
- Balloon pumps
- Carrying Pumps
- Decorating Pumps
- Portable, Battery Powered Inflators
- Compressed air
- Air compressors
- Helium
Why blow up a balloon with a pump?
Using a pump is better for your health than mouth inflating.
With a pump the kids can help you blow up the balloons so they feel that they are participating in making the creation. The older kids can fill and twist their own balloons.
With a pump, a defective balloon won't pop in your eye.
A pump helps limit the spread of germs (germ warfare) when you're physically ill.
It's more "sanitary." There's no moisture or condensation in the balloon. In restaurants I keep as much as I can out of my mouth. It doesn't look quite right biting on a balloon that you are about to give out. Also, my post-pop airborne saliva seems inappropriate as a condiment or dressing for the customers' vittles.
I use a pump all the time for safety reasons. I do alot of kid shows. I always tell kids not to put the balloons in their mouths, so I don't want the kids to see me putting balloons in my mouth. If the kids see you putting your mouth on a balloon, they will put their mouth on the balloon. If the kids _don't_ see you blowing up or even sticking balloons in your mouth, they will assume they shouldn't either. The possibility of the balloon popping in their mouth is wonderful potential for choking and lawsuits!
I have asthsma, and blowing balloons up by mouth just isn't an option.
I have glaucoma, and blowing balloons up by mouth could be dangerous to my sight.
The potential of breathing in the powder that they put in the balloons is not for me - I have enough breathing problems already.
Pumps allow you to keep talking while the balloons are being inflated. A pump frees your mouth to interact with customers. I use my pump on large jobs, if for no other reason than the fact that I can keep up a steady line of verbal 'shtick' with the kids.
Not as much stamina is required for l-o-n-g ballooning stints with a pump. If I'm going to be making scadoodles, or even just one scadude, of balloons, you can bet I'm going to pull out good ol' Mr. Pump. I pull out the pump when I am doing a lot of balloons or am getting winded.
A big pump also gives you a physical barrier between you and your audience. (this could be beneficial with that rough crowd... just hold it up as a weapon and tell them to watch out or you'll blow them all away.)
If I'm not in the mood to inflate by mouth, and someone decides they have to question my manhood by asking why I'm using a pump, I would hand them a balloon and request they inflate the next one for me. If that doesn't keep em busy and quiet for a while, and they actually DO inflate it, then I would ask them to imagine doing that 5 or 6 hundred more times tonight. Usually they smile and give no more problems.
You can do cool pump tricks like this:
Levitation - A steady stream of air from any source will float a small, light, round object and lock it in position over the stream of air. John does this with lung power and a ping pong ball. I do it with a 3 inch round made from 350 leftovers. I use my Pump1 or a fully inflated 350. The balloon ball floats about a foot above the nozzle. If you use a 350 for the air source, you can 'tow' the floating ball all over the living room...uh...I mean, stage.
The Pump1 and PumpO, when clean and lubricated, slide down on their own weight. This causes a light stream of air that can float a small balloon (like a 3" round bubble with the knot trimmed.) It is an interesting and curious activity if you find yourself with wait time. I expect the Pogo air stream could float something very light.
General The pogo is big, gaudy and attracts attention and conversation when table-hopping. Since I did away with the inner rubber return "spring", I can set the pump down as I arrive at a table and it will slowly drop to its lowest position, since I carry it from the bottom of the big tube. This extends it to its tallest as gravity pulls the stand down. This sinking movement usually causes the customers to notice the subtle it out of the corner of their eye. Most of the time they think its falling over and they grab for it. Or, they're startled by this "thing" moving all by itself... either way, its fun and starts the interaction. I also use Bruce Kalver's schtick about the pump being a giant pepper mill or parmesan cheese grinder. I also blow air at little kids' hair to demonstrate how it works. I never shoot it in their faces. I've actually been asked how often I have to replace the CO2 cartridge inside!!
pump disadvantages:
Lack of portability, slightly slower, can break down.
The kids love my Pump-O and it does draw a crowd. My biggest problem is getting the kids to leave the pump alone. I usually tell them in a nice way not to touch it because it breaks easily and if the pump breaks I won't be able to make any more balloons. This works about 50% of the time.
When kids are left to their vices, they will always play with your pump, no matter how many times you tell them not to, and this leads to breakdown too. Floor pumps get dirty easily cuz the kids love to stand on the base.
My biggest problem is getting the kids to leave the pump alone. I got a hoolahoop and stand in the middle of it. That is my "space" and they have to stand on the outside of it.
Pump testamonials
I use a Pogo 90% of the time, but still blow them up orally whenever challenged or called a cheater. I also do it when I am walking around a table and have left the pump at the other end of the table. When I started (1969) there were no pumps available (as far as I knew) so you blew 'em up or found something else to do. I've had headaches. I've had eye pain. I like using both methods and find that the pump isn't all that slow, once you get the rhythm of getting the nozzle over the inflation tip and doing the actual pumping.
Another thing I like about using both methods is the ability to use both kinds of comedy. I can use the mouth-blowing gags and the pump gags too! Plus, it eases the boredom of doing the same thing every time. And the security of knowing I can still do the gig if my pump breaks is very comforting.
For me blowing them up is faster because the pumps just slow me down. Usually I have worked large events with another twister who uses a pump. I have found that for the most part we make about the same amount of creations in the same amount of time. While I can work faster for the first hour, but she can work at a consistent speed the whole time
I've been inflating by mouth - ever since my one pump (a Q 2 way) broke in the midst of an event. However, the rest of that event all I did was mice, tulips, and small poodles - none of those big 'ol parrot hats (now, I always carry at least two pumps, if I'm going to be using them and not breath).
Here's a solution to this whole mouth vs. pump problem. Just ponder these questions yourself and then decide which direction you want to go.
- Would you rather decorate your mouth or your pump with little pictures of the balloon animals that you do?
- Can you still inflate and talk effectively by mouth if you have a tip container hanging from your lower lip?
Of course there are down sides.
- Your mouth rarely gets hung up in the x-ray machine at airports. (Did you ever try to check a Pogo? For some real fun, take a trip to another country with one of those little palm pumps and watch the gathering of customs officials as they try to figure out what it is, but won't dare ask. If they're really curious, they might go so far as to bring the drug sniffing dogs out to inspect it. Yes, this really happened. Now you know why T. "DRIVES" all over the country!)
- If you use a pump no one ever says "My, that's an impressive pair of lungs you have there".
- 3 out of 4 times, the children at the table won't want to play with your mouth.
Balloon pumps
Our dream pump:
- is not too expensive
- doesn't break
- doesn't make a lot of noise
- is small, light weight and easily portable
- inflates the balloon with little effort
Hand pumps; those inexpensive, usually disposable tools for balloon inflating and how to use them.
One must apply proper technique when pumping. Snapping several pumps in a single day. (which really isn't anyone's fault, the pumps don't come with any instructions) means you are not applying the proper technique. It takes a little fiddling with any new tool before you can feel comfortable with it, and be able to utilize it as an extension of yourself. Even using a hammer takes practice. Here are some tips:
I put a skinny balloon on a pump nozzle by holding the lips of the balloon lightly between my thumb and forefinger. Once the edge of the nozzle starts into the lips of the balloon I just roll the lips on over the pump nozzle. Some people quickly pull the lips open with both hands but it seems very awkward to me.
Hold the pump around the cylinder. If you cover the air holes on the end of the pump it will not work.
Don't push sideways while pumping! As the piston rod moves out it increases the leverage of any side force that your hand may be exerting on the nozzle. You need to pay attention to pumping in and out in a straight line. The less strength your arms have the more difficult it is to apply force only in a straight line.
Each stroke should be just short of hitting the end of the cylinder. If you are using the pump to tell you when to change direction you are bumping the internal piston into the end caps, your pump wioll not last. It is easier on the pump if they do not hit. Learn how long a stroke is by starting with quick short strokes and working out.
The typical hand pump will put large visible ripples into the inflated balloon. Any stop/start during inflation will affect the resulting shape of a long skinny balloon. It depends on the balloon, the pump, the pumper, how closely you look and how much you care. Trying to keep the air flowing evenly is all you can do. Usually, if I get any ripples, it's only one or two, and generally my own fault, (sub-standard pump technique) and they are never evident by the time I'm done twisting my animal. A palm pump does not produce ridges. It does however leave your hand very sore.
Quickly changing direction while pumping cuts down on the lost air between 'puffs.' The 2-way hand pump is an ingenious invention. In one version the O ring on the piston moves axially in its groove to make a seal on one side of the groove and allowes air to travel past it on the other side of the groove and into the center tube. Each time the pumping direction changes, the O ring has to seat on the other side of the groove in order for it to seal and allow the device to pump air. Quickly changing direction while pumping helps the O ring rapidly make a new seal.
The out stroke is usually less efficient. The out stroke has a smaller effective pumping area than the in stroke because the piston rod takes up some space. The out stroke also has 3 places to seal compressed air and the in stroke only has 2.
These cheap plastic pumps are just that. They are disposable. Buy lots of them and be surprised when one lasts a year. The old blue Qualatex Hand pumps were notorious for breaking immediately. The purple ones are better. The purple pumps have a nozzle hand piece that comes off. The center tube has a rubber washer and two pins. When the handle is pushed on the pins follow a slot and when the handle is turned sideways the pins lock into a notch. There are little arrows on the black handle that many people never see. Sometimes the handle comes off by accident. Glue it on with plastic cement or super glue.
The cost of making a good heavy duty pump doesn't yet fit the size of the market. (My large hand pump is $50 because each piece is made one at a time) It will. I'm working on a heavy duty 2-way pump but it will be expensive too. The market needs to get bigger to support the expense of molds and large runs to make a less expensive heavy duty pump.
One thing I don't like about hand pumps is that using one requires keeping both hands on the pump. When working in a packed dining room, I want a hand on the balloon to keep it away from patrons, waitstaff, and places the balloon shouldn't be. When inflating by mouth, a floor pump, an electric pump or a cylinder of compressed air, I can keep both hands on the balloon.
- Palm pumps
- Palm pumps are squeeze bulbs with a one-way valve in the nozzle. They are good for
inflating 130's, or starting a bubble in a 260 for continuing by mouth. It takes about 50
squeezes to inflate a 260 with a palm pump, giving you plenty of time to talk to your
customers as you develop carpal-tunnel syndrome. It's small enough to fit in your pocket
or purse, tucked inside a bag of balloons. A palm pump does not produce ridges in the
balloon. It does however leave your hand very sore.
From my own experience and from observing some of the 'greats' at work, I'd say that using a palm pump to repeatedly _fully_ inflate many many 260's, is not really what the palm pump was designed for. You could literally squeeze squeeze squeeze squeeze squeeze squeeze that thing forever! Instead, use it to get started! One squeeze - poof, a small bubble is born. Then go on to mouth inflate. We've all had friends beg for a balloon, determined that _they_ can blow it up, we watch until they are on ther verge of passing out, then give them a small inflated bubble to start with, and usually they can inflate the balloon. I've witnessed Royal Sorell mouth blow and twist for hours and hours, but later, when sitting around 'jamming with friends' he just couldn't get any more balloons to inflate. He promptly pulled a palm pump out of his pocket, used it to start a small bubble, and then mouth-inflated the balloon the rest of the way.
- 130 Blaster
- T Myers sells a small, slim, black, mini-mag-lite looking, double-acting hand pump called the 130 Blaster. It is made in Sweden and very well built. It has a long, very thin, black detachable nozzle which is ideal for inflating 130's. The nozzle is carried flipped around inside of the pump to keep it from breaking when not in use. It costs $8 and works just as wonderfully as the 260 Blaster.
- Euro pump
- The Euro pump is a double-acting hand pump that is smaller, lighter and than the Qualatex AirInflator. The neck doesn't snap off like the Q-Pump. They come in Blue, Red and Yellow, but the case pack is something like 2500 of one color, so they rotate the colors. You get whatever color they have that month. The nozzle tip of the Euro pump is not chamfered (beveled), like the one on the Qualatex pump. Since the bevel makes it so much easier to get the balloon nozzle onto the pump nozzle, I did a little file work on the Euro nozzle, followed by some emery cloth to smooth out any rough spots. I would recommend this modification to anyone who has a Euro pump.
- 260 Blaster
- I am crazy about the Faster Blaster II sold by Potsy and Blimpo, or 260 Blaster sold by T. Myers, or Blaster sold by All American Balloon Supply. For a type of pump which is usually considered disposable, it's built like a brick, um, outhouse :-). This is no cheap plastic party store unit...it's a good, solid pump, that even opens up for servicing should it become necessary. I've put it through its paces. Other plastic hand pumps I've used would have broken under similar conditions. This little baby is unlike any hand pump I've ever worked with. And it's colorful, too. The pink, white, & blue 130T's are difficult to inflate by mouth. Today I tore apart an old Sharpie marker and found that the tip fits perfectly on my Faster Blaster II pump!
- Qualatex AirInflator
- The Qualatex AirInflator . It fills a 260 in about 4-5 strokes, since it works on both the in & out motions. It is about 2.25" in diameter and about 13" long, so it is easy to carry and you can tuck it under your arm or between your knees, or drop it to the ground if you need to while you twist. It inflates balloons faster than the Euro pump does. This pump can inflate 130's; they fit on the pump's nozzle. However, the construction and materials are not the best - many users report a variety of structural failures. Many of these can be repaired with an application of Duco Plastic Weld, but if you use this pump professionally, it is best to carry a backup.
- Pump T
- I just received T's new Pump T and love it. It is a hand held pump made of plastic and will fill a balloon in about 2 1/2 strokes. It is a little larger than most hand pumps. As far as small pumps go, this puppy is nice. It feels like a real sturdy pump. No need to oil it like T's other pumps. It is "pre greased" at the factory. I wish T would build a bag or holster for it. If you are walking around you will need to figure out a way to carry the pump T. I love it for at home use because I lay it on the floor and make whatever I am making right there. No need to worry about how to carry it around. For sculptures that require an exact amount of air (Taz, Tweety), this pump helps me measure the amount better than others do.
- Other hand pumps that work for inflating balloons
- I bought a single-action pump designed to put water in the water balloon yo-yo's. It is turquoise plastic with a metal shaft and a clear plastic air chamber. It is very noisy (which the kids love), smaller than the Qualatex pumps, and most importantly is still going strong after 2 years!!!! I put it in my balloon box for small events when I will only be inflating 20 - 30 balloons. I think it was $6 and I bought it either at Conwin Carbonic in LA or at All American Balloon in Santa Ana. They tried to talk me out of it and recommended the other pump but it was one of my best purchases.
- For bullet proof use, use an ordinary sports ball pump with the plastic screw on tip designed to fill inflatable mattresses and floats. They are single-action pumps, but you can pump much faster since you don't worry about breaking them.
- In Wal*Mart I came across a pump. It's about 12 in. long and 1.5 in. in diameter. It is easy to grip and seems to be well built for an inexpensive pump. Much better than another plastic pump I saw that fits the description of what Qualatex distributes. It is distributed by Spalding and is meant to be a general purpose hand held pump. The body is a single piece. From what I can see of the valve system, I seems of good quality. It even comes with a needle for pumping up balls, and a plastic nozzle for blowing up other inflatables. The last can be used when you want to twist a beach ball, nylon innertube (aka humungus geo), or air mattress, as well as pumping up balloons. The nozzle that it comes with looks very similar to what T. Myers has in his catalog for $1. The pump's handle even has a storage compartment for the plastic nozzle (or maybe an extra one). Now for the drawbacks. It is only a one way pump (vs a two way pump). I tried pumping up some 260Q and it took 12-13 strokes. Still, it is much better than the small blue palm pump that I started out with, and it is easily available to those in the USA. If you're a beginner you might look into it.
Floor pumps
There are 4 manual pumps made by Tom Myers and they have confusing names. The PumpT, Pogo, PumpO, and Pump 1. Pump T is a big hand pump (see above). Pogo is good for walk-around or stationary use. Pump 0 & Pump 1 lend themselves more to stationary work because of their size and bulk.
All the Tom's pumps allow you to control the amount of inflation. The Pump 1 and Pump O give you the same kind of pressure control that you have by mouth. You use your body to control how hard you want to blow. Just stop pushing and take the balloon off the nozzle when it is as full as desired. Both pumps leave you one hand free to manipulate the balloon as it is inflated.
It takes 2 1/4 pumps to fully inflate a 260Q with the Pogo or Pump 0. The Pogo and the Pump 0 have a valve to keep the air in the balloon while you set up the 2nd stroke. Multiple pumps can be seen as a benefit though, because 2 pumps allow you to control the degree of inflation better than 1 does. Ex. one pump for mice and poodles, two pumps for giraffes and dinosaurs.
- Pump O
- The materials used on this aren't as strong as Pump 1, but otherwise they should be about the same. It's great because it inflates the whole balloon in one shot. Fine for stationary use but too big and bulky to use for walk-around. You should be at least 5' 5" to use this pump. I recommend getting the cloth carrying case; it makes transport very simple. Would be nice if it had a built in strap for walk-about action. After using it for hours at a time, my palm hurts from pushing the tube down.
- Pump 1
- called "the Rolls Royce of balloon pumps" in the catalog. It will probably
last you the rest of your life and then some. It will fill a 280 in a single stroke, up or
down. It's probably about 3 feet tall and 6 inches in diameter - Not a small thing to lug
around. Good if you are going to be stationary such as at a mall where you are set up to
have people come to you. It is also large enough that you can pull the sections apart and
stuff a large supply of balloons inside for compact travel. If you get moving fast and
forget yourself, you might take it apart on the upstroke.
To clean the Pump 1 PVC try rubbing alcohol or 409. On hard spots use a SOS pad. I don't know of anything you could just dunk it in and have it come out clean. You kind of have to rub it.
- Pogo Pump
- As described in T Myers '97 catalog, the new POGO 3.0 and it's guaranteed for a
year. If you are short (less that 5'5") or light (less than 110 lbs.), the Pogo is
easier to use than the big pumps. A novel feature of the POGO is that the wooden dowel can
be cut down to fit your height. The whole idea is to use your weight to power the pump. If
the pump starts out at your chin, it is hard to get your weight over the pump. You'll end
up using your muscles more instead of gravity.
If for some reason you need to extend the leg of the Pogo, try this: (both methods may require some sanding on the Pogo leg to get a good fit.) :
- Jam it into a piece of 3/4 PVC pipe cut the pipe to be whatever height you like, or
- Cut a section of 3/4 rigid electrical conduit and jam it 1/2 way onto the Pogo leg. Use a 3/4" dowel as an extension by jamming it into the other half of the conduit.
A wooden base comes with the pogo pump to keep it upright. Put an uninflated 260 across the fitting on the base and then put the dowel into the fitting. Now the base stays attached when you you can lift the pogo to move it to a new location.
After a long day of twisting, my wrists tend to get a little sore from using it.
The latex tube in the Pogo pump breaks. But the pogo still works if the tube breaks so you're not completely stuck.
- I replaced the fragile inner tube with a small garage-door-type spring.
- While at the Physical Therapist's office, I noticed spools of rubber tubing. The thrapists were cutting off 3 feet of it at a time for their patients to stretch for their exercises. It is the perfect size for the POGO Pump. It is very strong to take the abuse that people give it but stretchy enough to work in the pump. The brand name is THERA-BAND (as in therapy band). You want the RED tubing ( Thickness sized based on the color). I'll bet if you go to a Physical Therapy Clinic near you, you will find it.
- I also use a pogo pump and am constantly breaking the surgical tubing inside. I tried Bruce Kalver's rubber eye glass tubing; it too breaks after about ten hours of use. Now, I don't even bother replacing it. I just plop my foot down on the base, pull the tube up and push it back down to fill a balloon. I have installed a vacuum cleaner drive belt just beneath the black plastic cap at the top of the tube, the one the nozzle protrudes from. It helps me grab the tube to pull it up as I hold the balloon nozzle on the filler nozzle.
- The elastic would break every so often and I stopped replacing it. When the elastic is not there, the pump will compact better. It is also a little shorter. I think T should make them without the rubber band. I really prefer sliding the pump back up when I am ready to use it. Either way it is a fine pump.
- The Invincible Free Standing Balloon Pump
- ABS construction.
- Brass fittings and handles.
- 36" tall, measured from floor to nozzle tip.
- One stroke easily fills two long Qualatex balloons.
- Fleckstone faux granite finish, virtually scratch proof.
- Choice of colors.
- SOLID red oak pedestal base.
- SOLID red oak neck ring which doubles as Sharpie holder. (Not a splinter of plywood in this baby!)
- Lightweight. Beautiful balance.
- And best of all: GUARANTEED FOR LIFE!
If the Invincible should ever fail to perform to your needs or reasonable expectations, I will repair or replace it absolutely free. You will only be responsible for postage. The Invincible comes as a sealed unit. It must be cut open for repairs. Do not try this yourself, as this will void all guarantees.
- Living, breathing pumps
- At last, our prayers have been answered. No more hand pumps or the drone of machine
pumps. As we all know, to really have the balloon inflate properly you need the air
preheated and there should be moisture in the air to help expand the balloon properly. In
the past you could only get the right combination of heat and moisture by blowing with the
mouth. Well no more! Now a clown in the hills of Tennessee has the answer. While on
vacation a week or so ago, I had the opportunity to see Dr. Happy LaClair and his buddy
Blaze. You see, Blaze is a balloon blowing Goat. No fooling - a goat that blows up
balloons! So everyone throw away those pumps, not more sore mouths, let's all get a goat!
One of the best entertainers I've seen was a clown here in Orlando that had a cart drawn by a goat. The goat blew up the balloons for the clown!!!! I couldn't believe it at first, but it was true. The clown held the balloon to the goat's mouth. (I couldn't see, but I suspect he had some apparatus in the end of the balloon to hold the mouth of the balloon open since it looked like the goat clamped his lips down hard.) I thought it was a wonderful act!
Carrying Pumps
I have the pogo pump. I used it as a walking stick while I was walking parades.
When I do walkabouts at fetes my hand pump gets tucked under my arm, which is awkward.
At IBAC Marvin taught that you can make a hand pump holster out of a shampoo bottle by cutting the bottom out of it and adding slots in the side for your belt to go through. Paint it if you don't like the color. I also like Larry's idea of tying the pump to your person, which can be combined with the holster just described.
The Balloon Dude in California (His real name is Fred something-or-another) rigged my pump for me at the last COAI convention, to make it easy to hold. He ties 2 260's around the pump and then around his forearm. When not in use, the pump hangs from your forearm. I found that I really didn't have an interference problem with the hanging pump. When you need the pump, just drop your arm to your side, and in falls into your hand.
I wear an outfit with big sleeves and I made a pouch in the sleeve for it to sit comfortably. The balloon is up in 4 moves, so that's as impressive as using lots of puff. The pump is brilliant.
I used to connect a string to my small plastic pump and put it around my neck - then it was at my waist and available. I could just drop it and know where it was. I may tie a string onto a small, thick rubber band that I can put around the pump and then take it off easily. Kids often want to run off with the pump while you are busy.
I bought some really colorful nylon rope (mountain climber stuff). I taped the ends, tied it around each end of the pump (using some fancy knots because they tend to gradually slip out of the nylon rope) and made a strap for my hand pump. Now I just sling it over my shoulder and across my chest. I tied the rope at just the right length so that it is not in the way of my twisting yet easy to grab without looking. I had tried pockets and holsters of all sorts and this works the best for me.
I carry my pogo and it carries everything I need.
Decorating Pumps
I made a list of the animals I make and printed it out on transparency film. I taped it around my pogo pump. I made a second transparency with my name and phone number and wrapped it along the bottom of the pump. I then took a little plastic basket and added one of those clips that you hang your mops and brooms up on and attached it to the basket. The basket can then be clipped on the lower part of the pogo handle. It holds my markers and balloon tags.
At BJ's WHOLESALE CLUB I bought a huge package of alphabet pretzels. They came in a clear plastic jar that was shaped like 2 large abc blocks on top of each other. I attached the 2 broom clips onto the jar and now I can attach the jar to the bottom of the pogo handle. I keep my assorted balloons in the jar. I can even screw on the lid and the container is secure and waterproof. The jar holds 4 bags of balloons.
On the top edge of the pump (the black area) I glued a piece of velcro to hold my plastic letter opener which pops and cut off pieces of balloon.
The most amazing decoration I've seen was done by a clown in southern California. I don't remember who it was but she had make an outer tube in which the pump slid up and down. The whole thing was painted like a cowboy (I think). When she picked up the pump the cowboy's mouth opened wider and wider and when she pushed down the mouth closed. Very cute and clever. On the pump tube she had painted the head down to the middle of the mouth including the upper lip and teeth. Then the black hole of the center of the mouth went all the way down the tube. From the lower lip of the mouth down was painted on the extra outer tube so the mouth hole was covered until the pump was pulled up.
I was playing around with the new gray balloons and made a B*** Bunny. It was next to my pump with the hand on the nozzle and it hit me. The greatest decoration for the Pump-O has been right in front of our noses. I wrapped his arms and legs around the pump, and turned his head and it looks great. If you put the arms around the pump about three or four inches below the nozzle and attach the legs a few inches above the bottom, the pump works great, the balloon is not in your way, and what a great advertisement. Any of the big multiple cartoon characters would look great. The Duck, the Coyote, the pink Panther, tropical birds, etc., etc. Duh! Why didn't I think of this before??
I have a neighbor who does pin striping on cars for a living so I had him candy stripe my Pump-O in exchange for balloons at his daughter's birthday party. It looks great and was cheap to! I think anyone could do it, but I took the easy way out.
I've painted PVC pumps by light sanding, primer and Krylon Spray Paint. My paint jobs ended up chipping when the PVC knocked against something hard. I've had people tell me they did the same thing and it has not chipped. Partly chipped paint means repainting or getting all the paint off. Stickers, Tape, gluing something to the pump seems to be easier to clean or replace.
I have a PumpO which I have decorated with scraps of self adhesive vinyl gleaned from friendly instant sign companies around town. The stuff is used for lettering and graphics cut out on a computer. The vinyl comes in rolls and they usually throw out the last couple of feet on the roll end. It sticks permanently and is impervious to spills, baby vomit, salsa, water, margaritas and sweat. You can cut out shapes with an X-acto knife and stick them to the body of the pump. I covered mine with a field of bright yellow. I then took blue and red dots, along with some black squares, and stuck them on so it looks like confetti falling. The yellow came from a large sheet that I cut to just wrap around the circumference of the tube. It's worked great for almost two years!! It is durable, brightly colored and really adds to the look of the pump and it attracts a lot of attention!!
Portable, Battery Powered Inflators
There are mini electric pumps small enough to fit in a fanny pack which can inflate a couple gross of 260s on a single battery charge.
Regarding battery operated pumps, you have got to remember that any electric or rechargeable pump is nothing more than an electric air compressor. The all make noise and the motors can get warm and even hot after continuous use. There are several good electric inflators on the market now and all have their pros and cons. Which pump you use depends on what kind of entertaining/twisting you will be doing. If you are working outdoors or in a large crowd, any of the electric inflators can be used without worrying about the noise, they are also good if you need to keep mobile. If you are in an intimate setting though, you will want to keep the noise level low an a hand pump or PVC style push pump is the way to go. For restaurant work I would not use an electric because of the noise factor. The 'whirrrr" of the motor (over and over and over) can be distracting/disturbing to those people who want a nice quiet meal.
I found those portable pumps to be too noisy for indoor use. A restaurant would throw
you out if you used one.
I find those battery operated pumps too noisy for restaurant work. They also get hot after
a while.
The electric pumps are either on full power or off. You lose some control
They inflate the nozzle end and makes the balloons slightly more difficult to tie.
What do you do when you run out of power? Start huffing and puffing?
Can the battery be easily changed?
I'm totally convinced that a T. Myers Pump won't let you down. As long as you're in good
shape you never have to recharge. Stick with the Pump, as a matter of fact, consider
upgrading to the Pump 1. I have two and they are great!
I think the battery devices are great, but have yet to see one quiet enuf' for
me....particularly for going table to table... If you're stationary in the lobby or such,
then any of the pumps would work..' though I recommend PUMP! & PUMP0 by T. Myers...no
battery and they still just keep on pumping and pumping and pumping....
- The Inflator
- I had a problem with the original design and it was upgraded. It has a relatively heavy
12 volt battery in it which is soldered in. The upgraded one is lighter since the
transformer was taken out and a 12 volt charger is used. He has a socket for an auto
cigarette lighter for the charger and there is a cable to recharge from a car. It seems to
work OK.
My wife uses the Inflator from Clown Supplies Inc. We have one that's about 15 months old. It's been put through the paces big time. The one we have has the integrated battery and charger. He's updated it since to have the battery charger external. Also, the button on ours is the old hard to push one. We will be upgrading the button in the near future. It lasts about 4 - 6 hours at our level of usage (1+ gross/hr), then we plug it in to the wall, and keep going. Yes, It gets hot, and can mess up the balloons, so you have to be careful, and judge when to stop for a few minutes. Having two major pumps, person's, and T's, we can do this as necessary. We are also thinking of buying another one so Frances can swap back and forth as they get hot. Also, for the big jobs, we have some friends that help us inflate the balloons in advance, and try to keep up with us as we go :) In case you're wondering, my wife has wrist problems and has a hard time using T's pump, so she uses the inflator. Also, It's a mite bit easier to carry being smaller in size.
I saw a Balloon Buoy in action and I was impressed that it was lighter and less noisy than the Inflator that I have (from Cheezo). I have wondered about putting a nozzle cap over the existing nozzle to have an easier time with 130's, although the Inflator will blow up the balloons if they are held on top of the nozzle without actually pulling the end over the nozzle. It blows them up quite fast. I used to overinflate the balloons when I first started with it.
The Inflator by Clown Supplies Inc in NH is a great pump (I've had mine for over 7 years) and for the same price you get more inflation power - it will inflate 4 to 8 gross of balloons before it needs to be recharged. Although it weighs 10 pounds, its advantage is the amount of balloons you can blow in one sitting.
- Balloon Buoy
- The Balloon Buoy is good and does what it says it will do.
The 95-96 T. Myers catalog has several brands of these battery powered electric pumps (with short reviews) in it on p. 9-10, and they sell for $165 and up. One brand is called the "Balloon Buoy". Here's what I wrote in the catalog about the Balloon Buoy:
Battery powered pumps make inflating a 260 easy. Just push the button. If you want to be a roving entertainer, able to twist a few balloons and move on, a battery powered pump might be just the thing. The noise would draw attention. You could do a few balloons with lots of entertainment thrown in and move on. Or maybe you want it for parties. The noise is fine for kids parties. Kids parties are noisy to start with. They'd get a kick out of pushing the button. If I'm making balloon hats for a line of customers I'd rather have the Pump 1 or PumpO. The constant buzzing of an electric pump coming from my area would drive me bananas and limit conversation with the customer. Cranking out hats would heat up a battery pump and I'd have to slow down to let it cool. I'd be worried about running out of juice. But I am cranking out balloons. That's my style. I test battery powered pumps by sitting in my living room and fully inflating and tying 260Q's one right after the other. As if I were getting ready to do a workshop. This is not a field test. This is about as hard as you could be on a battery powered pump.
I saw an ad in January's "Genii" magazine for the "Balloon Buoy". The ad reads: "New Balloon Buoy will pay you back. Or we'll buy it back. If it doesn't help you do more business within two weeks we'll gladly buy it back. This is the world's fastest automatic push-button balloon inflator, delivering one-second inflation with excellent length control. Tie Helper nozzle makes it easier to grip and tie ends. Comes in an ultra-lightweight 3-lb. shoulder pack. Safe, dry 12-volt battery fills up to 400 #260 balloons with fast, one hour recharge.
from "T's" 97 catalog:
"BALLOON BUOY"
"Ed Rohr has put together a nice little rechargable electric pump. The recharger is a separate piece that comes with the pump. He uses a brand name tool battery so they are safe. I sell extra batteries or you may find them locally. The balloon buoy comes in a padded pouch with a shoulder strap and a side pocket. It weighs 3 pounds and is fairly comfortable to use. The padded pouch helps muffle the medium, loud noise. This is a great little walkaround tool. It could probably inflate 400 poodles during an afternoon with one battery. It inflated 130 full 260q's in about 25 minutes before the battery needed a recharge. During the test the compressor got hot and I had to slow down. After an hour recharge it did another 130 full 260q's. It is very light, tough and reliable. Ed's been selling this for 2 years and they have built-up a good reputation. 14 Day, money-back, 1 year defect warranty.BALLOON BUOY/ED "In the same padded case, the ED has a bigger battery and the pump casing is metal. It weighs 3/4 of a pound more but it pushes up to 70% more air. That's about 220 full 260q's."
I have been using the Balloon Buoy (original one) for almost a year now. It has made my life a lot easier. I feel that T. Myers has given it a bad rap. Sorry Tom, If I were you I would want to sell my own pump also. The battery lasts about two hours. I carry an extra one so I have the capability of going about four hours. The battery charger allows me to charge one up (it takes about an hour) while I am using the other battery. I have not had any problem with it heating up. It does get a little warm but not hot enough to pop balloons. If I was going to just blow up balloons, one after another, without stopping to twist them it probably would heat up too much. But I always make something out of the balloon I have just blown up. I used the original T. Myers pump for 10 years and loved it. But it was a lot more work to blow up the balloons. The Balloon Buoy makes a little noise but not as loud as other electric pumps that I have heard. The sound does not frighten anyone. They just laugh and think that it is smart that I don't have to blow up the balloons by mouth. Blimpo blows up the balloons by mouth and I tell them that I am not as full of hot air as he is. The difference with having an electric pump and exerting the energy to push on the T. Myers pump has really made a difference to me. I still have my T. Myers pump and won't give it up. It was a good work horse and I have it to fall back on if need be. I think pumps are a personal thing. Whatever works for you. You might be saying that I am talking it up because I sell them. Well, I had a Balloon Buoy before I decided to sell them. The profit margin on them is very low. I started carrying them because I wanted to share a good thing. Pat/Jack Frank
Tom writes: I didn't think I 'bad rapped' the Balloon Buoy. I like it. I'm happy to sell them. I just don't want anyone disappointed because it makes noise or gets hot when you work it hard. I try to describe it as honestly as I can.
I used Tom Myers big pump since the WCA convention in San Diego in 1985. I just changed over to the Balloon Buoy electric pump because it just weighs 3 pounds. I still use T. Myers pump once in a while because it just keeps going & going & going. I am also happy with the electric pump because I can do balloons for two hours and I am not "glued" to one spot. I am also not as tired as I used to be after a job. We started selling the Balloon Buoy pump because I was so happy with it. They now have one that is a little bit more expensive because it has a heavier duty compressor and battery and will pump up more balloons. But it weighs 3.7 pounds. That doesn't sound like much but if you are a fragile female it means a lot.
We have been selling the Balloon Buoy Pump now for at least six months. The only complaint we have had is that one only lasted one hour. We sent the compressor back and it was replaced post haste. I am very pleased with my balloon buoy pump. It does make noise but not as much as other battery powered pumps. I have the original model that weighs just 3#. They have since come out with a more powerful model that weighs 3.7#. I have to admit that it is the weight and size that sold me on the pump. I have had no trouble with my personal pump. I used a T Myers large PVC pump since the 1985 convention in San Diego. It is a wonderful pump. I make sure I have it for a back-up just in case my Balloon Buoy goes out. This has not happened yet. I carry an extra battery so I have at least 4 hours of balloon blowing right on my hip. The profit margin on these pumps is very low. We only carry it because we have been very happy with its performance and wanted to share it with others. Potsy
One other thing about the battery pumps. They slow down as the battery runs down. In blowing up 4 to 9 hundred 260's for a workshop, the PumpO was more work but faster than the battery pumps in balloons per hour. For $ per balloon, the PumpO is your best deal.
Here is Larry's extensive review:
I got to use a Balloon Buoy yesterday and I think I'm going to get one. Outdoors, the noise isn't bad at all. It does sound in a way like a mini fog horn and it does wonders to draw the crowd, but that's because of the distinctive sound, not the volume. People were as fascinated by the pump as the balloons. (It got even better reactions than the Pump O usually gets.) In fact, when the battery died on me and I started inflating by mouth, the kids complained that what I was doing now wasn't as cool. A few kids asked me if the thing in my bag (the balloon buoy) ran out of air.
Battery life - It did about 2.5 gross of balloons on a single charge. This is real life use, not Tom's rapid fire full inflation of balloons. It did slow down towards the end, and I may have made quite a few poodles, but I was happy. two batteries will get through most events that I do, and I have no problem inflating a couple gross by mouth if I need to. The battery to the Balloon Buoy is easy to change out. It is a Skil tool battery, available at hardware stores. If you are taking your time with twisting the balloons I don't think overheating the battery pump would be a problem.
I just had a very long day of ballooning last week. My Balloon Buoy, on one charge, went through 3 gross of balloons before I changed batteries. This is not a normal thing, but I thought those keeping tabs on how much use you can get out of a charge would be interested. I think the key is that I wasn't just pumping out balloons. I played around with folks as they came up. There was never a line. It was just steady work entertaining. So, the battery kept getting a rest and could keep going longer.
I have a few complaints:
- I wish the nozzle was tapered to make it easier to put various sizes of balloons (130s, 350s) on it. It was definitely designed for 260s, but that is what I use most.
- I found it easiest to operate the pump two-handed. This made it impossible to control where the air went in a balloon as I inflated it. That's a limitation I think I can live with for most things on busy days, and I can inflate by mouth for those sculptures that need it. I'll probably get the hang of one-handed inflation over time too.
- Lastly, I wish it inflated the balloons faster. The difference between what it does, and what I do by mouth is probably only a couple seconds, but it felt like a long time.
For walk around at picnics where I'm doing mostly balloons, it's great, and I'm willing to take a chance with it on long balloon days just so I can carry less stuff.
The Balloon Buoy works really well. It is a bit noisy and the tie helper nozzle is just a longer nozzle that would allow you to slide the balloon on farther. Anyone who can twist a 1" bubble and then let the air out before tying doesn't need the tie helper. It does recharge amazingly fast and comes in a nice bag that allows you to keep it hidden even while inflating balloons. The bag has a small pocket on it's front but it is too small for balloons. Maybe a good place for postcards?
I happen to be an owner of the Balloon Buoy. I was very excited with my purchase, but was slightly disappointed with the performance. It really just depends on what your using it for. I found that at restaurants, when going table to table, the noise was sometimes bothersome or the kids would make fun of the....how shall I say it.....expelling gas noises the pump makes. If your in a really noisy place, I'm sure it wouldn't matter. Also, I found that the battery would die about 1 1/2 hours into my 4 hour shift. I told Ed (the owner of Balloon Buoy Co.) about my problems, and he replaced the battery, but it really didn't help. Needless to say, My Balloon Buoy is in the closet and my purple Qualatex air inflator pumps are back in action. I wonder if I will ever find a pump that I'll be really happy with.
- Other Rechargeable pumps
- I recently purchased a cordless air compressor from WalMart for inflating my 260's. It
works great. It's a Campbell Hausfeld and delivers 220psi. It's not FAST, but it's
rechargeable. I don't know how many balloons it will blow up at a charge yet, and I will
have to admit it is a bit noisy... aren't most of 'em... but it was only about $45. Sure
beats the $150 - $250 elsewhere. It comes self encased (nozzles, tubing, and electrical
cord) with a handle. It's about 11.5" X 4.5".
I have not had much of a problem with the noise. I "warn" the kids ahead of time and they seem to be OK with it. If I'm working a job outside, it calls attention to me (like I really NEED to call attention to a clown anyway.)
- The cordless air compressor I use for balloon pump has the WalMart # 1090704, upc #45564
20181. Delivers 220 PSI. It weighs about 10 pounds which is not light, but with the
handle, it's not bad.
Comes with two inflation needles (one for basketballs, etc, and one for balloons), a DC 12- volt recharging adapter (for ciagrette lighter use), an AC 115-Volt Recharging adapter (I use for regular electrical use), a replacement 15-amp fuse, pressure gauge, and a 28 inch air hose with universal adapter.
The box says 1 fully charged battery will inflate 8 car tires @30 PSI, 29 rafts @1 PSI, 190 soccer balls @9 PSI. It doesn't mention balloons, but with this capacity, I'm sure it would do wonders. Also, for info, running time for TV @8 watts = 14 hours, Light @ 55 watts = 2 hours, and a car vacuum @ 55 watts = 2 hours. It's great! I love mine!
- I bought a little battery operated pump from a company in Atlanta that does a great job and I use it when I am doing a lot of hats or having a super busy day. It is noisy - but it does a good job and I believe it sells for something around.
- It isn't hard for a handy person to build their own battery powered inflator. Well, here's how to go about doing it (better check for patents before you start mass-producing them though...). Go down to your local auto-parts store and buy a replacement motor/compressor for a set of after market 12VDC air horns (they're just a little bigger than a man's fist), some rubber tubing and hose fittings. Then go to a good electronics warehouse store and buy a sealed, rechargeable 12V lead-acid battery (miniature versions of the kind they use in aircraft, with a gel electrolyte - perfectly safe. The battery charts you'd need to determine what size to use are available from the battery manufacturers, either as data sheets or in their engineering catalogs.), or the Skil power pack and charger (The Balloon Buoy uses a Skil brand cordless-tool power-pack), some wire, a fuse (or better yet a DC circuit breaker) and a push-button switch rated for switching DC at whatever current the air horn compressor draws (easily measured with a multimeter). A discharged lead-acid battery is easily swapped if you wire it in using any type of plug/socket connector, and it can be recharged with any motorcycle battery charger.
- I recently purchased a cordless air compressor from WalMart for inflating my 260's. It
works great. It's a Campbell Hausfeld and delivers 220psi. It's not FAST, but it's
rechargeable. I don't know how many balloons it will blow up at a charge yet, and I will
have to admit it is a bit noisy... aren't most of 'em... but it was only about $45. Sure
beats the $150 - $250 elsewhere. It comes self encased (nozzles, tubing, and electrical
cord) with a handle. It's about 11.5" X 4.5".
Compressed air
I've seen ads for a CO2 powered balloon inflator, says it can do as many as 3 balloons on 1 CO2 cartridge, so obviously it's more a bit of business than a serious inflator, was wondering if anyone had actually seen it, and any opinions on the same...?
Canned air dusters; They sell them in computer and camera shops. I used one for a gag. Have the canned air in a bag of balloons. Attach a balloon to the nozzle. Take out a balloon and try to blow it up. When you blow the balloon in your mouth release some air from the can and a balloon in the bag will start to fill. Try not to invert the can-it will release liquid freon and the balloon will pop.
I like to use a nitrogen tank to inflate balloons. This will obviously only work where you can stay in one place, or you have to drag this huge tank with you. I do a couple of school carnivals where I'm stuck in a booth, so it works for my. A regular black rubber helium tilt valve works great. Nitrogen should be available from helium suppliers, and it comes in a variety of sizes. The smallest tank I've seen is roughly the size of a steel 110 helium tank. Warning - Nitrogen does make for a much firmer balloon, so inflate accordingly, and burp the balloon before tying.
The simplest way to inflate 260Q's as well as other entertainer balloons is from a small, portable tank of Nitrogen. Have a 6 to 10 foot hose attached to the regulator with a tilt valve on the end of the hose. A small tank will fill hundreds of 260's. If you decorate the tank it will add to the performance and it is quiet, clean, and easy to carry. Contact Conwin Carbonics at 1-800-for their catalog. They are probably the best source for tanks, regulators, and the like as well as being a full line Qualatex distributor.
I can't inflate by mouth, the palm pump is giving me carpal tunnel syndrome and I don't like the ribs a hand pump puts in the balloon. The solution I opted for is compressed air. I bought a 5 gallon air tank, attached a mini-regulator that I set at 30 psi and connected a 25 foot 1/4 inch air hose. At the working end of the hose I put a brass button valve and one of the nozzles I got from the T. Meyers catalog. The button valve allows me to precisely control how much air I put intothe ballon. I switch between a large and small nozzle depending upon whether I'm filling 260's or 350's. I fill the tank from a small compressor before I leave the house. If I run out of air I have a small foot pump for refills. You can always get somebody to do the pumping for you. This set up is the ultimate for a couch potato like me. I leave the tank under the end table and drape the hose over the back of the couch. I can effortlessly fill a balloon and spend my time trying to figure out how to twist it. I attempt to do at least one balloon per commercial break while I'm watching television.
Air blowers
The cool aire II won't inflate a 260.
I have a Belle Gold, also called "Big Red", which is a very powerful blower, and I can get it to inflate a 260. I stretch the lip over the inflating tip, and then with the full force of the blower on, I stretch the balloon way out and it will start filling as I'm stretching it. By the way, a nice side effect of stretching the balloon while inflating is you can get a really straight balloon when it's inflated.
Get an old Electrolux cleaner, clean the guts out of it, place a funnel on the exhaust end of it and place the mouth of the balloon over the funnel. This will blow them up readily. Unfortunately, power is not available everywhere you perform. (but you can inflate the balloons before the show.)
I bought a small electric impeller pump which runs on 12V. I now have it fitted in a wheel-around box complete with speakers and cassette deck so that I can have music whilst I travel, it's also useful for holding extra bags of balloons, cold drinks, etc.
Air Compressors
I have an air brush artists air compressor that I use when I am blowing up the balloons for the Indiana Pacers. It never shuts off unless you unplug it. It is great for that job!!
There are numerous artist's airbrush air compressor models that automatically shut off when the demand for air isn't present. Besides being quieter, they save a lot of money down-the-road on wear-and-tear maintenance and repair of the 'pumps'. They require a 'storage tank' and have the added benefit of user selected air flow and storage pressure. For any airbrush or similar compressor, the air flow rate and delivery pressure can be regulated, but not all models come with these 'regulators' attached; be sure and get them separately if buying a compressor without them!!! Anyhow, my experience is with compressors made for 'studio' work and which shut themselves off. They are muffled, very quiet, and some 'Badger' models look sort of like a flying saucer, so they might make attractive props!!!
If you need to run your compressor out in the middle of a field somewhere, you may want a gas-engine powered model (but they are noisy, and have vibration, exhaust...)
Small electric-motor driven compressors use household 110V power. If you decide on an electric-motor driven compressor with more than 2 or 3 horsepower, it will require 220V power. (and those compressors which can be wired for either voltage will always last longer on 220 since the motors will run cooler). So you need to ask yourself whether or not 220V power is going to be available where you want to use the compressor.
If you desire to operate an inflator or air tool at a certain pressure you will obviously need to keep your air tank pressure a bit above it at all times to account for pressure drops in the regulator, lines, etc.
Preferably you would keep your air hose length between the compressor and the inflator/air tool as short as possible to minimize pressure drops. If you set up several inflation stations, feed full tank pressure straight to individual regulators mounted at the stations to minimize any problems with pressure drops that would occur when stations fed from one hose/regulator were used simultaneously.
Most electric motor driven, single stage air compressors have a pressure switch set to turn them on when the pressure drops below 95 psi and turn them off when the pressure reaches 125 psi. You may be able to get a serious commercial unit that can generate 140 psi and has adjustable pressure switch. If not, you may want to operate your CCSSDSI at, say, 90psi instead of 100psi, because the two-stage air compressors needed for generating higher pressures cost quite a bit more.
If you can, get a "direct drive" compressor where the motor is mounted directly to the crankcase of the air compressor (no belt). These are more efficient, more compact, lighter in weight (easier to lug-around), and have fewer parts to break than the belt drive models.
Compressed air will have condensed water in it, especially on humid days. When people talk about humidity effects on devices, they often make the distinction between "condensing" and "non-condensing." Whenever you throttle air through a pressure drop (like what happens in a pressure regulator), the temperature of the air is lowered. On a day where the relative humidity is high, that lowered air temperature is often below the dew point, and water droplets *will* form. You should consider an in-line water separator if you are worried about keeping water droplets out of the valves in your inflator. More importantly for latex balloons is the oil mist that could be present in the compressed air - oil and latex don't mix. The new oil-less compressors out today obviously won't have this problem, but a standard compressor having oil in its crankcase should have an oil-removing coalescing filter installed in the air line.
Sizing the compressor:
You obviously don't want the compressor to be the rate determining factor to how fast you
can inflate balloons, so it must provide enough capacity to do the job continuously. To
ensure that you get a powerful enough compressor, you must calculate what minimum capacity
you need.
The method described below is the same way that you size compressors for use with air tools, spray guns, etc. For compressors of equal CFM capacity, the horsepower number is only going to tell you which design is more efficient. Horsepower is not the determining factor; they just use that in all the advertising because people are more familiar with the term "horsepower." It's just like advertising in the vacuum cleaner industry which pushes the number of "Amps" used as a measure of performance, when that term is really only of secondary importance to the real measure of how a vacuum cleaner sucks. :-)
First you need to know the volume of air in a balloon. Say that a balloon contains
"V" cubic feet of air for this exercise.
Let "B" be the total number of balloons you want to inflate per minute, counting
all the stations you have attached to the compressor.
The necessary Cubic Feet of air per Minute (CFM) is then V x B.
Air compressors capacities are typically given as a number, followed by the term "Free air CFM @ 100psi". These numbers are always given right next to the horsepower numbers, even on Sears Craftsman air compressors. Call that number "Q" (why Q? I don't know. They always use that for flow rate in fluid mechanics class...)
So a capacity of "4.9 Free air CFM @ 100psi" means that when:
- the compressor is running
- the gage on the tank reads 100 psi pressure
- we are draining air out of the tank as fast as the compressor is stuffing it back in to maintain the tank pressure at 100 psi,
then the compressor is supplying 4.9 cubic feet of air, measured at atmospheric pressure (sometimes you will see this given as "4.9 Free air SCFM @ 100psi" instead of just "CFM." The "S" stands for "Standard", which means that the cubic feet are measured at atmospheric pressure, room temp).
So, the minimum requirement is that the compressor output equal the necessary CFM for inflating the balloons:
Q = V x B
If each balloon contains 0.4 cubic feet of air, and you wanted to inflate 12 balloons per minute, then from the equation above you would need an air compressor with a MINIMUM rating of "Q" = 4.8 Free air CFM @ 100psi.
A compressor with the minimum rating would run continuously during use. It would also
have no extra capacity for adding more inflation stations in the future.
A compressor just slightly larger than the minimum requirement would be starting and
stopping all the time during use, and this isn't the greatest thing for motor life. The
bigger the air tank capacity, the fewer the number of starts and stops though.
Finally, a compressor that could deliver 1000 times the minimum requirement would cost a
lot of $$$, be rather difficult to move around, and probably need its own electrical
substation.
So obviously, how big above the minimum you decide to go is up to you.
Calculate your requirements and choose based on the Free air CFM @ 100 psi number even if you are setting your regulator at 50 psi; because the tank pressure will typically hover around 100 psi during use.
You don't have to be limited to the tank size that comes bolted to your compressor. If you unscrew any of the pipe- fitting plugs in your compressor's air tank, you can install a female quick disconnect coupling in its place. Then you can buy a roll-around auxiliary air tank of any capacity and put an identical coupling on it in the same way. With male quick disconnect couplings installed onto each end of a short piece of hose, you can connect/disconnect the tanks in seconds. This combination will give you any size tank you desire, and since the female quick disconnect couplings are self closing you can still use your compressor w/o the auxiliary tank whenever you want to. I've used this system myself with great success. The auxiliary tank won't weigh much either.... until you fill it full of compressed air :- ) :-)
That brings up an important point:
*** Make sure you tie it down when you load it into your vehicle ***
If someone cuts you off and you have to swerve or stop hard, a 100 pound compressor is not
the thing you want to have hit you in the back of the head at XX mph! When I got my first
pickup I brought my compressor to a friends' house without tying it down, and almost had
it come through my back window. The experience left me shaking for a while... I later
learned that even briefcases left on a back seat have killed people when they start flying
around the car in an accident.
Helium and "Balloon Gas"
Latex balloons and helium are not good bed partners, period. Helium is a tiny, monatomic molecule. In a short space of time the helium will diffuse through the wall of a latex balloon and then the balloon will stop floating and go for ground zero. Depending on the thickness of the balloon wall, and the size/shape of the balloon it might float anywhere from 45 minutes or several hours. Foil balloons filled with Helium are much better at remaining up in the air for a long period of time. There are liquids on the market called "Hi Float" and "Super Hi Float" that you can squirt into a latex balloon prior to inflating with Helium, and the balloon will last up to a week rather than the traditional 16 hours. Check with your local balloon delivery shop for what they are using, since there is more than one brand available. See the Balloon Care section for more details on Hi-Float.
In my area "balloon gas" is becoming popular. This mix of Helium and Nitrogen(?) is being sold to local party stores, florists, and anyone else who inflates. My distributor delivered this stuff to me prior to a large decorating job, and I went nuts! Needless to say, I've since changed distributors. Be aware of the difference between "compressed Helium" and "Balloon Grade", or "Balloon Gas" Helium!!!
Don't use CO2 or your balloons won't last very long. At a nightclub they thought they could save money by doing part of the balloons themselves. After all, it was only swags around the dance floor. They didn't have air blowers so I guess that CO2 was the next best answer since they use it and have it on hand. Cheaper than helium in there case. The balloons started out as 11" and within approximately 2 hours. they were down to maybe 5". Quite interesting.
PART5
How to make various types of twists
How much to inflate the balloon
How do you know how much to inflate the balloon to give you
- enough air to get all your bubbles and
- not so much air that your last bubbles are rock-hard (prone to popping)?
Marvin taught this rule of thumb at IBAC: leave 1/2 inch of uninflated nipple for each twist you plan on making. Of course, you need to leave extra uninflated nipple if you incorporate features like a poodle-tail. In practice, you will adjust bubble sizes and stiffnesses as you go so that it ends up right; otherwise you'll have to pop the nipple end, let some air out and re-tie in order to finish your figure. Years of experience also helps.
Advanced apple twists:
Yo-yo twist (split Apple twist)
This idea is the fishing reel found in "Dewey's Zany Balloons." Dewey takes a bee body, inflates it half full, and does a basic apple. He then twists the apple in half horizontally. This gives the reel for the rod, and the 'apple stem' sticks out to be the crank for the reel. I sure that the rod needs no explanation. I've used this often for fishermen with great response.
It looks like two toruses (donuts) side by side, connected only at the centers. Like a yo-yo. If you pinch the donuts together on one side, it spreads open on the other side like a spring clothespin. You can then clip it on to a nose, ear, or whatever; it holds on by friction. For the earrings, add a few dangling 260's with 1-inch bubbles in the end (like poodle tails).
I have done this with both 260's and 350's, but I like the effect better with the 350. It turned out to be rather simple:
Method
- Make a 3-inch bubble. The actual length is best determined by experimentation, and depends on what the final use will be. Tie a knot. At this point, I prefer to trim off the nozzle close to the knot so the knot is smaller.
- Make an apple. This is done by making an apple twist (see above) all the way down and about 1/4" - 1/2" into the uninflated part. Grab the knot through the uninflated part, extract your finger (or other apple-twist tool) and twist a few times.
- Trim off the uninflated balloon after the twists you just made, but keep hold of the twist itself -- it won't stay twisted by itself (yet). Push the twist you are holding back into the balloon, as if you were making an apple twist in the opposite direction as you just did. Once the twist is fully inside, it will stay twisted by itself. Push it back in far enough so the knot is more than halfway back toward the side where it started.
You should now have an oblong bubble with a thread of uninflated balloon running through it from end to end. Give this bubble a simple twist in the center, making two back-to-back apple twists. The friction should hold the twists in place. You're done!
- Pinch one side of this, and the other side opens up like a spring clothes-pin. Clip this on to whatever body part(s) you desire.
More instructions:
- Instructions were also printed in Balloon Magic the Magazine but here it is in simple form. Inflate a balloon to form a 1 or 1 1/2 inch bubble and tie it. Tie another knot about an inch beyond the end of the bubble. This forms a soft bubble. Now, do a simple apple twist or tulip twist - whichever you call it. Tuck the knots all the way inside the bubble. Next, twist the apple twist in half to form the 'yo yo'. Squeeze the bottom and the top opens. It will grip on most anything that is thin. It works best as an ear ring - if you wear a hoop or dangly earring and attach the balloon to that.
- After inflating the small 1.5 inch bubble and tying at both ends to create a soft bubble, reach all the way through to create the tulip twist. Cut off the remaining portion of tail and pull both knots to the center. Twist the balloon in half to create the 'gripper.' As you said, if you squeeze one side, the other opens and will attach itself on almost anything. Earrings, nose bobs, hair decorations etc.
Uses
- Clown Nose
- Animal Nose
- Earring (add baubles and dangly bits)
- Hair Bow (thanks to my wife for this one!)
- Game: get the 'nose' off only be scrunching your face muscles
- Vehicle Wheels (makes a terrific Indy Race Car)
- Toys (see below)
- Inflate a 6-inch heart and wrap the nozzle between the two yo-yo bubbles. You know have a heart that will stick on a shoulder, on a Teddy Bear's ear, on a finger, a glass or a napkin holder (actually almost anything that is sized for the yo-yo.)
- If you put the feet of a balloon animal on one side of the yo-yo, you can use the other side to grip a glass or clothing or whatever. Now the twister creation can be conveniently placed almost anywhere. The balloon friction works to delightful advantage. Unlike glue, however, you can remove it whenever you wish. I've used this technique as a business card holder and as a card holder for magic. Works great!
- once you've made one of these from a 350, you'll see that you have *two* suction cups right next to each other! Imagine the possibilities for attaching things! Take a yo-yo and suction cup it to a table. Now look at it. Looks like a light piece of fluff sitting on a table. Ask some poor sucker to pick it up. Or have them flick it off the table (maybe cover their desk with them, like mushrooms). Because of the suction, they act a lot heavier than they look. Rather startling, really.
Tips and variations
- Sometimes I leave the uninflated part on and "countersink" it into the opposite end of the tulip twisted knots (i.e. push the knots all the way through the tulip twist and grip the end of the tail. Pull the tail end and the knots to the center of the bubble and twist in half. -- like making a basket except the basket is twisted in half) Now you have an earring with a loop. Lots of possibilities to hanging, hooking and creating including "bull with a nose ring", ear chains, baskets with flowers and on and on and on.
- When you cut off the uninflated part, save it! I can get three "noses" from one balloon by re-inflating. It's also good for popped balloons that still have a few good inches in them.
- You can make easy, fast, long apple twists by using a smooth dowel instead of your finger. I started using a chopstick I have that is very smooth from many years of use, though this could be done with fine grit sandpaper.
- Put two "noses" together by springing them open and pushing the openings into each other, crosswise. Carefully push/roll the bubbles past each other. The bubbles will form a very interesting tetrahedron of apple twists.
- If you make the original bubble long enough, you can make more than two bubbles in the last step. Note that they don't seem to hold together as well, but they could be useful as parts in other sculptures.
- I put 2 superballs (T. Myers 3/4") into a 350 before inflating. (Tom's "Balls 'n Balloons" book gives good techniques for this.) When I did the final twist, I made sure there was one in each 'chamber'. This thing rattled and spun and bounced and did all sorts of crazy things! Putting two of these together into a tetrahedron was even crazier!
Mark writes: I independently discovered this twisted apple-twist (yo-yo) this spring, after George Sands' book got me critically thinking about apple and hook twists. They're slick, aren't they? I had never seen them anywhere before twisting my first one, and remember proclaiming to several friends (and a professor) "I have just revolutionized balloon twisting!" :-) The biggest let-down of my twisting career came when I proudly showed Marvin Hardy one of them at IBAC. He said something like "Oh, that old thing" as he promptly made one and clipped it on my ear. :-(
Suction Cups
- A tulip/apple twist forms a suction cup. As much as I would like to claim the balloon
suction cup effect, I seem to recall reading about it years ago in one of the older
balloon books (Chuck Leech?) where it was described as an effect, without (at that time)
any apparent use.
Put a tulip twist in both ends of a 350, bend the balloon around into a horizontal "U" shape and suction cup both ends to a window to create a "basket-ball hoop."
I've used it for a table mount variation on the ray gun. ("keep 'em covered while I make the next balloon...").
The interesting thing about using 350's for the suction cup effect, is that you get a stronger suction than with the 260's (due to wider cross section?) and the 350's are structurally stronger.
Suction hint: If you are having trouble making the tulip twist stick, try this: After you make the tulip, work the twist (what would be the stem knot in an apple), back toward the end where you first stuck your finger in. As though you were trying to turn an "innie" into an "outie". When you get that end "flat", moisten it, press it against the glass and, while holding the tulip with one hand, gently pull on the body of the balloon with the other hand (pulling the twist partway back through the tulip.) Ta Da, Maximum suction cup effect.
I've been suction-cupping balloons to things all over the place. A few days ago I made a person that definitely needed a hat. The head was made out of a couple heart balloons. I suction cupped an apple balloon to the top of the head to form the hat.
Rattlesnake Tails and Other Cool Stuff
- A marriage twist is just an apple twist that joins two balloons. This twist is a way to attach one balloon to the next, as with a one-inch black nose (tip) to a 3-inch white nose (base). The marriage knot is a second knot placed on the first balloon, in order to make a longer nozzle part. The knots are approximately 3/4 inch apart. The first knot is what is tulip twisted (or apple twisted) into the white balloon, along with the white nozzle. The first knot helps anchor the tulip twist. What results is the black one inch bubble laying in the tulip twist suction area.
- I recently bought "Dewey's Celebrity Balloons" and he has a GREAT way to make shoes on cartoon animals like Mickey Mouse, etc. - by apple twisting 6-inch hearts and connecting them to the legs! (Tie the knots together and push the knot into one lobe and apple twist) Even high heels by adding a short 260 bubble opposite the leg! So, what I want to know is: who out there has ever apple twisted a heart balloon? Be honest, now...
- Stack 3 or 4 decreasing size apple twists together on the tail end of a 260 and you have
a rattle-snake tail. If you pour a little uncooked rice or sugar in the 260 before you
inflate the balloon, then divide it into each apple twist as you make the tail, it will
really rattle. It's AWESOME!!! (and easy because sugar packets are available everywhere).
Method 1:
Push the knotted nozzle a few inches into the balloon (like a hook twist), but don't twist and close it off - just hold the knot through the balloon wall so that air can pass by. With your other hand, twist soft apples of increasing size. The last apple will hold the knot in place, and because the apples are soft, they will hold against each other pretty well and not unravel (unless you give it to a kid...) Make sure you push the knot up into the last apple. These are true stem-to-bottom-of-core apples, because they are really just one apple twist twisted into smaller apples. I just made a 4-apple (no end bubble possible with this method) tail as I wrote this, so it does work.The beauty of this method is that if you don't size all the apples perfectly the first time through, you can almost untwist one apple at a time until they just start to leak, and then pass air back and forth between neighboring apples to adjust the sizes. A way to cap off this tail and make it look finished is to add a single small bubble from the end of a second balloon, tied off, but with enough uninflated balloon (1-2") still attached after the knot. As you make the deep apple, stuff the uninflated part into it, and complete in the regular way.
Note: In Texas Style Balloons, Bobby Cordell makes a rattlesnake tail by making a long, soft (squeeze some air out) hook twist (very long apple twist). Then, since it is soft, he twists it into 4 or so individual bubbles.
Method 2:
In George Sands' book Encyclopedic Balloon Modeling he presents the "Center Apple Twist" technique which enables you to put an apple in the center of a balloon, or literally anywhere you put a twist first. For the knotted nozzle, you substitute tiny bits of broken balloon held against the wall of the balloon and push them and the balloon wall into the balloon to make one apple twist after another. It takes a few trys to find out just where to place the balloon bit and how to push it in so that the result looks good, but it's a very useful trick. Sands recommends using an apple twist followed by a few Center Apple Twists stacked together for the rattlesnake tail. Here is Mark Balzer's better-looking version that explains the details of the Center Apple Twist technique:- Twist a small bubble at the end of the balloon. That is the last rattle.
- Take a small piece of broken balloon and place it on the snake body bubble, about 1/2 inches away from the twist you just made. Poke it into the balloon with your finger and grab it through the balloon wall with your other hand. Complete as if making an apple twist. That is the second to last rattle.
- Repeat 2) as required.
The trick is to make that 1/2" distance as absolutely small as you can... like 1/4" or less. If it is too big, you will get... an ugly mess. These 'apple' twists are not really perfect apples connected stem-to-bottom-of-core; but rather like apples connected *near* their stems to the bottoms of the cores. Because of this, they want to form a little lop-sided. Keep that 1/2" number to a minimum and twist each apple enough times so that it snugs up tightly against its neighbors. That minimizes the lop-sidedness and allows them all to help hold each other in shape. If you have lop-sided apples, rotate them so that they cancel each other out and still form a straight rattle. You need good inter-bubble friction to hold it all together, so talc on the outsides of the balloons is a no-no. I just made a 4-apple + end bubble tail as I wrote this, so it does work, though it is harder and slower than Method 1.
Method 3:
Method 1 ends in an apple, unless you add a second balloon. Here's a method to add the bubble at the end with one balloon. Twist a small bubble at the end of the balloon. That is the last rattle. Twist all the air out of the next two inches of balloon by continuing to twist the balloon into a thread. Take a small piece of broken balloon and wrap it around the center of the thread you just made. Push the thread and balloon bit deep into the balloon (like a hook twist), but don't twist and close it off - just hold the knot through the balloon wall so that air can pass by.Now, with your other hand, twist soft apples of increasing size. The last apple will hold the knot in place, and because the apples are soft, they will hold against each other pretty well and not unravel (unless you give it to a kid...) Make sure you push the knot up into the last apple. These are true stem-to-bottom-of-core apples, because they are really just one apple twist twisted into smaller apples. I just made a 3-apple + end bubble tail as I wrote this, so it does work. Isn't topology wonderful?
Method 4:
A variation on the first part of method 3: leave an un-inflated tail at the end of your balloon. Then, take the ring of nipple (saved from a discarded balloon), roll it up the nozzle-end to where the inflated and uninflated sections meet. Then, make a poodle tail at the end of the balloon. Trap the thickened, added ring of latex with the end of your finger and use it to secure a hook twist. Please note: if you leave the uninflated section of the poodle tail too long, you will have an awkward space between the end apple and your rounded rattle. Not cool for tight looking tails, very cools for space-alien feelers/ antennae.
Hook Twist
This is the "hook twist" that Dewey describes. He uses it for a lot of neat animals: dogs, snakes, squirrels, frogs, etc. This twist is basically a variation on the apple twist. Instead of pushing the nozzle into the balloon only about an inch, push it in as far as you can reach with one finger. If you bend the balloon a bit you can reach further along the wall of the balloon. Now grab the nozzle through the wall of the balloon and twist the way you would make an apple twist. Then carefully work your finger out of the balloon. I use the thumb and middle finger of the same hand that has the index finger inside the balloon. These two fingers kind of push the sides of the bubble back a bit while I retract my index finger. If you can do an apple twist you already know how to take your finger out. It's just a bit harder now since there's more finger inside the balloon. Practice making apple twists of increasing size. I suppose a bit of powder on your finger couldn't hurt to reduce friction, but I've never tried it. When you take your finger out of the balloon, the bit of balloon inside the bubble that goes from the nozzle to the end of the bubble will go straight from the twist to the end of the bubble. If the bubble is bent (or hooked) as described above, that inner piece of balloon will hold it in that position.
The key to getting that shape is really to get the nozzle further into the balloon than your finger could reach if the balloon was kept straight. I scrunch up the bubble to really reach in there far. Note that no matter how far you reach in, the same length of balloon will be inside since you're only putting inside the balloon what covers your finger, so the further you can get the nozzle in, the greater the hook in the bubble.
- Inflate and tie a 260 leaving a few inches uninflated.
- Put your index finger on the knot and press the knot into the balloon as for an apple twist. Rather than keeping your finger centered in the balloon, it should go in toward one side so that the palm side of the finger is along one edge and the inflated part of the balloon is on the back (dorsal) side of the finger.
- Insert the finger into the balloon as far as you can. Then use your other hand to push another 3 or 4 inches of the inflated balloon onto the finger so that the inflated balloon bunches up on the dorsal side.
- With the other (right) hand, pinch through the inflated part of the balloon to grasp the knot between your thumb and index finger. Twist the balloon to lock the knot in the twist as you would do for an apple twist.
- You now have a long apple twist that's curved and bunched up on the convex side of your curved index finger. I use my right forearm and elbow to hold the remainder of the inflated balloon against my side to prevent the apple twist from coming loose during the next maneuver.
- When all but an inch of your index finger has been freed from the twist, tip your finger up so that the back side of the finger is along the outside (convex side) of the twist. This will allow the other end of the twist to hook as you remove the tip of your finger.
- The twist should have a reasonable approximation of a tight "S" shape. You can move the main body of the twist toward or away from either end to accentuate or reduce the curvature at that end.
Apple Twists and Deep Hook Twists: How NOT to Get Your Finger Stuck
- Peel the balloon down off your finger rather than pull the finger out.
- Don't try to pull your finger out of the twist! It won't work. Instead, use the thumb and first two fingers of the right hand to grasp along the curvature of the twist and gradually roll it off the entrapped left index finger. The knot end of the twist will bend into a hook as you do this.
- Use your other fingers to push the balloon off of your finger, rather than pulling your finger out of the twist with 'brute force'. This eliminates the friction which pops the balloon. It is hard and a little awkward at first, because your first instinct is to pull your finger out of the balloon.
- I push most of the air out of the twist before removing my finger. Then I just reach around to the uninflated end and squeeze the air back in before giving it the anchoring twists.
- I find that if you push the air up to the top of the balloon to create a lot of pressure, you'll have no problems getting your finger out of the balloon.
- The biggest problem I had with the hook was extraction of the finger while TRYING to hold the knot. My solution was to tie at least 2 knots & leave an extra inch or so of nozzle, so that when I inserted my finger there would something more substantial to grasp with my free hand. Also, I crook my insertion finger into the shape of a hook so that, for a shallow hook twist, I only allow the balloon to collect into the first joint of that finger. For a deeper hook twist, I may go to the second joint. Not going so deep makes it much easier to extract my finger.
- Wear gloves.
- Besides wearing gloves, you can cover your finger with a thin cloth - I used to use a juggling scarf - and it makes pulling out your finger very easy. I only use it on deep hook twists.
- Using baby powder or gloves works, but I find it hard to work in full gloves, because the cloth gets caught in the twists. I tried baby powder for a while, but it is messy.
- I saw Pat-in-the-Hat utilize a round, very smooth chopstick to make deep hook twists. I'm sure that anything thin, round, smooth and fairly sturdy can be used as a stuffing tool. If you go the chop-stick/thin wooden dowel route, don't use the cheap ones you get for free at restaurants. (too many splinters, pointy parts are bad for the balloon!) You can also use a balloon straw.
- Be sure your finger is very dry and possibly use a fine baby powder, that is what they use inside the balloons anyway.
- Any slight moisture will tend to make your finger stick, either very wet or very dry will do the trick. Try Cornstarch. It works. I tried it, and I don't think it will cake on your hands as much as baby powder has a tendency to do.
- A trick for making apple twists is to lick your finger before pushing the balloon in. This makes it MUCH easier to get your finger out.
- A trick for making bubbles inside a balloon and also for making apple twists is to: *lick your finger* before pushing the bubble in. This makes it MUCH easier to get your finger out without pulling the bubble out, losing a lot of air, or whatever. Of course, you can have as much fun hamming it up with this as you like.
- I was able to stop popping the balloons by wetting my finger before I did the twist. Then it pulled out without popping the balloon. Not too tasty, but it works. I find this most often happens to me when my finger nails are too long, or aren't trimmed cleanly.
- It's really hard to pull off a hook twist without popping a balloon after applying a relatively fresh coat of nail polish - some sort of weird friction thing goes on.
Meatballs
I call a bubble placed inside the balloon a meatball.
Twist a small bubble.
-----------------
                 \  --
most of balloon   )(__)  - small bubble
_________________/
push the small bubble as deep as you can into the big one with your index finger.
-----------------
            -- __)   ____________
           (__)__<- (_________   \_______
_________________)        (___  your hand
                          (___   ________
                           (____/
        pinch here
           |
           V
------------------
           --xx __)__________
          (__)x(___________
__________________)
           ^
           |
         and here
Now there is a bubble and your finger inside the large bubble. There is a second layer of latex around the small bubble. the outer layer is still connected to the big bubble. With your free hand, pinch the big bubble where the little one is inside of it and hold that bubble in place. With the finger nail inside the balloon, break that outer layer. (The outer layer to be broken is marked by x's in the above picture). Breaking it just takes a bit of practice. If you stretch the balloon that you want to break, by working the bubble further inside the long bubble with your other hand you should weaken it enough to help break it.
While still pinching the large bubble, work the little one free. Your finger will still be inside of the balloon.
        pinch here
           |
           V
----------\
     __    ----__________
    (__)    (___________
__________/---------
           ^
           |
         and here
Since you're pinching the balloon, air shouldn't escape while you get your finger out. Now just tie the balloon from the end where your finger came out of.
peas-in-a-pod: make five or six meatballs, and then deflate the balloon around them, leaving something that looks like a pea-pod. The pea-pod can also be called a caterpillar. Then if you make wings out of another balloon you've got a butterfly. [Note: A chain of small bubbles, each pushed into the balloon body separately can be used to create the same effect... after the outer balloon shell is deflated.
A hint for tearing off a meatball inside a balloon, which I discovered by watching Richard Levine here in Eugene:
- Make the bubble
- Poke it deep into the balloon with one finger
- Pull that finger out fast - the balloon will often pop due to friction, and the 'meatball' is free!
- If (3) fails, tear the end off with a *fast* motion, which is easier than slow.
- Failing (4)... use scissors. Latex makes crummy dental floss!
When you twist off the bubble that is going to be inserted, make it fairly small and twist it 4 or 5 complete turns. The first hard part is pushing the bubble into the main body of the balloon. Make sure the bubble is smaller than the main body of the balloon. I hold the main body of the balloon in my right hand right up close to the twist. I then (slowly) push the bubble into the main body with the index finger of my left hand. When you get it in, push it as far into the main body as you can. With the thumb and index finger of your right hand pinch the main body down onto the twist of the bubble. Hold this tight in your right hand and start to pull your left index finger out of the main body. The idea is to break off the bubble at the twist with the fiction between the main body and your left index finger. Sometimes if you move your left index finger down a little at the first joint you can increase the friction and insure that the twist breaks. When the twist does break, clamp down with your right thumb and index finger to seal the hole. Then retie and the bubble is inside the main body.
I push the bubble in almost all the length of my index finger, then I grasp the little bubble with the other hand from the outside and withdraw my pushing finger just enough so that I can pinch the bubble right where it meets the rest of the balloon. This pinch should be firm enough and should effectively cut-off any chance of air escaping once you pop off the bubble. Now, give a twist your finger that is still on the interior of the balloon; make sure you give your finger a hook shape and sort-of scoop twist. Usually the bubble will just pop free and you'll be left holding an unknotted balloon. And you'll probably have about enough space left where you're holding to simply knot it up, if you like. Try practicing with a superball, it is a lot easier to insert and break off.
I could not manage to get a bubble inside a balloon -- until this last weekend! Yea! Two hints helped me get it to work:
- From the October Balloon Magic Magazine ('Magic' section): Push the bubble back into the balloon by holding it with your thumb and first two fingertips until it is back into the balloon, then use one finger to push it the rest of the way in. I had a lot of trouble pushing the bubble straight back with just my forefinger; it kept slipping out before I could get it secured into the balloon.
- Make the bubble smaller than the diameter of the balloon itself. I was definitely making the bubble too big before.
I found T. Myers instructions on the balloon seed (bubble insertion) to be the easiest to do consistently. After inserting the bubble, twist another bubble on the end (it will look like a tulip twist) and pull it off. It separates easier. Later you can use other techniques to put one color inside another etc.
When I'm breaking off a meatball, I twist the balloon tightly around my finger inside the balloon to ensure that I pull it all back. It makes it a little more difficult to break off the ball, but I find it ensures a successful insertion. I leave a little tucked inside, and the flash gets incorporated into the knot.
Putting an object inside a balloon
If you want to put a ball or other object inside, it's the same thing, except that you don't start with a small bubble. You would just insert the ball the way the small bubble was inserted.
There are basically two ways to put something inside a balloon:
- Stretch the mouth/ nozzle open and shove the item inside.
- With an inflated balloon, push the item into the end, with the forced-in section of balloon forming a skin around the item. Keep pushing until the item is completely inside the outer balloon. Break off the connection to the inner section of balloon, trying not to loose too much air. The item is now inside the inflated balloon, and is coated with the broken off section of balloon.
Superballs are high-bounce balls. They are available at most toy stores and come in various sizes and colors. The smaller ones go nicely into balloons.
A super-popular item is ball-in-balloon toys. I also got superballs through Tom Myers, and in the end each one costs the same as a single balloon. So, cost isn't really a factor -- it's just like doing multi-balloon figures. However, these things are more like kinetic toys than figures. Some things I've been making with superballs in them: fill a balloon all the way, put a ball in, and tie the balloon into a big, loose knot. Overhand and figure eights work great. You can twist 1" bubbles in each end then connect those together if you want. A simple but stunning balloon/ball "maze"! Another toy: fill two balloons of different colors; put a ball in each. Make a long double-helix (see below), and you have a spiral ball racetrack.
The superballs sold by Tom Myers fluoresce under a black light! I discovered this when I used two of them as eyeballs in "googly eyes" (inside of a clear 260Q bubble) while twisting near the bandstand in a bar. Since the bandstand is lit up with "black" lights, the superballs looked like they were ready to jump right out and grab you - like a cat's eyes in your headlights! Very cool!
The ball putter was invented because putting a ball into a 260 is something that takes a knack. The balls n' balloons toys can require you to put a ball in every 2nd or 3rd balloon. After a day of this my finger hurts. The ball putter makes it fast and easy, but you are carrying around another tool. If you can get the ball into a 260 quick and easy and it doesn't hurt your finger, you don't need a ball putter. T. Myer's "Ball Putter" is one of the greatest things I've ever seen. I was not really sure about it when I ordered it. Now, I wouldn't give it up!
My favorite thing I picked up from T. Myers was using two small super balls in a clear heart or clear 260Q to make googley eyes. When you stuff anything inside a balloon with the meatball method, you end up with a layer that surrounds what you put inside. After working at putting things inside balloons, I can now even controllably unwrap the layer of balloon from the object (ball, etc.) I stuff in the balloon before I withdraw my finger. Google eyes with inserted superballs (or balloon balls) look best if you unwrap the clear cocoon from them after insertion. When I put something inside that I want to unwrap, I try not to break the cocooned object off completely. Instead I try to leave a little latex attaching the cocooned object to the rest of the balloon. My finger stays inside the balloon to plug the hole so the air doesn't escape. Then I use that remaining bit of latex as a handle for my inserted finger, in conjunction with my outside hand, to peel the cocoon from the object. It can still be done even if the object is completely broken free, though it is not quite as fast. In either case, don't leave the cocoon floating around inside the balloon with the object. It is distracting. Just remove it when you pull your finger out.
With regards to the little bit of loose rubber left in the balloon after you've inserted an object, and then stripped the rubber off the object: I usually make sure I trap that little bit in the first small bubble I make. It's a lot less obvious than leaving it in a long bubble, where you can watch it rattle around as you tilt the balloon. I've seen a twister manage to insert an object, manipulate the rubber off the object,(his finger still in the balloon) and then drag the little rubber bit out... all in one shot.
I've been using the T. Myer's Ball Putter to put superballs in balloons, and I love it. I say my sharp wit pops the bubbles. It's so fast I can usually do it before the recipient (child or adult) sees what I'm doing, and they go gonzo (that's a technical term) when they see the ball bouncing around inside the figure. T Myers ball putter is great for super balls but won't work with bubbles.
At IBAC, Marvin recommended that for stuffing you first go to your local Farm Supply store and buy a 'Banding Pliers' - a pliers used for stretching rubber bands when castrating animals. With a simple squeeze you can stretch and hold open a balloon nozzle while you fill it with confetti or whatever.
Marvin invented the Jiffy Tube system specifically for inserting items into the 260's. It works great. There are 3 tubes which will allow you to insert things into 260's, 5", and 9" balloons. We use the "banding pliers" to easily fit the neck of the 260 over the end of the tube.
To put a business card into a balloon you need to start with a jewel tone color (yellow, orange, etc.) You will need to inflate the balloon leaving enough to do the insert, pop and the twists for a small animal. Roll the card around a pencil or pen and insert, pop and tie off. Then strip the rubber off of the card. I don't bother to get this piece out as it shortens the balloon but you can if you want to be mysterious about how the card got in there. Twist the nose, ears and neck and gently unroll the card (it will have to stay somewhat curled) then finish the animal. Practice, practice.
Use a hi bounce ball to hold an inflated heart through a geo. I was making swans, hearts and geo sculptures and wanted a way to make the heart stand in the geo. Stretch the knot through the geo, place a ball against the stretched neck of the heart and the interior of the geo. Let it all go and 'Presto!'. The ball snuggles up into the geo and holds the neck of the heart against the interior of the geo. It also works with frogs on lily pads, dinasaurs on rocks, flowers in vases and, and, and. I twisted swans, poodles, dinasaurs etc. around the heart/geo to make lots of fun stuff.
Things to put inside balloons
- Refer to the Sculptures in Messages Section of the Guide for information on Ball In balloon toys.
- I make what I call the 'puzzle toy', which is simply a meatball put into fully inflated balloon, which I then loop into a pretzel shape. The meatball can then float from one end to the other by turning the balloon. A bubble inside the balloon doesn't always roll very well, but a ball is heavy enough that it rolls through the whole pretzel shaped balloon very easily.
- Insert ball. Inflate balloon but don't tie it. Bounce it on the floor. Watch the fun.
- For the bouncing balloon use a 1" ball in a 350 or a 340. The floor needs to be hard and dropping works better than tossing. I think that that bit is from an old balloon book called Blow By Blow.
- I put two racquet balls inside a 350. The resulting balloon was only about 20 or 24 inches long. It was a lot of fun for tossing up in the air and it bounced kind of strange. A friend picked it up and threw it across the room. The balloon went sailing straight through the air! It flew like a missile, you've got to be careful how hard you throw it!
- Put a quarter into a clear 9" balloon and then rotate the 9" balloon to get the quarter racing around the inside of the balloon. You won't believe how fast you can get the quarter going.
- I like leaving tips inside of balloon figures when I'm in a restaurant.
- I took an orange balloon and made two balls inside of it, then I shot them out and stuffed them into a clear Geo blossom. I put the Geo onto a flower hat and the balls jump around like popcorn every time you move you head. Even little boys want a flower hat like this one.
- You can make a 'pi–ata' out of a really huge balloon and fill it full of treats, confetti, toys, whatever.
- You can put Hershey Kisses or other candy inside balloons, but there are a few things to
consider:
- having to break the balloon to get the candy out means little kids may put the balloon (or the broken pieces) into their mouths. I doubt this is a problem for us big kids though :-)
- you probably only want to put food in balloons you pump up, not balloons filled with warm moist air from your lungs (those pesky germs again...)
- the talc on the inside of the balloon will get all over the candy.
- When giving children candy, I follow the Halloween rule: If it's not wrapped would I want my child to take that piece of candy from a stranger?
- Sometimes at trendy "eclectic" type toy stores, you can find a variety of giveaway objects just about the right size to put into a balloon that cost in the neighborhood of 3-5 cents/each....stuff like plastic spiders, fuzzy worms, ants (maybe uncles), frogs, miniature piggies, and so forth. My favorite was a plastic newborn nekked baby with his hands up and legs outstretched. It's about 3/4 to 1 inch long and I bought up all the ones they had for 5 cents each. They must be inserted head first; the little plastic feet (and the hands too, so you have to be careful) are hard plastic and so little they easily pop a balloon. I use them in anything.... such as in a dinosaur tummy, for older kids, especially precocious 10-12 yr old boys who are rowdy. I tell them it's the dino that ate Tucson....and if you don't behave you could end up just like this kid! Another thing I do with the infants is insert them in a clear balloon and then make an angel out of the balloon. I make the angel's hands as though I was going to pop twist, but instead of popping the middle bubble, the baby lays inside it on its back....Gives the illusion the angel is carrying the baby. I use it for mommies-to-be or on baby shower gifts. If you draw the angel's eyes closed, it makes it look almost even sweeter. Little girls like them cradled the same way in Teddy Bear hands.
- There's a place called Oriental Trading Company in Omaha, Nebraska, that has all sort of teensy toys, superballs, et al. for WAY CHEAP. Their prices are good but the shipping will kill you unless you order a large quantity. Call and have them send you a catalog.
- Here's a few Halloween ideas I had for putting things inside balloons. Now, not all of
these would be perfect for small kids so I hope you can tell which is witch. :-) I got
started with these ideas on a visit to U.S. Toy in nearby Kansas City. They had all their
Halloween stock displayed and I was sucked in. Here are a few ideas:
- Spider rings (~ $1.00/gross). Looking back, I see this has been mentioned already. Here again: A black plastic spider ring looks pretty cool inside (say) a yellow dog. Be sure to push it in back first so the legs don't pop the balloon. Any ideas on how to make a spider web inside there? Without an actual spider, of course. (I have a way to get a live spider inside, but I'd be sure to get complaints from animal rights activists.)
- 1" Eyeballs (.28/each). If Cujo were a balloon animal... Also try placing two of them in a balloon dog. Put one in each "ear".
- With most multiple-bubble-head-type animals (lion/monkey/poodle/etc.) you can place one of these eyeballs in the "top of the head bubble" to make a Cyclops lion/monkey/poodle/etc. Ok, you _could_ just draw it on but what fun is that?
- Introducing the 1002nd thing you can do with a thumb tip. Insert a fake thumb (or finger). Be sure to draw teeth and add highlights with a red marker. Hold the balloon creature carefully in your right hand and point to it with your left, being sure to curl your left thumb in so that it appears missing. "You have to be careful of this one. He bites."
- I thought about trying to insert those plastic dracula teeth but I think they're a bit big for 260's. Maybe with a 350.
- A steak knife. It wasn't the sharpest knife I ever saw, but it was sharp enough to cut
meat. I figured that if I placed it in point first I would just puncture the balloon. If I
put it in handle first and I slipped, it would shoot out like an arrow. I chose the latter
approach and pointed it at the floor. It was a success, and it got quite a few reactions.
)
Put the knife in blade first. If you put the tip of the knife on the knot in the nozzle, it provides enough extra protection to prevent the tip from popping the balloon. And if the knife slips, the handle comes out first so you won't be cut. It works every time for me. - I was thinking of things to put into balloons. How about a watch into a dog producing . . . "a watch dog". I think you can buy plastic watch look-a-likes in a toy store fairly inexpensively, you know, the ones you get at carnivals at the duck races. Or hey, put a Rolex in one and send it to me. Takes and licking and keeps on ticking.
- A friend and I came up with a couple stuffing ideas today: One was an action figure twisted into the belly of a dinosaur. The other was an anteater with plastic ants rattling about its belly (these were wedged into the mouth of the balloon before inflating). Flies in the belly of a frog or lizard might work well also. Oh, almost forgot... push a computer chip into a balloon. "Intel Inside." I've been putting Halloween whistles inside balloons.."Look! Your dog/cat/whatever Just swallowed a whistle!"
- I have used a balloon doggy for the final of a magic routine using a spectators ring. At the end of the trick the ring vanishes and I offer to make it up to the spectator by making them a balloon. In the process of making the balloon I insert their ring. I twist up a basic dog making certain the ring ends up in the stomach portion. I give the balloon to the spectator and wait for the onslaught. I inform them their ring is in a very safe place it is being guarded by "mans best friend". They immediately dive for the balloon. Try to use wedding bands or small class rings stay away from anything with small stones as they tend to pop the balloon or worse come loose from their setting. Another use is to borrow a bill from a spectator. The higher the denomination the better. Vanish it and make it appear inside a animal balloon. Another neat trick I have played with is sticking a playing card inside a balloon and twisting the balloon into a sword. Then you can do a neat version of a card stab. Take a deck of cards force the duplicate on the spectator. Palm out the card, toss the deck into the air lunge at the deck with your balloon sword. You have told the audience you impale the card on your sword. Much to your surprise and theirs the card ends up inside the sword.
- Light stick jewelry. These things are plastic with an ampoule of a second chemical inside them. When you crack the ampoule, the chemicals mix and it begins glow a neon green or yellow etc. The necklaces are long skinny tubes that would wrap around your neck or wrist. I was able to feed one into a 260 then break it and twist it into a animal, heart, hat etc. It made sort of a electric neon balloon. They looked really neat in the dark nightclub. It may be something to consider for Halloween. I kept the bubbles with the light sticks large enough to handle the glow sticks. The sticks were maybe 10-12 inches in length. Hot dog dogs, Giraffes, Hearts all were big enough to hold a glow stick. The hats seemed to be the most popular item I made. Qualatex discusses this great trick in their book "Design", and they also show it in some flyers I got for their Halloween themed printed latex rounds. I'll bet they look awesome in a 260! We use them often in our decorating business to add excitement to dining tables. Place the necklace under a dinner plate and the bracelet around the napkin or under the coffee cup to add a glow.
- Look at the tiny, battery powered flashing LED ear-rings and pins that they make now - These would look great in balloons.
- How about stuffing one of those music-box-in-a greeting card circuits inside a balloon? You can buy them separately (i.e., without the card attached) at craft stores, and each one plays several different songs.
- I think it is the 260Q Decorator Book where it is suggested that you can braid Christmas tree lights in with 2, 3 and/or 4 balloon braids.
- Fortune balloons - like fortune cookies- put pieces of paper with jokes on in my balloons (they'd include my contact details as well of course).
- For Christmas Balloons, how about putting sleigh bells into balloons before twisting? They still jingle when they are put inside balloons. Put them in the antlers of an antler hat, inside reindeer, or snowmen or any creation.
- Per request of a young boy, I put a little sword (toothpick size, from an exotic drink) into a light, translucent 260 last September. I then made a ballooni brother, leaving the sword in his torso, and informed the family that it was a sword swallower that went too far.
- Fourth of July twists? Anyone ever tried firecrackers or smoke bombs inside of balloons? I think balloons pop enough on their own w/o help. Besides, would you light the fuse BEFORE or AFTER you put it in the balloon? Pop art now has a whole new meaning.
- I stuffed two wooden strike-anywhere matches into a clear 260, and lit them off of each other. I wouldn't call the experiment a success, as the flame instantly popped the balloon. A larger balloon or a smaller flame / spark would be more successful.
- Don't put live bugs (such as fireflies) in balloons because, aside from the whole idea of trapping a living creature inside a teensy space... when the balloon pops, the bug will get trapped in the now-deflated balloon, as well as get its eardrums messed-up.
- Tried putting a Hamster in a 350 once. She much prefers her cage - a lot more room.
- John Travolta - he portrayed "the boy in the plastic bubble" in the movie. They should have left John Travolta in a plastic bubble. While cruel, it would have spared millions a couple more seasons of "Baa-baa-baaaa, baa-baa-bareeno!"
- For an adult crowd...especially in a bar, How about "a Trojan horse" ?
- "How To Stuff A Full Drinking Glass Into A Balloon, Without Spilling A Drop"
or "The Glass Wrap" Trick.
Needed:
- 1 drinking glass, smooth (especially the rim), stiff (not soft plastic, paper, etc. Diameter must be less than that of a inflated 350Q balloon. For a first try, 2" wide works well (I used one of those little glasses that come with cheese spread inside. Smooth, thick, free.) Caution: Wine glasses look cool, but don't use anything too thin, that could shatter and cause injury.
- Enough fluid to fill the glass, to 1/2" of the rim. Try water for practice (no stains), but have a carbonated soft drink available for later.
- 1 - 350Q balloon (clean), clear or yellow preferred.
- scissors (balloon removal later)
- towels (just in case)
- 1 - drinking straw. (trust me)
Method:
Fill the glass, to within 1/2" of the top. For a wider glass, use slightly less liquid. Inflate the 350Q, leaving a 4" uninflated tail. Let the air out, and re-inflate (this will make the balloon slightly wider and easier to get over the glass). Squeeze the body of the balloon to soften it. You should now have a 2" tail left. With the glass resting on a solid surface, put the end of the balloon with the tail into the rim of the glass, with the "tail" hanging into the drink. The balloon will curve into the glass, to the fluid level. If there is too much liquid in the glass, the balloon will force some out, over the rim.Slowly press the balloon down onto the glass, working the balloon around the sides of the glass. When you get to the bottom, keep pushing, so the balloon wraps under the glass. Notice how the inner wrap has skinned around the glass, trapping the liquid inside. Notice also how the uninflated tail section is poking down into the glass. At this point, when the balloon has covered the bottom of the glass, you can very carefully turn/ rotate the glass inside the balloon, closing the bottom, kind of like a tulip twist. If you are brave, you can now set the balloon down (on end), and the weight of the glass will keep the twist from unwinding. Ta - Dah !!!
You now have several options:
- Keep going and put the glass further into the balloon, break the "umbilical", re-knot the balloon and have a covered glass loose inside closed balloon.
- Put glass inside balloon, work skin off of glass, and have *open* glass inside balloon. Visually very impressive.
- Win bets by taking glass back out of balloon without breaking balloon Carefully unwind the twist, and slowly ease the balloon up, off the glass. Control of the balloon is critical for this move. It may have a tendency to spring upward, and then there can be a suction effect on the surface of the liquid. Move slowly.
- Do the "Glass Cover" trick. With the balloon down around the bottom of the
glass, slowly let the air out of the rest of the balloon. Cut away what was the outer,
inflated balloon, leaving just what was the inner wrap/ skin section.
Here's the cool part: If you have used carbonated soda, holding the balloon, where it covers the sides of the glass, gently shake the glass. The resulting pressurization (fizz) should make the balloon tail pop up, out of the top! Use the scissors to cut the very tip off, insert the straw and hand the spill proof drink to a amazed audience member, or drink it yourself, to thunderous applause.
My kids loved this one. Caution: It's tempting to use the "glass cover" like a baby bottle, and suck on the balloon, but again, we don't want kids to think it's okay to put balloons in your mouth. Use the straw.
Hope you like the Glass Wrap. Have Fun!
Where to get stuff to put in balloons
- Accent Annex, 1-800-322-2368.
- Loftus Novelty, 1-800-453-4879 has a whole novelty catalog.
- Oriental Merchandise Co., 1-800-535-7335. Order their wholesale catalog
- Oriental Trading is either 1-800-828-9898 (a Dallas number) or 1-800-228-2269 (a Omaha number)
- Slam Bam in Brooklyn, NY, 800-451-7481.
- Source Book, published by Paper and Party Retailer Magazine, (203)845-8020. A good all around source for many items.
- I get my glow sticks at Martin Industries in Ontario, CA. You can call directory assistance for the 909 area code for their number. The owner is Gary Martin. They supply Disneyland and Knott's, and their stuff is always fresh, which is important.
One-liners for balls in balloons
Refer to the One-liners section of the Guide for One-liners for Balls in Balloons.
Pop twist
It is often desirable to get more limbs on an animal than there are ends of the balloon. The basic dog works out OK, but legs need to be grouped in twos. The pop twist will allow two legs or arms to be separated. When you are at a point where you want to make a Pop Twist, twist two medium bubbles, three small bubbles, then another medium bubble. Do a lock twist with the medium bubbles so nothing untwists. Ear twist the first one.
    in    out
     \ \ / /
      \ V /
       \|/
      _( )_   <--- 1 medium bubble (ear twist and tuck between "in" and
"out")
     ( )^( )  <--- 2 medium bubbles (become separate legs)
     (a)_(b)
       (c)    <--- 3 small bubbles (a, b, c)
Ear twist bubbles a and b. Twist them about 5 times each (completely around). Now pop c. The air should not come out of any of the other bubbles which now represent paws or hands..
          ET                                                   ET
   ______()________                                           @
  O______)(________)  side view with              end view  _(_)_
        ((_)          perspective attempted                (_) (_)
         oo                                                 o   o
Pop twists - good for pop-apart arms and legs on beasts, but the twists can easily come undone. Usually I try to put animals and other creations with this kind of pre-popped balloon twist on hats or leashes so they're more likely to "live" longer.
A "pinch & pop series" is a 5 bubble series. Bubbles 1 & 5 are the same size and bubbles 2 & 4 are the same size. The series is twist locked to form and loop (almost diamond shaped). To pinch bubbles 2 & 4 you take one bubble and bring it's own ends together by pulling on it's middle and pinching the ends together. Twist it at least 5 times if you're going to pop bubble number 3. Do this to both bubbles. This is exactly how you would make the outer part of a Teddy Bear head. I believe some books call this a bean or ear twist. Be sure to support the pinched bubbles while popping bubble no. 3 so they do not untwist. Hint - if you twist the pinch in 2 it makes good claws for your T-Rex or Eagle.
Popping the center bubble
The easiest way to pop an inflated unwanted balloon is to pinch the balloon between your thumb and middle finger and simply snap your fingers. If you can snap your fingers normally you should be able to do this easily. I've even used this technique to make the fully inflated 260 'disappear' instantly. The kids like it and always ask how I did it, I tell them it was 'magic.' That's the way I do it too (though I'd mention that my thumb NAIL and middle finger NAIL pop the balloon with a scissor-like action when I snap. I never tried just snapping the fleshy parts of my fingers to pop a balloon though I expect that would work if you pushed hard enough and your hands were clean and dry). Makes pop-twists extra impressive.
I used to use my teeth, but I thought better of it when I saw a child doing the exact same thing to a balloon after seeing me do it. That's when I went to the small knife. I don't think we should set an example of putting an inflated balloon in our mouth to do anything to it.
I've found that the best way to pop a balloon is to try twisting it into an animal shape right after telling a friend, "Let me show you this new design I've come up with."
Pop Twists: The Alternate Method!
I'm not sure what anyone else calls this one so for now I'll call it a toe twist since that's what I like using it for. Make an ear twist, with only a little air in it. The softer the better. Twist the bubble in half now to form two toes.
        twist along this line
          |
          v
         ___
        (_v_) existing ear twist
        / ^ \
       / / \ \
      in    out
          ^
          |
The Dewey method for pop-twists requires "toe-twisting" each ear-twist in the pop twist series.
Mike Decker has new technique. After you make the 2 ear twists, & before you try splitting them in half with your fingers, try moving the ear from on top to under, then pushing the ear up, causing the ear to be split by the balloon (2 chambers next to it) creating 2 little bubbles from the ear. Now twist these little bubbles around a time or 2 and your ear-twist is set. Repeat w/ other ear & pop. I lose almost no pops this way and can't remember the last time a kid came back for repairs.
There is definitely a difference in the two methods of pop twisting. In the Dewey method, you twist the existing ear twist in half. In the Mike Decker method, you squeeze the two bubbles on either side of the ear twist towards each other, then push the ear twist up through the bubbles, using the bottom half of the bubble to separate it into two halves. then you twist the two halves around. When I was first starting out, I had a terrible time twisting the bubble in half and broke a lot of bubbles learning the technique. I saw Mike Decker's Video, and his technique is easier for a beginner. I could use his method immediately with little or no poppage. There is less control of the size bubbles with Mike's method. Now, I can do either, and really don't know which is better. Hope this helps
Raisin Twist
To attach one Geo, heart, or round balloon to another, save the knots from broken balloons, and drop them into the balloon before inflating, then after inflating, grab the knot in a little piece of the balloon where you want to tie on, and twist it to make a little nub to tie on to. (Otherwise, if you drop a BB or a small hex-nut into the balloon before you inflate it, the BB will fall to the lowest point. Grab the BB through the wall of the balloon and twist to form a nub that you could attach a balloon to.) The Balloon Dude in California makes an awesome elephant with a geo, using this technique, the nose comes out of the hole and the ears are attached as described.
We named the twist a raisin twist and it goes like this: tie a square knot in a scrap and break off the knot, drop this into an un-inflated balloon and then inflate and tie, grasp the "raisin" between the index and thumb, pull out slightly and twist, lock it by attaching another balloon to it. Using this twist, I was able to take home the First Place trophy in the advanced multi-balloon comp. (I made a momma sow suckling a piglet ). Brit Anders
I read in a book (about camping) how to tie a rope to a tarp without putting a hole in it. Find a suitable rock, hold it through the tarp, and tie the rope around the lump. I just applied the principal to a balloon surface.
I purchased the book by George Sands and the twist listed in there are all a modification of the apple twist. In the Sands book, he is discussing how to use a match head or piece of paper to create a knot-like effect on the nipple end of the balloon in order to create an apple twist. He does not discuss putting something in the balloon.
If you've tried the raisin twist with no luck (the balloon breaks or develops a leak), try 11 inch rounds inflated to about 8 or 9 inches maximum to practice. I've had no problem this way.
Use a raisin twist to connect some bug food to a geo for the frog sitting on the flower. Fun.
Side Bubble
One day, I thought about the fact that out of all the different shapes I did and have seen others do, I never saw anyone twist a balloon from the side. So, I made a claw out of my hand and pinched a bubble out of the side. I've only been able to get a small bubble that way and I couldn't think of how to lock it. Yea, I invented the "twist a bubble in the side of a balloon" trick too, but I wouldn't be surprised to find out that it also was first done a long time ago. None of the twisters I met at the 1995 IBAC had done a side bubble, so I demonstrated the concept at the 260Q Jam Session, and then provided an application with my jet plane sculpture. Within a few hours of his seeing it, Sean Rooney (one of the most amazing balloon artists I have ever had the chance to meet) was already twisting 2 side bubbles in a 260, _in_the_same_cross_sectional_plane_!!!! I wouldn't have thought of that. (Wow, what dexterous fingers he has... he eventually got 3 in the same c-s plane! Sean is a fan of "Pure Sculpture" (balloon sculpture without any non-latex support structure) and thought the technique would open up a lot of attachment possibilities.
Attaching balloons with adhesive
Rubber cement
I'm not sure that any one brand is better or worse for balloons. The kind that I use is Elmers. Before I brush any of the cement on the balloons I take off the cap and let it sit for about 10-15 minutes. Letting rubber cement sit for 15 minutes helps to prevent the balloon popping; the "rubber" in rubber cement is in a solvent. The drying process allows the solvent to evaporate, leaving the rubber. This solvent can dissolve balloons. Vaseline will dissolve a condom Gasoline will dissolve a Styrofoam cup. In short, petroleum based substances (gasoline, paint thinner, kerosene, etc.) will often dissolve polymers (rubber, balloons, Styrofoam, plastics).
When applying the cement to the balloon, make sure you keep it away from your fingers. It's difficult to handle the balloon when it keeps sticking to your fingers. Use the brush that comes with the bottle to apply the adhesive, but be careful not to POKE the balloon. Also, only use a minimal amount to get the job done. Too much makes the sculpture look messy, other things (dust, particles etc.) can get stuck to it, and people can see where the glue has been applied.
Wait a few seconds until the glue loses it's clear look and becomes whitish. Now just connect the two balloons together. Make sure the balloons to be connected touch in the right place, because it's hard to take the balloons apart with out breaking them.
Oasis floral glue is the best balloon-glue made! Oasis floral glue works unbeli evably well on balloons. A small amount holds well, a large amount will not pop the balloon (as rubber cement will) and it stretches enough to take a lot of ab use. This is one of my favorite tools when building large sculptures for event decor. It doesn't need to be plugged in, you can't burn yourself on it and it d rys quickly.
Now, what can we do with the use of rubber cement?? Instructions for making a rabbit, a three layered cake and a gumball machine can be found in Steve Hattan's Mon, 25 Apr 94 email entitled "Sculptures".
Cold Glue Guns
For balloon sculptures, cold-glue guns are used. These are similar to hot-glue guns, but they operate at a much lower temperature and use an adhesive that does not dissolve latex as rubber cement does.
PART6
Advanced Twisting: Tricks of the Trade
Double Stuffing
Color Combination
How to minimize squeaking when twisting
Do you find that humidity and/or temperature affects the squeaking? Let us know.
Pull the bubbles apart
- The best way to minimize squeaking is to pull on the balloon as you make your lock twists and ear twists. The less the balloons rub against each other, the less they will squeak (and pop).
- Pull bubbles away from each other when you are making a twist. Also, If I want to make something quietly, I sometimes place a couple fingers on either side of a twist so that the bubbles rub against my fingers rather than the other bubble. I don't wear gloves, but I assume this is what people with gloves do that reduces the squeak.
Wear gloves
- According to Flash (Ken Stillman), wearing gloves to twist reduces squeaking and popping. He uses nylon gloves, although other people at his workshop said they used cotton gloves. It makes several things easier: long hook twists, stretching the balloons, popping and tear offs, etc.
- I have used gloves with the finger tips cut out for six years as a clown. (The finger tips kept getting stuck in the knots or twists.) My first few nights without gloves, I noted how noisy the balloons were, and there were more balloons popping. With gloves, the noise stopped, and the number of popped balloons went down.
- I have found that gloves help reduce the balloon noise and popping, and on monster days of ballooning, help protect my hands. Several of my clown friends wear full gloves. They are excellent balloonists and have no trouble getting the gloves caught in the balloons. When I was a beginner, I did have the problem of getting the tips of the glove fingers caught. It is probably a matter of practice though, just like everything else.
- Being a white face clown I too feel that it is best to twist in full white gloves. I use a good grade cotton glove. They do get a little dirty and I do get marker on them, but a little Iron-out works wonders. Nylon gloves get caught in the knot and this makes a hole in the finger very quickly. I don't have this happen with cotton. The gripper gloves are ok but I personally don't care for them as I twist very quickly and sometimes the grippers stop your hands from sliding along the balloon.
- I work with gloves, finger tips cut off, when in clown. Otherwise I twist with no gloves. Both ways work fine for me. I do restaurant work, so it's usually only 2-3 hours a night, but on holidays I can be there in the lobby for 8-10 hours making balloons and keeping folks occupied as they wait... My hands really get dry and semi-raw from all the twisting... I like the glove idea.
- To make fingerless gloves, start by finding gloves. They are available in many colors at Costume shops, Women's accessory shops, and from mail order clown supply businesses. If you wear white gloves be prepared to wash them regularly and toss them when they're irrevocably dirty, otherwise, I'd invest in colored gloves that are better quality. Here's one place to buy colored gloves if you can't find them in your area, I called and they have two different shades of pink, three of purple, several shades of blue and green, and carry many other colors.
- I've cut the fingers off of one pair of top quality military dress white gloves. They cost me $10.00 for 3 pair at an Army surplus store.
- I favor wearing colored gloves as they look cleaner longer than white ones do.
- I use colored gloves (white ones get terribly dirty). Apply a product available at Fabric Stores called Fray Check to keep them from running/ fraying after the fingertips are cut off.
- You can purchase a product called Fray Check at any fabric store. It is inexpensive to use and very effective. Spread the product on the finger of the glove just below where you are going to cut the finger, then let the product dry. Cut the finger - OF THE GLOVE - off. Fray check keeps the glove from running. If you sew, you can turn the edge under and hem, but if you don't sew, the fray check will work fine, even after repeated washing.
- I like twisting with gloves much better than without. I wear nylon gloves. I tried cotton ones, but they didn't seem fit and move with my fingers as well as they nylon ones do. They're usually too long for my thumbs, but the other fingers fit... like a glove (sorry, couldn't help myself :-). I turn them inside out and sew across the top of the thumbs so they're snug once I get them on. Every once in a long while I do get caught in the twist, but I can untwist quickly. I do seem to wear out the area that covers the pads of my thumbs of my index fingers more quickly than the rest of the gloves.
- Wearing gloves greatly reduces the annoying squeaking noises the balloons make, so I wear them whenever I twist. Plus it eliminates my fingernails and jewelry adding to the pop factor.
- I use the heat of my hands to mold some of my balloons and it doesn't work very well if you have gloves on.
- The friction from rubbing the balloon, with or without the gloves, usually is enough to create the heat you need to form shapes.
- Besides wearing gloves, you can cover your finger with a thin cloth - I used to use a juggling scarf - and it makes pulling out your finger very easy. I only use it on deep hook twists.
Use powder
- If you do not want to wear gloves, you can minimize squeaking noise by putting some baby powder on your hands. Before I wore gloves, I kept a little zip lock bag of baby powder in my balloon apron, you will have reapply often if you are making a lot of sculptures.
- Powder has been on all the balloons you ever bought (but probably in much smaller quantities). It prevents the balloons from sticking to one another and too themselves. After all, they're just tree sap!
- "Baby powder" comes in two forms I know of: talc and cornstarch. Which one do you use? I find the talc to be too slippery. Also, use very little of the stuff - it's very easy to overdo; you'll have no squeaking and figures that don't hold together either.
- A lot of people do use powder to reduce squeaking, and that works just fine for those people. I've found that it makes it easier for some sculptures to untwist. I also don't like the mess, and after a while, the powder on my hands starts to irritate me. I need to wash them off more often when I get powder on them.
- I got a bottle of "Liquid Talc," a lotion produced by "Bath and Body Works." This stuff works like a charm when I have really clammy hands and I have a lot of balloon breakage. It goes on like a lotion, and evaporates within about 20 seconds. It then turns your hands into a powder-covered texture that's really smooth. Your hands are turned into twisting lightning! It's fairly powdery, and can mark up if you wear black clothes. The bottle says it contains Rosewater and Evening Primrose Oil. I'm sure it must have a little Shazam in it too. Here are the details from the bottle.
- FYI, Bath and Body Works is a national chain, but is usually only found in the larger, more upscale, malls. They have a suite of products in each of their scents (you can get body spray, bubble bath, shower gel, and lotions to match your liquid talc scent of choice). I don't know how hot you guys are to smell like vanilla, raspberry, apple, peach, flowering herbs, etc. But the liquid talc is way cool. They do have some products in fragrances for 'men only', but I do not know if they make liquid talc in the 'butch' smells. (I doubt it, though) Why not simply use regular talc, you may ask? Well, since you apply this as a lotion, you get a thin, uniform layer of talc, that you don't see, rather than patches of white, and a lower potential for white powder to fly everywhere if you get bumped with the shaker open. (plus it's way cool, kinda funky, and smells purty)
Holding a chain of multiple bubbles ("String of Pearls")
On long bubble sequences, if you always twist the same way, you only have to hold on to the first bubble, and the last bubble. I hold on to the first bubble with my little finger and palm, then feed the bubbles through the thumb and first finger.
When I make mine, I start with the first three bubbles scrunched into my hand, then I sorta turn the 1st bubble around in my hand an grasp it with the ring finger and pinky with the rest pointing out and around from that side of my hand. This anchors the end, and frees my thumb and 1st two fingers (sometimes 3) to continue twisting. I do the same when making 'pearls'/'grapes' bubbles. This is the best way I've found to do long sequences of bubbles, and you also don't have bubbles come undone in the middle of a sculpture. (P.S. this is how I teach my students how to twist bubbles - i.e. a challenge, see how many bubbles you can hold)
The fastest way I have found to make a "string of pearls" string of small bubbles is to roll the body of the 260 down my leg with one hand while the other hand holds the bubble. The first bubble of the string also has to be held, either by the bubble hand or by being attached to a held sculpture. By rolling the body of the 260 the same distance down your leg each time you get a uniform number of twists between bubbles. If the twists aren't even the line of bubbles tries to make them even and some bubbles may untwist. The pearls hat is not the fastest hat to make but it is popular. I figure the pearls take about as long as a fancy poodle.
I inflate a 260 no more than halfway and begin twisting round bubbles. The trick is that you have to hold the first two until you reach the end and can twist the beginning to the end. I have a lot of fun saying that the purple strands are amythest beads, the reds are rubys, the greens are emeralds, etc... Girls of all ages love them. After all, "the only thing that separates us from the animals is our ability to accessorize" (Shirley McClaine in Steele Magnolias).
I would note that it is a bit tough on the wrist and can simulate a carpal tunnel syndrome, so be sure to flex your twisting wrist after each strand.
A variation on this is that I will inflate the balloon a bit over half and use the large section that you are unable to twist into pearls to become the head of a swan when I turn the strand into a bracelet.
Shaping/forming a long section of balloon
Swan Neck
The easiest way to get the neck to bend is to take the uninflated portion of the balloon (the part you left for the beak) and hold it against the neck, essentially folding it over where the air ends. Give the neck a quick squeeze forcing some air into the folded over section. This quickly forms the curve of the head. There are other methods you can use, but this one works every time for me.
Making a heart from a 260:
You should choose which method you like, according to what your goals are. Personally, I like the general, softer-looking method for butterfly wings, and the heart-and flower combination creation. If you want to put a stand-alone heart on top of a pole or on a hat, etc. etc., the T. Myers method will make your creation look great!
- Note: The general problem with this method is that the end result looks slightly soft.
Meaning: the point between the lobes of the heart is a soft curve, rather than a point. It
doesn't look like a 'crisp' heart-shape. However, I have never seen anyone mistake this
shape for anything other than a heart.
- Leave the balloon slightly under-inflated, so that you can tie the nipple and the nozzle together, creating a circular loop. (slightly obvious) Note: In all of the methods, the point of the heart is formed by the above knot. The two lobes of the heart are formed opposite the knot.
- Find the mid-point of the loop (opposite the knot) and pull that area of the balloon downward towards the knot, creating a (slightly rounded) "M" shape.
- Now your goal is to stress the heck out of the balloon at each of the three points of the "M". You can repeatedly squeeze the balloon, pinch it, pinch a small area and twist it a few times, etc. etc. etc. You may have to do repeat your method a couple of times. Also, you might need to manipulate the balloon slightly to make the lobes of the heart appear less angular and more rounded.
- If you've been practicing your snake's and making curly-Q's (see the Blowing up a Balloon section of the Guide) you might want to try this: During inflation, Jesse Biddlecome (working with a large pump) created one well-placed curly in the center of the balloon. So that when the ends were tied together, he had a corkscrew in the middle...kinda like the matchbox race-car track where the car goes upside down. He did this very quickly, I'm sure that there is a key to correct twining of the balloon about your fingers, to achieve this feat. Also, I'm not sure how much this extra step adds to the fundamental structure of the heart, or if it's just a slick refinement for added showmanship.
- Note: Because of the extra twist at the point between the lobes of the heart, this
method creates a really crisp, well-defined heart.
- Tie a 260 into a circle. (see above)
- Twist into 2 equal bubbles.
- Curl both bubbles together down from the twist. Curl up less than half of its length, like a snail shell. When it looks like a comma, hold it. Soften the outside of the bubbles on the curve and the sides of the curve by rubbing the balloon on your clothes.
- When you let go and open the 2 halves apart it should look like a heart. If not, make it look like a comma and rub some more.
Generalized Method
A slight refinement:
Tom Myers Heart - Short Instructions (By T. Himself)
Double-helix balloon poles
To quickly make two balloons twisted tightly together, Tom mentioned in his newsletter to twist them in on each other as you twist them together. What I found that works really well for me is this: Twist a 1" bubble at the nozzle end of each balloon and then lock-twist them together. Start with the lock-twisted bubbles in your right hand (I'm right handed), and then open your left hand, palm facing the two balloons. Put the twist (the center where the two balloons are being twisted together in the palm of your hand which is facing to the right. One balloon is over the space between your thumb and forefinger and the other extends down the base of your palm towards the floor. Push in slightly so the balloons are almost at 90 degree angle from the twist being created in your right hand. Then start rotating your right hand to make the twist. To get a tight twist you have to push the crook of the twist a little into your tight palm and also use the friction of your palm or fingers (right hand) to twist each balloon itself as the two are being twisted together. Also, once you do a straight twist that is locked at both ends, the balloon makes a lovely twist in the air if you throw it like a spear. Or twist a hook into one end and it's a candy cane.
Weaving
Balloon Weaving Hints and Ideas
Royal Sorell demonstrated his spiral weaving technique at IBAC. Try this for starters:
Inflate 5 different color balloons (any number of balloons will work), leaving a 4"
nipple.
When you are done, each balloon will end up looking like this for a left hand spiral (note that for this discussion, my balloons start with a bubble denoted "!" and end with a bubble denoted "i"):
   i_
     |_
       |_
         |_
           |_
             !
or like this for a right hand spiral:
            _i
          _|
        _|
      _|
    _|
   !
and a planar, 5 balloon right hand weave will look like this:
                 _i
               _|
             _|_i
           _|_|
         _|_|_i
        !_|_|
       _|_|_i
      !_|_|
     _|_|_i
    !_|_|
   _|_| *
  !_|    \
 _|       \_______ This vertical is where you first get
!                  all 5 balloons connected into a circle
                   if you are making a tube.
To make a spiral tube:
- Twist the knot of balloon 1 (or a 1" bubble next to the knot) into a twist located 9" (or 10") from the knot on balloon 2,
- Twist the knot of balloon 2 into a twist located 9" from the knot on bn. 3,
- Twist the knot of balloon 3 into a twist located 9" from the knot on bn. 4,
- Twist the knot of balloon 4 into a twist located 9" from the knot on bn. 5,
- Twist the knot of balloon 5 into a twist located 9" from the knot on bn. 1.
- Twist connect the balloons every 3" so that they form connected helices of "L's" with a twist at each right angle.
- Twist up the spiral tube by going around CW for right hand or CCW for a left hand spiral, as if you were knitting the sleeve on a sweater out of successive neighboring pairs of balloons. When you use up each balloon, twist in a new one at the last twist you made before you got to the end, or tie the new balloon to the end of the old one.
To vary tube diameter, increase the length of the bubbles. To really change the tube diameter, twist more balloons into the centers of the long bubbles and keep saying "knit one, pearl two..." :-)
Royal and Patty Sorell use a weaving technique they call Gymping (remember Gymp in summer camp?) It's similar to Marvin Hardy's weaving with one major difference, you twist each balloon to the one next to it and constantly create tubes that spiral up. Kind of like those old knitting tubes. Each section is a tube of a different diameter. With weaving and our Gymp-ing methods, the key is when you start, use all separate colors so you can get the pattern down and understand what the balloons are doing. It's easy once you get the hang of it!
I have done a LOT of weaving of clothing for various costumes. (Wedding Dress for IBAC, Belle Dress from Beauty and the Beast for Halloween, Tuxedo for a Bridal Show....) As with any clothing, I suggest weaving it on the person directly. It insures a better fit. If you're weaving it for yourself, try to get someone else to weave it around anyway - it will still work better than trying to weave free-form.
For a vest. I start at the top, and work down. Start by forming the armholes and back of the neck with single balloons, and connect across the top of the shoulder. You'll want to connect across the front of the neck too, for the purpose of shaping. But, this balloon will be removed later, so make sure it's either a separate balloon, or that it's really well tied off. Create the "V" with two 'spoke' balloons. Using uninflated 260's to hold the front together after you weave a row will help with the shaping - just cut them out when you're done.
Tie on the rest of your "spoke" balloons across the shoulder and around the armholes. Then, start weaving! For me, the hardest part of weaving clothing is the inital structure. Once I have that set up, I can do anything.
The 'Eyes' Have It: Miscellaneous Eyeball Methods
To add white eyeballs try this: make two 1-inch bubbles with a white balloon. Pop-off and toss the rest of the balloon. Tie a knot in the remainder so the air doesn't escape, tie the two ends together, so the two bubbles are lock-twisted, and now add them to your creation where the eyes should go.
Use a yo-yo as the eyes. This gives a great eye-type look because the centers tuck in to form a pupil on each side. The groove that runs around the edge holds the crest balloon nicely! Also, you can put pieces of colored balloons, small round bubbles or something else in the dimples to make different types of eyes.
My favorite thing I picked up from T. Myers was using two small super balls in a clear heart or clear 260Q to make googley eyes. Google eyes with inserted superballs (or balloon balls) look best if you unwrap the clear latex cocoon from them after insertion.
Make a black balloon ball (just like you would make a pregnant poodle, but you detach it). Then you put the black ball into a blue balloon, but you don't push it all the way in; leave a small black circle showing. Detach it. Now you put it into a white balloon leaving the black, and some of the blue showing. Detach it. Voila! A very realistic eyeball!
Make a small black bubble with a tail of uninflated balloon on it and place it into the center of a tulip twist in a white balloon. You can also use this to make a snout with a black nose on the end. We can call it a black olive twist. (The green olive/twist is for a martini ;-)
Marvin's eyes: made from bee bodies with the ends cut off after inflating (in Pioneers' 321 book).
Inflate a 321 as you would to make an apple. Sqeeze a bubble into the colored tip (aka poodle tail). Tie a knot at the base of the small bubble so the air will stay in it. Now do your apple twist. Roll the apple toward the tip. The bubble will rest inside the end of the 'apple'. I think this makes a great nose or eyeball, depending on how it's used. The closest I've come to Pooh so far has used this kind of nose. I've tried a couple of other things with it too. You can attach it to a round balloon to get a big face with a snout, or you can make a standard teddy bear with this nose in the middle of the face. If you twist the little bubble in half before pushing it into the apple, you work it off to one side and you have a couple of nostrils for the snout of some animal. Actually, if you want a little wheel for say a carriage or lawnmower, this will give a little wheel and have a hub.
OK, how about making one of these eyes, stuffing it into a transparent balloon, peeling off the encapsulating layer of latex, and then twisting the balloon into a "seeing eye dog!" :-) :-)
How to tear apart a pencil balloon
- This is the technique Marvin Hardy taught at IBAC for tearing apart a fully inflated 260
so you end up with two pieces and you're holding onto the torn ends.
When you try to tear something, most people just move their hands a couple of inches apart, as if tearing a piece of paper. This limits the amount of force that you are putting on the object, because you are subconsciously trying not to let your hands fly apart when the object rips.
Instead, do it this way: Quickly pull as hard as you can while thinking about spreading your hands, elbows and arms as far apart as possible (don't worry - your hands won't go flying off your wrists!) Get your shoulder muscles and the momentum of your moving arms into it.
Marvin said it's a martial arts thing - like the difference between holding up your hand and asking someone to punch it, and then on the second attempt, asking them to punch THROUGH your hand. The latter punch will always be more forceful.
I had lots of trouble with this myself until Marvin told us all why. Since then, it has worked for me every time and I no longer hesitate to do it. Additionally, if you make a twist and then break the balloon apart at the twist, the air can be released without a loud popping noise. This is good for when you don't want to disturb others, when you make a mistake or when the balloon has a hole in it.
- Arleenie and Yummy's method
Say for instance you have a fully inflated green 260 you want to split into equal halves for palm tree fronds. To each side of the halfway point where you want to pop it, make a small bubble to fit in the palm of your hand. Leave some air in the center bubble to make the popping easier if you want.A B C D ____________ ____ _______ ____ ______________ >(____________)(____)(___!___)(____)(______________)== / ^ \ / middle \ / of 260 \ / \ hold this hold this bubble in palm bubble in palm of your left hand of your right hand make sure you tightly hold the twists at points A and D when the popped part deflates; it's your fingers that stop the deflation there.Stick your thumbs in the middle part and hold them against your index fingers and with a quick 'snap' pull the balloon apart. If you put your thumbnails right up against each other, dig them in and yank them apart quickly, it's a snap. It pops easily, and you really don't have to pull too hard for it to work. The twists on either side will keep the two separated parts from deflating. Immediately after snapping it apart, pinch or hold tightly at points A and D and let the bubbles deflate. If it makes you feel more secure, you can take the part of balloon left between points A and B or points C and D and wrap it around a finger once or twice while you knot the now separated ends of whichever side you didn't wrap.
The idea is basically the same as for a pop twist, but you don't have to go to the trouble of making ear twists. Like anything else, it takes practice. After you do it enough times, you'll get to where you skip the A-B-C-D twist and just go for the middle and snap! You do not have to have any bubbles for this to work - just pinch the balloon between your fingers or finger and palm of each hand to prevent any air from escaping. I looks really COOL !!!! and I always get ooooohs because it looks like you did something great! Plus you get a nice POP for extra drama (you don't get the pop if you just twist and pull the balloon apart the Marvin Hardy way). It is really fun to hand one of the inflated halves of the balloon to someone and ask them to hold it. Of course, they can never grab it in time and it deflates leaving you with a great opportunity for humor.
- I showed Tom Myers the technique referred to in the paragraphs above and he shook his head saying "No... like this" as he showed me a refined version of the method, making it ABSOLUTELY NO EFFORT AT ALL to break the balloon in half. I was so surprised when I first did it his way that I almost burst out laughing. He perfected the technique for a trick where he breaks the balloon in two behind his back. Anyway, here's the trick: Balloon inflated tight, not burped or soft; grip the balloon with fingers over, index fingers side by side and touching each other. Then as you press your thumbs in (squeezing the balloon against your index fingers) move them apart, letting the friction between the balloon and your thumbs stretch the balloon wall lengthwise (and here's the trick) until it is fully taut and you exhaust its ductility. Then like magic the balloon is just two pieces which don't even leak any air because you've got the broken ends pinched off. It is simply amazing.
- I do a trick that Tom Myers showed me; one balloon behind your back passes _thru_ your body, up both sides to your head, then shoots off in 2 directions... I think it's described in his "Giant Tazmanian Man-eating Devil" book.
Tools for cutting a pencil balloon
- If you are still having trouble with tearing apart a pencil balloon, Marvin sells a neat little belt-hook-mounted razor-blade holder that protects the blade but allows you to slide a balloon twist down into the holder to slice it in half, cut nozzles off, etc. It's called a Magic Cutter. When you get comfortable using this tool, it is incredibly slick, and you don't even have to look down at it to use it. One note: You do need to be careful when using it though - the plastic razor blade holder (actually one of those plastic letter openers with a tiny, protected razor blade set in at an angle) has a pointed end which sticks up. Though it's to be used for popping bubbles, the point is easy to forget about and easy to scrape your arm against (which I promptly did - Ouch!). I think I am going to shorten the pointy part on mine, and wear it closer to my belt buckle than to my right side so I don't injure myself again.
- I was trying to decide what would be best to use, when I found a coupon clipper in the food section at Pic-n-Save. It's off-white, uses a razor blade to cut BUT the passage is too small for even the smallest fingers, though a balloon twist will fit nicely. It's handle is a closed circle, so I'm able to tie ribbon to it and hook it to my apron, or costume easily. The blade is also replaceable. For only 69 cents it's a bargain and parents think it's a riot that I use it. I'm trying to work out a coupon clipping routine to go with it. There's GOT to be something funny there, I just KNOW IT.
- I use my hands and/or teeth.
- I have a little pair of sharp pointed Fiskar scissors that I use. My balloon apron has a little pocket made just the right size to allow the handles to stick out enough to grab them.
- I use small children's scissors (good quality ones) which have brightly colored handles. I slip one of these in my shirt pocket and have it close at hand all the time. Works great. I use a toenail clipper for popping and trimming.
- I use the small Fiskars brand scissors that are sold as kids' scissors. The tips are not needle-sharp and they are small and light. I use a coiled key chain cord and have had zero trouble with them.
- Unlike my friend Ken Stilman "Flash", I don't like wearing gloves when
twisting balloons. (They drive me nuts!) So when I need to remove or shorten a piece of
balloon I use scissors. The drawbacks to scissors are:
- Size-weight-bulk, more to lug around
- Where to put them for quick access
- Not losing them. (I lost one pair leaving it behind at a table I worked in a restaurant, and another I must have just dropped somewhere.)
- Not getting poked by the sharp end when you're moving fast, reaching for other things.
- Some solutions I've found useful:
- To cut down on weight & bulk I switched to a small pair of folding scissors. The first brand I bought (commonly sold at fabric stores) worked, but after a while the "chrome" started wearing through (looked bad) and peeling (cut fingers). My sister Barbara (who performs as "Miss Bubba") had a set she got from Fuller Brush Co. back east. They were great, but not available here in CA. There is a brand sold with camping supplies at sporting goods stores, stamped "made in USA" that are excellent.
- For easy balloon access I work wearing a multi-pocket/pouch belt, but the little scissors tended to get lost in the pockets. So, I use a key chain leash (a plastic coil like a phone cord with a key ring at one end and a clip at the other) with the scissors on the keyring and the clip attached to a "D" ring on my belt. Normally I drop the scissors into a side pocket, but if I'm moving fast I can just drop them and let them dangle from the belt. (And I don't loose them anymore)
- These scissors come with needle sharp points that can easily damage fingers & balloons (especially dangling from a leash!) What I did was open the scissors and round off the point on one side with a grinder, (you could use file if no grinder available) and then ground the point on the other leg(?) shorter, at an angle(NOT tapering the whole leg). So that it still has a point, but when the scissors are closed, the leg with the point is hidden behind the longer, rounded (safe) leg. The tension of the scissors should hold them closed. This way, the scissors are handy, you don't loose them, they are safe (rounded tip only, exposed), and you can still open them to use the point if you need to pop a bubble. This works well for me, and when I demonstrated it at a COAI convention workshop it went over well. P.S. I've made a few before, for friends, and they make great, inexpensive, gifts for any other balloon twisters in your life.
General Twisting Tips
Don't be limited by the belief that the length of one balloon makes a difference. You can add another balloon anyplace there is a knot or a twist. If you run out of balloon before you run out of creativity, deflate the balloon to the last twist, tie a knot, add another balloon, and continue. Two 350Q's make a 3-100.
There have been three hurdles I have had to overcome so far.
- I limited myself to one balloon figures for about three years. It was a real awakening to realize that I could use more than one balloon.
- I thought I had to use the whole balloon. So many figures are much better using only a part of the balloon, like the frog, ear rings and finger ring, and wrist corsage or lapel flower.
- I thought I had to start at the front - nose or head to make animal figures. The Unicorn, the Rhino, and a number of other figures are so much better if you start at the tail.
Mike Decker says to use that one extra balloon, it will make the customers seek you out among all the other Balloon Benders
Let your imagination and your creativity fly. They are the only limitations you have.
A wise man once said, "I can make 300 balloon animals - all of them dogs." There's some truth to this statement. Elongate the neck, and you've got a giraffe. Twist a pair of bubbles in the middle of the giraffe, & you've got a camel. Make a dog with long ears, short front legs & longer back legs, stuff the forelegs into the back legs, & you've got a rabbit sitting down. You're imagination can take it from there.
It is the smoothness of the performance that counts. If people are entertained by your performance, whether the figure you make is basic or detailed, the figure you end up with will not matter.
Minimizing the deflation rate
When twisting, if you work with a tight balloon and keep bubbles as tight as possible the figure looks better, longer.
I find that greater pressure in any balloon does give it better longevity. However, they are also more prone to pop in the hands of ruffians, leading to higher attrition rates.
There are so many variables in dealing with balloons (thickness, imperfections,
temperature, pressure, etc.) that unless you have a test lab to work with, all you have
are *perceived* variations and conjecture. O.K., I perceive what appears to be a faster
rate of deflation in balloons with more twists than in balloons with few or no twists.
Scratch theory #1 that the balloon is stretched thinner at the twists. Hum... O.K., how
about "twisting bubbles tends to increase pressure in that area/ bubble, thereby
increasing rate of deflation due to combination of membrane stretched thinner (in body of
bubble, away from twist), and increased pressure." Practical experience: bear ears
tend to deflate faster than sides of head (due to higher pressure in tighter twist?) Or is
it just that the ears *appear* to deflate faster due to relatively smaller size/ volume?
Also Rate of deflation appears to vary. Ever notice how most sculptures tend to *droop*
relatively quickly, and then stay slumped for far longer than the initial rate of
deflation would indicate. I conjecture that as gas escapes, the balloon contracts,
membrane/ walls thicken and reduce rate of deflation. Or, perhaps as the outer surface of
the lava flow cools first, the still molten core drains away leaving a long hollow
tube...oops wrong channel.
Insight into soft and hard bubbles? O.K.... when they are soft the rubber/ color is
thicker/ darker than hard/ pressurized/ stretched-thin bubbles, therefore making them
harder to *insight* into. (sorry, couldn't resist.)
You can make a specific bubble (any bubble, not just ear twists) take more abuse by giving it more rubber. Twist the bubble larger than you need then untwist just enough to squeeze some air out of the bubble. The idea is to get the same size bubble with more rubber.
I'm not Looking!
Here's a tip that Marvin shared at IBAC - practice twisting figures blindfolded - entirely by feel. Then you won't have to watch what you're doing and can always be making eye contact with your audience....
I recommend that you practice making balloon figures blindfolded - not blindfolded balloon figures. Once you can make a good figure without looking at hour hands, you will be able to maintain constant eye contact with your audience. When you do that, each figure seems to appear as if by magic.
Rehearse everything you do in front of a mirror. When you can perform a trick well enough to fool the person in the mirror you are ready to do it for the public.
I like to watch my audience more than my twisting, so I usually inflate without looking, by feel. An easy measurement for sizes is using your hands, fingers etc. for different measurements, for example, the width of my fist, across the palm is about 4". If I hold the end of the uninflated balloon in my left hand, in a fist, with the tip just at the left (little finger) side and inflate it, I know I will wind up with a 4" uninflated tail. To the audience it looks as though I am stretching the balloon, while I am really just moving my hand away as I blow. I can feel the pressure change as the inflated section approaches the fist. Want 7"? For me, width of fist with thumb extended.
Was it Roger Seigel who in his book shows you how to blow up two 260's at once, tie one handed knots, and then twist a complete poodle in each hand without ever bringing your hands together? Now that's impressive!
I heard about one guy who twisted behind his back. I have done it several times and the kids get a kick out of it!
Ken "Flash" Stillman and I did a routine for the instructor's night show at the W.R.C.A. convention last November. Competing twisting balloons, inside a laundry bag, blindfolded, with thumb-cuffs on. Ken won.
Using Color
Sometimes you see a twister make a multi-balloon sculpture, and because of the colors he chooses (or just pulls out of his bag without looking), it ends up looking very unappealing - sometimes even black, blue and purple like a bruise, or worse. To avoid this scenario, here are some tips for using balloon colors to your advantage.
First, some notes on color from the book "Design" by Gary Wells & Qualatex:
Seasonal colors:
- Spring - pastel colors (pink, lavender)
- Summer - bright colors (yellow, red)
- Autumn - warm colors (orange, brown)
- Winter - cool colors (blue, violet)
warm colors (red, yellow) - advance or appear closer.
cool colors (blue, green) - recede or appear farther away.
colors can affect:
- emotional response
- red - passion
- green - envy
- I'd like the rest of these so if you know them please post!
- state of mind (yellow - joy)
- mood (blue - peace)
The Color Wheel consists of the 12 pure colors:
                               YELLOW
             Yellow-orange                 Yellow-green

                                  1
               Orange         3       3        Green
                           2             2
                                 \|/
          Orange-Red      3     - o -     3      Blue-green
                                 /|\
                           1             1
                  RED         3       3        BLUE
                                  2

                Red-violet                  Blue-violet
                                Violet
Primary colors on the color wheel are labeled with a number 1.
They are RED, YELLOW, and BLUE.
Secondary colors on the color wheel are labeled with a number 2.
They are created by mixing the neighboring Primary colors.
They are Green, Violet, and Orange.
Intermediate colors on the color wheel are labeled with a number 3.
They are created by mixing the neighboring Primary and Secondary colors.
They are Yellow-green, Blue-green, Blue-violet, Red-violet, Orange- Red, and
Yellow-orange.
Definitions:
- Hues - Pure colors from the color wheel
- Tint - Hue + white ( pink = red + white )
- Tone - Hue + gray ( rose = red + gray )
- Shade - Hue + black ( maroon = red + black )
Thus a "tint" color wheel could be constructed, as could a "tone" or "shade" color wheel.
Color Harmonies - how to use the color wheels:
Monochromatic Color Harmony - One hue + its tints, tones and shades
                               (white & black are the ends of this spectrum)
Analogous Color Harmony     - Any 3 hues that lie side by side
                               on the color wheel
Complimentary Color Harmony - Any 2 hues that lie directly opposite
                               on the color wheel
Triadic Color Harmony       - Any 3 hues that lie equidistant
                               on the color wheel
For the last three color harmony definitions, the word "hue" could be replaced by the word "tint," "tone" or "shade."
Qualatex offers round balloons in many colors. Unfortunately, the 260Q's and 350Q's are only available in:
Transparent colors - Qualatex Jewel-Tones: Diamond Clear,
                                            Emerald Green,
                                            Sapphire (Medium) Blue,
                                            Quartz Purple,
                                            Amethyst Violet,
                                            Ruby Red,
                                            Citrine Yellow,
 Transparent colors -  Q. Deep Jewel-Tones: Onyx Black,
                                            Cocoa Brown
 Opaque colors  - Qualatex Standard Colors: Orange,
                                            Pink,
                                            Pale (Light) Blue,
                                            White
                                            Grey
Clear, White and Black aren't colors, Pink and Pale Blue are "tints," and I don't know where Brown fits in this scheme. Diamond Clear, Amethyst Violet, Cocoa Brown and Grey are not in the assortment bags. If you buy assortment bags but then try to hand-sort the balloons by colors, it can be hard to tell what the darker colors are (i.e. green, violet and black) without inflating them. One solution is to stretch them across the face of a turned on flashlight and the color shines through. A really easy way to sort the darker 260's is to take them into fairly bright natural light, and sort them while wearing "Blue Blocker" sunglasses. The glasses change the light patterns enough that you can see a very real difference between the colors.
After the long, but successful, campaign to get a grey 260, Pioneer Balloon began production of Grey 260Q's. This has led to yet another campaign to get additional 260 colors into production. Here is the status of these efforts:
- Pearl Tone 260's.
- Pioneer says that they can not make a pearl tone 260 that meets their quality standards. Pearl tone latex is created by adding crushed mica to the latex. This process makes the latex more brittle, and less twistable. If you want to see proof of this, you have to look no further than at Tilly Pearl 130's. So, for now, there is no real chance of getting pearl 260's.
- Gold/Silver/Metallic 260's
- Metallic latex is made in the same way as pearl latex. See above.
- Agate 260's.
- Agate balloons are made by dipping the mold into latex twice. A double dipped balloon can not be inflated very easily, much less twisted. Proof: A 321 is made by dipping just the tip of the balloon into the latex twice. Imagine trying to twist a balloon made like this. Therefore, this is not a likely new product.
- Neon Balloons / Entirely New Latex Colors:
- Since the grey campaign was a success, many people have asked about getting additional new colors made. This is the process through which a new color gets approved: Convince Pioneer that it will sell. However, this is not an easy process, as the grey campaign proved. At the moment, there is no active, organized effort to get a new latex color made. Please See Below:
- New 260's in Existing Latex Colors:
- This is where the current organized efforts are focused. A representative of Pioneer balloon company has said that Pioneer would be willing to make 260's in any existing latex color, (except pearls and metallics) if a distributor would be willing to order them as an exclusive product.
Currently, there are 13 possible latex colors not available in 260's
- Standard Tones: Red, Blue, Green, Yellow, Orange
- Jewel Tones: Burgundy
- Fashion Tones: Turquoise, Wintergreen, Teal, Goldenrod, Peach, Lilac, Ivory
One popular thought is: New shaded of green.
"I always get great reactions when I make flowers with different shades of green in
flower stems!"
As you may know, Pioneer Balloon is consolidating their manufacturing operations in 1996. As a result, they are experiencing shortages of certain products. Realistically speaking, it is pretty certain that Pioneer would not begin production on any additional products until they are caught up on their existing products. So, don't expect the new colors to pop up any time soon.
The Qualatex Color Wheel consists of the following pure colors:
                           CITRINE YELLOW
             xxxxxx-xxxxxx                 xxxxxx-xxxxx

                                  1
               Orange         3       3        Emerald Green
                           2             2
                                 \|/
          xxxxxx-xxx      3     - o -     3      xxxx-xxxxx
                                 /|\
                           1             1
             RUBY RED         3       3        SAPPHIRE BLUE
                                  2

           Amethyst-Violet                  xxxx-xxxxxx
                            Quartz Purple
Here are the Color Harmony permutations possible with 260Q's and 350Q's:
 Monochromatic Color Harmony - Sapphire Blue + Pale Blue (+ White
+/or Black)
                               Ruby Red + Pink (+ White +/or Black)

 Analogous Color Harmony     - Ruby Red + Amethyst Violet + Quartz
Purple

 Complimentary Color Harmony - Citrine Yellow + Quartz Purple,
                               Emerald Green + Ruby Red,
                               Sapphire Blue + Orange,

 Triadic Color Harmony       - Citrine Yellow + Ruby Red + Sapphire
Blue,
                               Orange + Emerald Green + Quartz Purple,
Pink + Pale Blue + White 260Q's also look good together, though they don't seem to fit the scheme listed here. It must be a pastel thing... :-)
Additional colors can be created by Double Stuffing.
Proportion for color use:
- 65% lightest color (usually on perimeter)
- 25% middle color (in between perimeter and focal point)
- 10% darkest color (for focal point)
Keeping in mind ROY-G-BIV (a mnemonic device for remembering all the colors of the light spectrum in order: red, orange, yellow, green, blue, indigo, violet) when making balloon sculptures, I think of a color line - a belt of color that changes one strip at a time:
Onyx Black, Grey, Diamond Clear, White, Pale Blue, Sapphire Blue, Emerald Green, Citrine Yellow, Orange, Ruby Red, Pink, Amethyst Violet, Quartz Purple, and Cocoa Brown.
I put Onyx Black, Grey, Diamond clear and White on one end, because they are what I would call non-colors. They are either all colors or the absence of colors, depending on whether or not you are talking about light. I put Cocoa Brown after Quartz Purple, because brown has some red qualities, and it is, also a good overlap point on our way back to Onyx Black.
On my color line, neighboring colors look good together.
However, a few other color combos also work. Any of these combos look good:
Quartz Purple + Amethyst Violet + Orange + Emerald Green + Sapphire Blue.
My personal favorite is Ruby Red + White (peppermint)
I mostly use brown as an accent: It's the teddy bear holding on to the heart, or the coconut on an all green teensy, one-balloon palm tree. it's a muscled black man sitting on the hat or swinging from the vine on a bachelorette's hat, or Mini-Taz swinging from a vine as well.
Combining colors is easy if you know what colors make what other colors when you mix
them. Two Primary Colors create a Secondary Color:
RED + BLUE = Violet, BLUE + YELLOW = Green, and RED + YELLOW = Orange.
You can combine colors that are not quite right if you remember my color line sequence and keep unlike colors apart on the same sculpture. For example, blue and orange don't look great together, because they have nothing that draws them together; no common color that gets you from one to the other in one easy step. But if you remember, how to get from blue to orange, you can make a pretty good hat. Maybe, start with blue as the base hat, allow a feeler of green and a feeler of yellow to extend upwards, curving this way and that. At the top of the feelers, you can now put an orange spiral, that looks like electricity connecting two posts. All the neighboring colors match, so nothing clashes.
Brown should only be used as an occasional accent. After all, brown, black and green look good together, but they hardly make a festive hat, so you shouldn't try that one.
Ask yourself what you are trying to accomplish. Think of a theme, and the colors may well follow:
- Red-white-blue if you feel patriotic.
- Rasta colors--green-yellow-red-black.
- Mexican national colors--red-white-green.
- Channukkah colors are white-blue(sapphire).
- Christmas--red-green-yellow.
- Halloween--black-orange.
- Thanksgiving--avoid brown, but use lots or red-yellow-orange.
- Easter--purple-pink-white-red yellow (bright cheery colors).
- black-white-red (I call them the trashy lingerie colors - its a color combo that people either love or hate)
- school colors; if someone loves their alma mater they may want school colors, even if they aren't perfect together.
- Realistic colors. Younger kids have had the first five or so years of their life having certain truths drilled into them, so they can begin to identify and classify the world around them. Colors are a popular topic. They've been told repeatedly, tigers are orange with black stripes, elephants are gray, blue jays are...blue. A balloon is a wonderful, brightly colored thing, but for some kids, it'll just be even better if the alligator really is green. Any white dog you can twist will be part-dalmation if you add black spots (or a cow, depending on how good your dog-shape turns out...)
What about the kid who asks for the pink, light blue, orange and black hat? If you're careful, you can combine these so that they work. I usually do this: Lt blue hat, w/a pink fishing pole, a black fishing line and an orange goldfish. the kids love it because all the colors they demanded are together on the same hat, and the parents are happy because you still managed to make all the colors go together. With a little ingenuity and my color line you can make things go well together that don't normally go well together, because you know which colors need to keep separate. Give me a list of colors and I'll give you a way to combine them effectively.
A tool for color design for balloon decorators:
I've found the Qualatex Balloon Network Color Kit to be very effective. We have one for
each size that we frequently use (5-, 11-, 16-inch; and 3 foot). The only drawback is that
it's tempting to use the sample if the client wants to see a certain color balloon
inflated... then you'll need to replace it. The QBN Color Kit is a great on-site tool when
the client has not selected a color scheme. It would be great to have a kit like this for
imprint balloons from Pioneer.
Double Stuffing
Color Combination
The process of putting one color inside of another to get a particular color is commonly called "double stuffing" in the balloon decorating side of the industry and has been used very successfully with round balloons for some time. I use it a lot with 260Qs for a variety of purposes besides the color. It often makes it possible to match a particular wedding color for instance. (This could be the solution to those bags of lesser quality balloons.) Following are some hints and then some color combinations that work well.
Try the following combinations using the current 260Q colors:
        Inside                  Outside                   Result
        -------------           ---------------           ----------------
        Ruby Red                Amethyst Violet         = Cranberry
        Orange                  Amethyst Violet         = Watermelon
        Orange                  Citrine Yellow          = Golden Orange
        Ruby Red                Citrine Yellow          = Yellow Orange
        Pink                    Citrine Yellow          = Sunshine Yellow?
        Light BLue              Citrine Yellow          = Neon Green
        Onyx Black              Emerald Green           = Chrome Green
        Onyx Black              Sapphire Blue           = Chrome Blue
        Onyx Black              Quartz Purple           = Chrome Purple
        Onyx Black              Clear                   = Chrome Grey
        Onyx Black              Ruby Red                = Dark Copper
                                                          or Metallic Maroon
        Pink                    Amethyst Violet         = Hot Pink
        Ruby Red                Sapphire Blue           = Navy?
        Sapphire Blue           Amethyst Violet         = Purple Taffeta
The color mix isn't always great though; for example, black and white do not create gray, but a pearlized black or a cloudy looking white. The clear colors (Jewel tones) mix better than the translucent colors (Standard colors).
But, if you've ever wished that some of the jewel tones were more opaque, then try stuffing a white in them. The resulting colors are much more intense (an added plus) as well now being opaque.
I hope that some of you are already seeing the possibilities of metallic colors for motorcycles, rockets, spaceships, guns, swords, etc.
Advanced Techniques
You can also use any color inside of any color for two-colored figures. When inflating, blow up a one inch bubble in the outside balloon, then inflate the inner balloon. For instance put a white 260Q inside of a black 260Q and make a figure as you would normally do. As you twist the bear, squeeze the air in the black, so as to leave an air pocket between the inner and outer balloons. Now, with the greatest of care take a needle and carefully prick the outside balloon. It's fairly easy to do at one of the wrinkles formed at a twist. (I've gotten to where I can pinch it with my fingernails). When you prick the outside balloon it will immediately pull away from twist to twist, leaving you with a white segment - leg, neck, etc. while the rest of the balloon remains black.
For example, make a teddy bear and break the outside ear bubbles, the nose, the top & sides of the head, the neck, the belly, and the tail bubbles to create an awesome panda bear.
Stuff a 130 inside a clear 260. Inflation is harder because you have to inflate the 260 before the 130 without letting the 260 deflate. But, try making a poodle inside of a clear 260 (the famous "poodle under glass") Use a white 130 with the clear 260 and it's an X-ray of the poodle. Any other color 130 inside the clear and the poodle is wearing a space suit.
I have made light sabers with a yellow outside and a black or brown inside. The darker color for the handle looks cool.
Multi-colored figures take a bit longer, but they are awesome. I use them a lot in balloon art exhibits and private parties when there is time to entertain rather than just make figures. The possibilities are endless.
Granted the time spent stuffing one balloon into the next is prohibitive to mass balloon work, but when ever you're looking to add a bit of flair and creativity to what you are doing, double stuffing is certainly worth trying.
Stuffing Tools
Q: I have a quick question on double stuffing. I've tried several times and have the darndest time getting the second balloon inside the first! Does anyone have any suggestions, tricks, or secrets?
A: I'm sure that anything thin, round, smooth and fairly sturdy can be used as a stuffing tool. Thread the straw inside of one balloon and stretch the balloon out so that the lip end hooks over the open end of the straw. Insert the balloon and straw inside of the second balloon. Grasp both balloons together at the end of the straw and hold them while removing the straw from the inner balloon. Grasp the lip end of the outer balloon and stretch it out until the two lip ends are together. After two or three tries you will be able to do this quickly. To put 130's in a 260 you need only drop the 130 in. To inflate a double stuffed balloon you do need a pump and they are definitely harder to twist.
- Balloon Straws
- There is a heavy plastic balloon straw that works well for double stuffing the 260's or the 350's. Most balloon distributors have a variety of balloon straws in their inventory. Balloon straws are made of a plastic material and are stiff enough to work well to put one 260Q inside of another. Use a thin straw that is several inches longer than the uninflated 260Q. Otherwise you can also use an extra long straw from the local convenience store, and slit it to allow you to put a 260 in it.
- Chop Sticks
- Pat-in-the-Hat uses a round, very smooth chopstick. If you go the chop-stick/thin wooden dowel route, don't use the cheap ones you get for free. (too many splinters, pointy parts are bad for the balloon!)
- Knitting Needle
- I use a knitting needle to double stuff. Place the inside balloon on the needle and then push it into the outside balloon. It works well and is quite fast.
- If you use a knitting needle, I think you'd want to file the point down a bit first.
- Powder
- Q: Do you powder the outside of the inner balloon before stuffing? If so, do you use
baby powder, talc, cornstarch, what?
A: Others have suggested powdering the balloons a bit, but for me it's easy. It's mostly a matter of getting it started.
- Soda Straws
- I have tried using a soda straw but someone must have a better way!
A 'balloon straw' and a 'soda straw are two completely different animals, just in case you didn't already know.
PART7
Decorating 260 Balloon Sculptures
Markers and Paint Pens
Additions: Glow-in-the-dark
Additions: Uninflated Balloon Bits
Additions: Miscellaneous
Markers and Paint Pens
To draw or not to draw: YES!
- When I can make a sculpture and add all necessary details that I want it to have, then I'm a happy camper. I love the pure balloon aspect to ballooning, but the artist in me can never resist mixing mediums. When I add a couple of pen marks here for eyebrows or a superball there to make the whole hat vibrate, then I've added the finishing touches that my artistic creation needs to make it really mine. A good multi-balloon sculpture needs all the details. My multi balloon D. Duck just wouldn't be complete if his beak and feet didn't have the details.
- Genies and tigers really need the markings. A three year old informed me that bunnies should have teeth, so I always give the bunnies teeth. I get a lot of "oh, how cute!"s with that. Always listen to three-year-olds.
- I don't use the pen for a crutch but I do feel that they are a necessity to my style of art. I love seeing families' faces when the elephant has googly eyes or when the diver who is falling off the high dive is grimacing at the fall ahead of him.
- If you can't make it look like what you want it to be without drawing on it then you are not making it as well as you could. Nonsense! Do you build a house without painting it? Do you draw a painting and not color it in? Do you buy ceramics and not paint them?
- I use Sharpies. I have every color that is available and I love to draw on my balloons. I was not - I repeat NOT an experienced artist when I began doing balloons, but I decided when I began that I would draw on my balloons so I started paying close attention to cartoons, t-shirt drawings, etc. and got my ideas for the different types of eyes that I do. I practiced my art work as much as I practiced my balloon art. I can't tell you how many times people say to me - "I just love your balloons. They are so different. I like the eyes and the stripes and other features that you add, they make the balloon." I did a school festival Friday night and had a line all night long. I drew on every balloon that needed it and got no complaints from people waiting. Sharpies have my vote! I just wish they had pink! Marks-A-Lot has come out with a pack of pink, light green, and orange (there might be another color).
- The added bonus of permanent markers (as opposed to water based ones) is that
- the decoration can be handled without the ink coming off,
- they survive deflation. Ink even looks good on a deflated balloon, like it was printed there in miniature.
This is a good effect for things that take a while to draw, like the bee-body mobile-phone. Blow up, do art-work, deflate and store. "Brrrt-brrrt, brrrt-brrrt. Gosh who could that be?" Puff! One instant phone. "Hello, [insert appropriate joke]". You can give the mobile-phone away but warn people not to use them while they're driving.
- Draw a worm and leaves on a balloon apple. Give the worm a big smile, though.
- What do you do with your colored sharpie's? Whenever I use one I normally use black
(simple eyes, noses, ears) and different colors simply wouldn't look as good. What am I
missing?
- I use orange, brown, & black for stripes on yellow cats to turn them into tigers(yellow & black on white for albino). Blue is for Tweety eyes. Red lips go well on the mermaid. Green and purple are the most seldom used, but I have made a white cat w/these colors for stripes once. The more I use them, the more uses I find for the other colors.
- On any sculptures with two birds, etc., kissing, use a black marker to make eyes... open, shut, or one of each, depending on how you like to kiss :-) then run a red marker around at the twist between the two heads for lips. (Yes, I know birds don't have lips but...) A variation of this which also works well, if you're doing the birds for a couple with some distinguishing characteristics (glasses, red hair, things like that), use your markers to make the birds look (roughly) like the couple.
- My 5-year-old sons have met many a 5-year-old girl delivering all manner of balloon animals. This is the best reason I know for making balloon animals. Now if I could just convince them that they're supposed to ask for phone numbers... Here's a clever "in-character" way that works for me - have them write their numbers on an inflated 260 with your Sharpie, then deflate it and put it in your tip pocket for safe keeping :-)
To draw or not to draw: SOMETIMES!
- Do you "Sharpie"??? When I first learned the balloon twisting art I was lucky enough to find a mentor who had a great impact on how my twisting evolved. This man taught me to always be as professional as I could and to try and make my creations as well as I could. He had two very hard and fast rules as a twister. (1) It is better to do a few creations very well than to do many creations poorly. (2) If you can't make it look like what you want it to be without drawing on it then you are not making it as well as you could. I have since learned the joy of using a "Sharpie" and do add to many of my twistings. But I still hear the rules told to me over and over again. Most of my twisting is without the "Sharpie" My biggest reason not to has always been a time crunch. When you have 25-30 kids in the line, marking takes valuable time. In a more relaxed environment I will decorate my creations with the "Sharpie".
- I like to use a marker, but only in slow-paced or informal twisting situations. I pack a black Sharpie for general use, and a red for dog's tongue, rabbit's eyes, etc. (Unfortunately, markers add too much time to most "commando twisting" situations.) I think the purpose of the marker is not to take a balloon blob and try to make it look like an animal, but rather to take an animal figure and give it a little added dimension. You can twist all the 260 horses you want, but until you've seen a kid smile when you draw horseshoes on the bottom of its feet (credit for that idea to my son), you haven't squeezed every drop of fun out of it.
- My solution is simple: only draw on the balloon when the kid looks at it and says "this doesn't look anything like a 'blank'." I then tell him/ her, "okay, let me give your imagination a boost." Presto! A few scratches and he can see the animal.
- I love to make the tiger, and with the proper markings it is a real show stopper. But in a busy crowd it is also a line stopper as it takes a few extra moments to draw all them lines, then make sure the ink is dry.
- I use Sharpie's if I have time. We get into such varying situations, we may be able to draw on the balloons, or we may be pumping out dogs as fast as possible. I have learned how to talk while I work, to try to get some of my dumb jokes in.
- I usually carry Sharpies with me, but I rarely use them. Like others have said, sometimes there's enough time to just add a bit more detail. And of course, if you're trying to entertain, you have one more tool to play with. I've always liked trying to do the best I can without markers.
- I don't use any marking devices on the balloons, mostly because I can barely draw a straight line with a ruler. Second, I think that drawing on the balloon takes away a little from the creation itself. (This is only with my drawings; people try to figure out what those round spots are on the head, instead of appreciating a lovely fancy poodle.) I've seen lots of Sharpie work that looks good and enhances the creation. So if you can do it and it looks good, then by all means draw on that balloon!
- I try to avoid using a marker on balloons that will be given to children. However, there are a few sculptures that simply cry out for a touch of ink. In those cases, I make sure to warn the child and adult to dispose of the balloon as soon as it starts to deflate or get rid of the pieces carefully if it pops. You don't want Mom to bring Junior back to you with ink-stained clothes!
To draw or not to draw: NO!
- If I'm going to be in a busy situation, it's better to just keep the marker in a pocket somewhere. Once you do something really spiffy with it, every child wants one (a term should be developed for this, maybe "The Green Balloon Syndrome"... the balloon is always greener on the other side of the line). Make eyes on a cat, the next kid will demand you add eyes and stripes to his, the next wants eyes, stripes and claws... eyes, stripes, claws, teeth, a cute nose... etc. I save my marker mostly for private parties now.
- No matter how careful you are, you're going to end up popping a certain percentage of balloons when you draw on them. Sharpies can dry out in a particular area, even on a fresh pen, and that rough area can pop the balloon. The worst part is when your drawing pops a balloon that you've already sculpted properly, so all the work is lost. If you inflate a balloon improperly, you can make it into something else. If you pop a balloon, you have to start all over.
- My problem with markers, both paint and sharpie, is that when the balloon eventually pops, leaks, or otherwise deflates, they leave a *nasty powdery residue* that gets on the holder's hands, clothes, etc.!!! I'm a bit hesitant when distributing markered balloons, because I don't want the ink to get all over and have a parent come back (justifiably) ticked off at me.
Brand names
Sharpie
- "Sharpie" permanent markers are best for marking on light colored balloons. Water based "erasable" markers won't work because the ink "beads". The Sharpies come in different colors too.
- Sharpie has an extensive line of colors, such as orange, blue, green, red, brown, etc. They aren't available in most stores, though. Check an art supply or pen/stationery store.
- I solved some of my problem with the "sharpness" of sharpies. I tap the new marker firmly on a piece of paper to dull it a little. Don't tap too hard or it'll be fat-pen-city, just enough to dull the point When the point is dull, I use various sides of the pen... i.e. the tip for finer lines, the edges for filling in spaces and writing big, etc.
- Although for most purposes, Sharpie markers are "permanent", this is not the case on balloons. When you write on an inflated balloon, you're writing on a stretched surface. When the surface contracts, whether slowly deflating, or rapidly when popped, the ink contracts along with the surface, condenses, and comes off, like stamp pad ink.
- I personally like Sharpies. Yes, after the balloon begins to deflate, it will rub off, however; it's seldom I hear from anyone who's kept one around long enough to do so. Those that do, tend to put them up and NOT play with them. Once it's lost enough air for the marker to become chalky, the balloon tends to collapse when touched, resulting with the critter being tossed in the trash. Since I don't fully paint the entire body, there's a good chance that the marked area won't even be touched, (possibly) except for a little smudge on the fingers.
- Sanford (manufacturer of Sharpie markers) also makes two different sized broad tipped markers called "Impact" & "Hi-Impact". The tips, as well as the ink chambers are larger from one to the other.
Expo
- I gave up using a Sharpie because I always got messy. They work fine on inflated balloons, but the ink comes off all over me when the balloon deflates. Now I use Sanford brand Expo markers, designed for use with an erasable white board. They work great. I can get a packet of 8 colors in chisel-tip markers from my local office supply store.
- The basic Expo marker set includes red, blue, green, and black. Additional colors are available in the larger pack. The normal ones are large chisel point. They also make fine point markers in red, blue, green, and black.
- Try this experiment: blow up a 260, don't even bother twisting, write something in both types of marker, then put a hole in it so it deflates slowly - now rub... you'll never go back to Sharpie.
- The results of my not-quite-scientific study are now in. Sharpies smear. Expos (for dry erase boards) don't. Try 'em, you'll like 'em. They come in large chisel-tip or small round point. They stink, but hey!
- The Expo's work but the tips dries up too quickly. They also smell awful. Not good if you are inside.
- After using the EXPO markers for a few days in working situations, I think I'm swearing off markers again. The Expo's do smell funny, and they dry out very quickly. Also, markers slow me down. Since I only have a couple of balloons that REQUIRE marking, I'll carry an EXPO or two and not use them unless I must.
- My number one complaint about Expos is the smell. I've even had complaints from people trying to eat. In some cases its a catch-22. When I was going to school I actually knew folks who would drop a class because of the Expo's.
- Dud!!! In an earlier post I recommended the Expo, I recant that. I went to a show armed and loaded for bear (faces), I had two Expo's quit writing in just a few minutes. If you want to use an Expo, go for it... but keep a back up Sharpie on hand just in case.
- The REAL number one problem... they just dry out too fast. It's got nothing to do with the talc on the balloons. Almost every class, the profs would come in with special holders to keep all their EXTRA markers inverted, as well as have a few extra upside down in their pockets. Every few minutes there would be the need to switch to a 'fresh' marker. To much bother and expense if you ask me. I tend to loose my Sharpies long before they dry out on me.
Other Brands
- I like the chisel-pointed Marks-A-Lot markers better than Sharpies. The Marks-A-Lot have the ability to write thick (for coloring in) or thin (for eyes, etc). Marks-A-Lot have a drying agent with an odor between the Sharpie and the Expo.
Paint Pens/ Markers
- Q: What do you get when you cross a magic marker and a spray-paint can?
A: A "paint marker" - A "paint marker" is filled with paint and has a little metal ball inside to
help mix the paint when you shake the marker. A valve allows the paint to flow into the
wick-like tip when you depress the spring-loaded tip vertically downward against a hard
surface. When you exhaust the supply on the wick-like tip, you depress the spring-loaded
tip against a hard surface again (make sure this isn't a table-top or you will leave a
spot of paint on it) to replenish the supply. These paint markers are available in many
colors and sizes at art supply stores.
Make sure that you shake the paint marker thoroughly before you use it, ESPECIALLY the first time! Otherwise, you will wick out most of the thinner the very first time you depress the tip and your marker will be useless thereafter.
As the marker gets old, I find that I often have to pull out the wick-like tip and turn it around to get it to work well. The paint from these markers is flexible enough that it doesn't crack when the balloon flexes (unlike Liquid Paper). I have not had any problems with the balloon popping. The fine point white markers I use cost about $2-3 each.
- I found a brand of paint marker that I like! It's a Testor's (yes, the guys who make those tiny bottles of paint for plastic models) paint marker. They have a 1/2" inch diameter metal body, and more paint in them (1/3 fluid ounce) than the expensive art-supply store paint markers. They come in a bunch of colors, and they are only $2.50 each. I found them at a hobby shop and also at Menards.
- I use a white paint marker when drawing on dark colored balloons.
- If you want an alternative to markers, try a paint pen. The paint takes much longer to dry, but it just wrinkles and flakes when the balloon shrinks.
A Marker Magic Trick
- A Sharpie *pull*: If you do magic or like to appear that you do, try this. A magician's
*pull* is a device to make something seem to vanish from your hands, by pulling it swiftly
under your suit coat or vest. One common way is to simply use a piece of elastic. To do
the effect using a Sharpie marker, you will need:
- A piece of thin, round, elastic. 3 feet would be plenty, (black preferred).
- 2 safety pins
- A Sharpie marker (or other brand of choice)
Attach one end of the elastic to the cap of the marker. The easiest way is if you make a hole in the end of the cap, thread the elastic through, and tie a knot, then pull the knot back into the cap. If you use this method, you may want to have a spare cap to put on the marker for storage, to prevent drying out.
Take the other end of the elastic, and thread it through the spring loop in one of the safety pins. Pin this pin inside your jacket or open vest, just in front of and slightly below, your left arm pit.
Pin the second safety pin inside the back of the jacket about where your right shoulder blade will be. Take the end of the elastic, threaded through the first pin, and, pull the marker cap up to the first pin. Now bring the elastic across, without stretching it, and tie it to the spring loop in the second pin. Don't cut excess yet, you may want to make minor adjustments. Basic preparation is now complete.
The Move: Put on the jacket/ suit coat /vest. You should be able to reach across your body with your right hand, inside your coat, and find the pen in the cap hanging there, out of sight. If you pull on the cap, the elastic should slide through the first safety pin, which acts as a guide and stop. As you pull the pen w/cap out of your jacket, raise your left hand and grab the cap. Pull the pen out of the cap, with your right hand, do your writing, then push the pen, firmly, back into the cap (still held in the left hand). Appear to rub your hands together as you release your grip on the pen. Your hand movement should cover the elastic pulling the pen back under your coat. Wa-la!
Open hands to show pen has vanished. Note: this is only a rough description. Practice in front of a mirror. You may need to lengthen or shorten the elastic, or move the anchor points.
One drawback to this method is that you need a third hand to hold the balloon while your others are holding the pen and cap. If you have a spare cap, you can start with the pen, with spare cap on, in your shirt pocket, take it out, put the cap back into the pocket, have your hand free to hold balloon, then when finished, grab gimmicked pen cap when appearing to reach into jacket for regular pen.
Additions: Glow-in-the-dark
- Since they make so many things glow-in-the-dark, wouldn't it be cool to have some glow-in-the-dark 260 balloons! Especially around Halloween! What a difference compared to the clear or white "ghost" animals!
- Glow in the dark stickers. I've used stickers for eyes on animals. I saw an ad in a mail-order catalog for a "pen" that put that glow in the dark material on things. If you let it sit for a while it became permanent. Might be neat for balloon decorating... wow, glow in the dark eyes!
- There is a 2" long glow stick that is great to put inside poodles or other animals with a belly. They last 6-12 hours, depending on the size and the temperature of the room. The company that manufactures them has recently changed the formula, the new products do not glow as long or as bright. Thus, they are best used in a room that is fairly dark. The light from a carnival or stage lights can be too bright, and make the products appear not to glow.
- Put a glow bracelet in a sword and it is even better!
Additions: Uninflated Balloon Bits
- I use broken lengths of 260's to make the reins on a horse. Otherwise they get a bit wild!
- Three or four inches of uninflated red balloon around the neck of a figure can be used as a scarf.
- Went out with a bunch of friends a couple of weeks ago, and we pulled out the balloons to wow the new gal in my office. I made her a jackrabbit. She dressed him up a bit, by taking a longish bit of a broken pink balloon, and tied a bow around his neck. It was cute. Newbies, think they know everything. Sheesh.
- I like using balloon sticks. It can make sculptures look classy. A 6" heart looks
much better on a clip n' stick. Animals can be stuck into the birthday cake carousel
style. Small flowers on sticks can fit into floral center pieces with ferns and other
greenery.
Balloon sticks (or drinking straws) can be used as legs on a flamingo (make a pink swan).
Once I made a mother swan from a 260 & sent her out upon the waters. she tipped in the wind. I taped a quarter to a cello-straw about 16" (8" would do, I think.), & put it on mama. She made the other shore. Use the straw and coin act as a keel and ballast, respectively?
         ,_.
       =<_  \
          ) /
         / /      _
        ( (___.,-' )
         \(___.`--<
~~~~~~~~~~(____>-._)~~~~~~~~~~~~~~~~~
             |
             | <=== balloon straw
             |
             o <=== coin or washer
Additions: Miscellaneous
- In a fabric store, I wandered into the section where they display their miniature items
used for decorating dolls and other creations. They were selling things like:
- tiny copper cow bells with clappers inside (perfect for hanging around balloon cows)
- tiny sleigh bells (perfect for balloon reindeers)
- tiny bubble eyes in all shapes and sizes - the ones with a captive black eyeball that rolls around inside a clear plastic bubble with a white backing
- and all kinds of little doll-sized accessories that were quite inexpensive and could really dress up a balloon creation.
- I bought a package of the 5 mm diameter bubble eyes (144 pieces for $1.39), and some 12 mm oval shaped ones to play with. Maybe I can attach them with a glue stick or something.
- I have used doll making supplies and felt pieces (pre-cut) to decorate my balloon figures. The felt can be glued on with glue sticks, or static electricity can keep them in place and allow them to be modified. I like using this technique when story telling with balloons.
- When Halloween is near, I hang a teeny plastic skeleton from the knot-nose of the animal, or put it riding on the back in a seam, or inside a curly.
- What an interesting use for reinforcements: as a template to draw eyes! It's the solution for all my "here, you draw the eyes so it's just the way you like it" deal. Remember to peel it off very soon after contact & peel it slowly, so it doesn't stick with your creation.
- For eyes on dark balloons (particularly black spiders!!!) I use the self-adhesive O-rings used as reinforcements on ring binders. It's quick and easy and the kids like them. I should try red reinforcements for the back for our famous red-backed spiders.
- I've used stickers for eyes on animals. I also made a Christmas wreath and decorated it with stickers. I think the kids like the stickers. That balloon becomes more personal when they get to pick the colors of the balloon and stickers.
- Pipe cleaners for whiskers! place them under the kitty's nose.
- Marvin showed this stand to us for holding his motorcycle with rider in a wheelie. Take a piece of a straw or other rigid plastic about 3" long and insert it into an uninflated 260. Marvin put a little bit of air into the 260 to give it body . Place the straw about 4" from the end and tie a knot at each end of the straw (so it stays there) and leave another 4" on the other side of the straw and cut or break of the excess. Now tie the ends together. What you should have is a triangle with a rigid piece of straw in the middle section. Take the top (where it is knotted) and slip the knots under the "seat" of the motorcycle and stretch the sides over the back wheel; the stiff part should be under the wheel. He used 2 of these to make the motorcycle do a wheelie.
PART8
Twister fashions
Visibility
On the need for costumes:
How costume affects tips
Normal, comfortable clothes
On the "uniform" look
Your outfit is part of your act
On clothing covered with pictures of balloon
More examples of what people wear
Other fashion-related resources in the Guide
Visibility
I've worn a variety of costumes for twisting. For a while, when working the streets (Balboa Park) here in San Diego, I wore clown garb, but since I got an extremely visible mad hatter's top hat and a spangly vest, it doesn't matter; it's VISIBILITY that counts. And kids still think I'm a clown since I'm dressed wildly and making balloons.
I like the bright clown makeup and clown costume the best myself and the kids like it. A clown is easy to spot the length of a football field away, since you are the only thing in yellow pants on a green field at a company picnic.
When we're doing nothing but twisting, my husband and I go by the name of Mr. and Mrs. Balloons. The costume consists of simple black pants - cotton, comfortable very washable, a comfortable polo shirt (long or short sleeves depending on the weather) which has balloons in primary colors airbrushed all over front back and sleeves (find an airbrush artist and or student for this) and a red Fedora hat which we found in the LL Bean catalog for about $25. This is a very colorful outfit that tells people what you do without saying a word. They can be at the back of the line and they see a colorful looking person with lots of colorful balloons twirling around him/her as they twist. It draws the attention - that's what you want to do.
Balloons draw people to the balloon person. Always have on a balloon hat so that people know where you are...
On the need for costumes:
Costumes are important but they don't make the clown. I believe that a costume MUST be professional i.e. neat, clean and fit the personality. But as someone who spent 2 years studying clown & comedia in European schools, I take great offense to entertainers that dress like clowns and act like someone's uncle. To be professional, your character must "carry the mask". If your costume is bizarre, your character had better be bizrare. If you can make people laugh by dressing like an english butler and acting like an english butler, you're more of a clown than someone who looks like Bozo and acts like a regular guy.
The main point of a costume, uniform, or whatever, is to make the performer distinctive. Whether a clown suit or a Tux, the outfit points one out as different, and different in a way that takes time and care, and distinguishes one from the customers/audience/bums-on-the-street/etc., etc..
If entertainment is your goal, a solid character and costume is essential. Your clients and audience will see and appreciate the care and attention... Otherwise, you had best be the most superlative twister and friendliest most personable human (unless you do it for nothing).
If you are an entertainer, you need to dress like an entertainer - whether it's in character costume or in a fancy dress or suit. If formal, you must dress a tad better than your audience. I have seen performers in white shirt, black pants and a balloon apron with the name of the company on it. I'm sorry but that is not a performers outfit. They look like waiters or waitresses and not performers. It looks like they hired someone that answered an ad and they gave a uniform to. Balloon twisters if hired for events are performers first and must dress accordingly. Create a character or dress up if your "on stage". Now don't get me started on clowns that don't put white face on their necks...
I am certain that for some people and in some markets, there is no point or need to costume or appear in character. I get BORED if I'm not in character and performing while ballooning. I like the interaction my characters have with the audience. Clients see a value in the character and costume.
Hopefully, the costume foreshadows or suggests in some obvious way the nature of the performer. There are few things more incongruous than a clown in costume and whiteface lighting up a cigarette, slamming a beer, and bitching about life... Conversely, the twister's shirt with the balloons airbrushed on would, I imagine, do this suggesting admirably, non-verbally, and unambiguously.
I use the costume to my advantage. When 'Looie' twists, he wears big, baggy pants with double pockets; two on the front thighs, two on the hips in back. Each pocket actually has two pockets within one. Thus, I effectively have eight pockets in which I can hide balloons. The pockets are long enough to house the entire length of the 260s. I segregate colors since I use a lot of color-specific creations. No one knows I have any balloons until I whip one out. (which means I can say I'm out if I want)
How costume affects tips
In this neck of the woods and for this twister, I have made a few observations:
- Tip-wise (and this is by no means my major income source), I do better when in full costume (more later) than when I dress up brightly and colourfully... but in obviously normal clothes. I have 4 clown costumes for my main character, a Klondike, Western, Medieval and other theme costumes. I make up simply (or some of my characters have make up). There was about a 50% increase in tips when I started doing balloon busking in costume and character two years ago. And I get my picture in the paper more often.
- The client at a commercial function appreciates and sees the value of a COSTUMED CHARACTER performer. I get many bookings in our small market because I can costume and provide a character to suit a client's needs.
- My goal is to entertain FIRST and make balloons SECOND. Object lesson: While busking the Edmonton Fringe Festival I spent 1 1/2 hours working a crowd. In that time I made about 20 balloons. But the ENTERTAINMENT provided was so appreciated, the hat worked out to about 4 times what I can get just twisting balloons (NOTE: I never suggest a donation now. I had an increase in my take of 20% when I just said that I accept tips. Vendors set prices, buskers entertain and let the change fall where it may.)
- Working in costume increases your tips, as well as helping you to identify yourself as a performer and not a balloon machine. If you are entertaining and another balloon artist is there, people will come to you because there is laughter and smiles being given as well as balloons.
I have tried it several ways.
- Clown makeup and costume both talking and non talking. didn't make much difference in tips or how many balloons I tied etc.
- Just a top hat and tail coat, no makeup talking, this is one of the outfits I wear when strolling and doing balloons at company picnics outside. Talking or not talking made no difference since most were freebies for the folks at company paid events and they never had any money in their hands.
- Mime makeup, now made a great difference in tips. The non talking mime makes it harder for the kids to tell you exactly what they want. Mom and Dad especially will drop the folding kind of money into a tip bucket for a mime, since I wear a badge that says "I work for tips!!!" The mime makes three times the money in tips of any of the others. Same person doing the same balloons but the rewards are greater. I usually make more on company picnics since I have a starting price which covers balloons, and any other handouts the company wants. Also do the usual Geo's and balls in balloons at company picnics. But for street fairs where you have no paying sponsor the Mime is the only way to go for me.
There is a perception that clowns are hired to hand out balloons for free, since clowns are always handing stuff out free. If that is how your crowd feels it is a disadvantage to be a clown working for tips.
I work in restaurants and have tried usually dressing in my black pants, dressy shirts, and my collection of wide ties ie mickey mouse or snoopy ties. but I find I make much more in tips when I wear my tuxedo and long tail coat and fancy vest or fancy cummerbund which is just a very colorful one.
I quit putting Magician under my name on nametags because too many people would "skim" it, reading just the "MA...." and assume that since I was dressed well, wore a tie and had the nametag, that I was the MAnager.
Normal, comfortable clothes
In regards to what to wear, no matter what you wear, above all you've got to look and be professional. If you look like a street bum the parents will not want you near their kids let alone giving them stuff.
Good advice from T. Myers: I don't bother with a clown costume. Clean and comfortable helps when you are putting in long hours and the balloons will start and keep the line going. It is important to be clean and friendly. I want to look like a (slightly dressed up but comfortable) dad wearing a silly balloon hat. As a dad-looking-person I still have a position of authority, even in a silly hat. As long as you look just a little better than most of the fathers out there in the crowd, the balloons will sell themselves.
Be comfortable. You don't need to be in costume to draw attention. The balloons will draw attention for you. I wear a hat and attach lots of balloons to it. A hat made entirely out of balloons is a bad idea. It will begin to feel really awful against your skin in hot weather if you're out for a few hours.
Unless a customer specifically requests something ( ie. Tux, or whatever), I try to dress one step better than most of the people in the room... generally I wear a shirt and tie in the summer time because most of my work is in a restaurant where 99% of the folks are dressed casually. I add a jacket in the winter and really rare occasions I'll get fancy.
When I work the restaurants I feel wearing a suit works best, people tend to be intimidated by someone in a tux, especially since I'm only 19.
And let me add one piece of advice for people in this costume that was handed to me by the Amazing Jody Baran: shine your shoes! People unconsciously take away performance points if your shoes are scuffed.
As a restaurant twister, I started with a white, long-sleeved shirt and necktie. Then I went to the shirt, no tie and suspenders. Then came the loudly colored vest, which I liked for the extra pockets; but I didn't like the extra heat it contained as I worked. I've gone back to the shirt, with short sleeves, and the necktie.
On the "uniform" look
My balloon twisters and I all wear normal clothes when we work (black and white, with our colorful balloon apron) and we do just fine. It's comfortable, fast, easy, and we're all uniformed. That way people know that they are with Balloons With A Twist. When people call and ask if we dress in a costume, I explain to them how we dress and tell them it's because we entertain for all ages and all occasions: ie. kids that are too young are scared of clowns and costumes, and adults just want an entertainer. It works for us! I think people use costumes as gimmicks, and our balloons are so impressive they speak for themselves. Individuality is important, but my "team of twisters" as I affectionately call them are a group of individuals. I don't think we are balloon making factories, and I don't think we look like waiters. I think we look very clean and professional and so do my clients.
I often pinch hit for twisters on vacation or sick and work for a company. Otherwise, I twist free-lance. The company I work for requires its twisters to wear white shirt and black pants. It is in the contract. I believe when working for someone else and under contract, if the contract stipulates what to wear, then that's what I wear.
Many companies do insist that their twisters wear "uniforms". Just because these "uniforms" require, for instance, black pants and a white shirt, does not make them true uniforms. The performers add their own personality to the "uniform", e.g., amusing buttons, crazy ties, colorful vests, interesting headgear, etc., and turn it into a costume.
My #1 rule is to be and express myself, so my choice in colors/ties/socks/nametag and all is totally me. My argument against the "uniform" style is that to me you are taking away an entertainers identity and self when you do that, and IMHO this is where most of the entertainment and character comes from. A good entertainer can rise above what they wear, but what you wear can also help to attract attention and to help "solidify" yourself/character in the audiences mind, which is one of my main goals. I want them to remember me, not just the magic and balloons. I don't want to just be known as The Balloon Guy, or Mr. Magic.
I have seen twisters going out in a white shirt with a bowtie , black pants and an apron. By putting twisters in "service oriented" uniforms you homogenize their performer status to just being a group people who went through the training and are just working their shifts. YOU may know that they are working from the heart but the audience perceives them as service people and NOT entertainers. That may not bother you, and they may not care either. When the audience looks at the uniformed people the first thing that crosses their mind is not "entertainer" but rather "Oh, here's a balloon delivery person." My father had a balloon delivery and singing telegram business once. He had special "costumes" made (red with the pill box hat and sequins all around). Yes they were uniforms, but each one was unique. Some performers that he hired wore flowers, some wore pins. His business stood out because of the entertainers and the unique COSTUMES he used.
I did a lecture a few weeks ago for some ventriloquists in Connecticut on promoting yourself through advertising brochures and gimmicks. One of the hardest things to do when you're creating a flyer is to think about the way the GENERAL PUBLIC perceives you. Ventriloquists call their puppet all sorts of fancy names but the truth is that the public calls them dummies. White shirts, black pants and an apron is seen as a UNIFORM and NOT a costume. Uniforms are uniforms and costumes are costumes.
Not everyone can afford to go out and buy the full regalia for a part-time job. So, let me just say that bow tie, white shirt, black pants, balloon apron is as much a costume these days as baggy rainbow striped pants. In the old days, you put on a coat and tie to go to a matinee. Today, people don't generally dress this way unless they're going out to eat in a fancy restaurant or they're going to a job. Nowadays, who wears the costume we've described? Waiters, true, but only in better restaurants (most of the chain coffee shops have gone with cheaper colored shirts with open collars). Dealers in Vegas dress in white shirts, black pants and aprons. Bellmen in better hotels. When twisters put on this garb, they are dressing up in a costume that identifies them as a service provider, true, but as an elegant, high-class service provider. When you wear this outfit, it automatically changes your behavior, making you want to be more suave, more professional.
There is a big difference between career twisters who go to conventions and work on the street and so forth, and twisters working in agencies. I have been working for an agency (BalloonAbilities) for 2 years and I can tell you, there is a high turnover rate for agency twisters. We are mostly students and we don't have much money. The initial investment of an apron, a few bags of balloons, plus a white shirt and black pants is as much as we can afford. We're not really all that serious about this thing -- it's just a part time (temporary) job for most of us.
Your outfit is part of your act
Hats are part of the act. They should always be. I wear a purple madhatter-style top hat with a bright shirt and a sequined vest. I'm also covered in Looney Tunes buttons. Everyone loves this outfit, and yes, I have other costumes, but none of them attract attention and tips like this one does. It gives my a comical appearance without making me clowny. I also do clown work, but when I work a restaurant, I prefer to avoid the clown aspect of what I do; for the most part, I'm just myself out there. Since I'm naturally bigger than life, and outgoing, it all works out pretty well. I save clowning for when it's specifically requested. A good hat is worth more than its weight in gold. My madhatter hat paid for itself in just a few weeks. Invest in an eyecatching, tasteful costume and you won't be sorry.
I use a little doo-dad that I bought from restaurant magician Jim Pace, which slips into the tie and causes it to roll up quickly when pushed by a hand or touched in the right spot by a finger. It gets a lot of reaction!
I perform as a non-speaking whiteface clown, so it is hard to communicate effectively that my time was up. I happened to be near the end of the balloons in my pocket, so I decided to just continue until they were gone. I grabbed the last 260, pulled out the pocket, left it sticking out, looked sad, waved Bye-Bye. Wow! I thought, "why couldn't I just plan out the exact number of balloons every time?"
Then I made a "magical balloon pocket", patterned after a change bag. My real pocket is deep, it holds a full gross of balloons. But at ANY point in my show, I can reach into it and (seemingly) pull it all the way out and show it empty. I could also set it up to reach in, pull out a whole handful of blue balloons, telling the kid, "I'm sorry you can't have a red one..." The second pocket could also hold hearts or other special balloons.
Regular pockets are made with 2 pieces of cloth. My right hand *pocket* (actually 2 pockets) is made from 4 pieces.
You could make two identical, regular pockets, and then sew them together. (with the front of first and the back of the second pocket sewn into the proper place) However, the seam between the two pockets will be visible.
This is a regular POCKET pattern. You will need 2 of these (don't forget to make one with the GOOD side up and one with the GOOD side down)
X * * * *  *
X - - - -- - - *
X- - - -- - - - *
X - - - - - - -  -*
X - -   - - - - - -*
  *- - - - - - -  - *
    * -  - - - -  - -*
     * - - - - - - - *
      *  - - - -  - *
       * - - - - - *
         * - - - -*
          * * * *
This is the special part. .. make two of these also..( Again, make one with the GOOD side up and one with the GOOD side down.) Sew together on the $$$$$s with the seam on the inside and the two GOOD sides facing out.
* * * * *  *
   $  - --- - *
     $- -- -- - *
     $ - - - - - -*
   $ -   - - - - - -*
  *- - - - - - -  - *
    * -  - - - -  - -*
     * - - - - - - - *
      *  - - - -  - *
       * - - - - - *
         * - - - -*
          * * * *
Then lay one of the regular pocket pieces on top (GOOD side down) and sew this piece to the top piece of the 2 special ones. Sew along the * * * * s.
Lay the other regular piece face up on the bottom and sew along the * * * *s to the third piece. Then sew each of the two 'regular"' pieces into the side seam of your pants.
If I reach in and keep my fingertips close to my body, I go into one pocket. If I put my hand in just a little bit and then aim my fingertips away from myself, I go into the other pocket. Use which ever pocket seems most natural to you for the balloons and keep the other empty. Also, consider which pocket will look the most believable (hiding the other one) when you pull it out to show it empty.
On clothing covered with pictures of balloon
Our 'balloon shirts' are airbrushed with round balloons all over and provide Identification. A simple suggestion I have is to buy the balloon vests available from the Creation Station. They have a full color Ad slick and price list to send you. From my experience the quality is excellent and you really get noticed when you wear them because the colors and prints are so great. The vests are very colorful with a splashy balloon print, and they even make bow ties and long ties. This eliminates the service oriented apron look while still giving you a clean polished look. Vests are a very generic clothing item which looks good on 90% of the people and if you change employees, the vests can be passed on to the next person.
I've traded services several times with local air-brush shops. I entertain outside their mall store in exchange for a custom airbrushed balloon-animal shirt. When I wear them on a gig, they are always very popular. The most effective use is just wearing them. People are curious and the subject of balloon twisting comes up in the conversation. As we talk, I'm able to educate them about how twisting would be good for their next birthday party or business (i.e. crowds and happy customers). I've worn out several "dress" shirts and sweat shirts and continue to have a good working relationship with local air-brush artists. Good for them -- Good for me.
I've had shirts with lots of pictures and shirts with only a few large animals. I like the few large pictures best. They seem less busy and generate the same amount of curiosity and conversation.
T-shirt decorating. There is a product called "TRANSFER-IT" I believe it's by Aeeleen Crafts and can be purchased at craft stores. Take a color Xerox copy of your picture, cover the copy with the Transfer solution. Put the image on the fabric and let it set up overnight. Then, iron the paper backing to set the picture and rinse the paper off, leaving the image on the fabric. You can get about a dozen pictures from one bottle of solution, which costs about $5 a bottle. You can also buy Cannon T-Shirt transfer paper. Scan your picture into a computer and print it with an ink jet printer onto Transfer paper. Then, iron on your transfer's. A package of 10 transfer sheets (8 1/2 x 11) is about $20.
More examples of what people wear
My balloon lady character wears several things with consistency:
- a HUGE, purple Mad Hatter style top hat
- a pair of red Doc Martin boots that have fruit all over them (my "frooty boots")
- a sequined vest adorned with Looney Tunes character buttons
- and my balloon apron (T. Myers 5-pocket with Adrienne's koosh 260 arrangement)
- an appropriate fanny pack to keep things in (tips, cards, keys, etc.). This fanny pack is always small enough to hide under my balloon apron, or to place at my hip just beneath my pouch for balloon droppings.
I have added a pouch to my apron for 'balloon droppings' so that I can always clean up after myself.
I have a variety of brightly colored shirts and I either wear bright pants or a loose fitting miniskirt, depending on the weather and my expected audience.
Whether my skirt is short or I am in baggy turquoise pants, my costume is family oriented. I never dress in a seductive way... it is not my role as a family entertainer, nor is it part of my balloon lady character.
I have discovered that people are VERY disappointed when I vary parts of my costume that have become permanent parts.
My tips go down when I wear REALLY nice shirts... they also go down when I accidentally leave my hat or vest at home.
I have a denim jumper with a bright yellow shirt. I've got yellow and orange clown (stripes) socks and a beanie with a propeller on top. I had balloon animals added by air-brush around the collar. Have them put one animal in the front (on the neck line) an animal on each sleeve (my local artist charged $3.00 per animal). It's pretty simple, but professional looking, and cool/ comfortable to wear.
As for aprons, I use two; one T. Myers 5-pocket on my front, one 3 pocket on the back. I pass the strings through those click together plastic buckle things, and then cut off the excess length.
PART9
Balloon Care
Storing Uninflated Balloons So They Last
Carrying Uninflated Balloons So They Last
Making Inflated Balloons Last
Storing Uninflated Balloons So They Last
- Balloons should be stored away from heat, light and exposure to the air.
- Does freezing help preserve balloons?
It seems to have worked well for my balloons. Mine are more than 5 years old, kept for almost all of that time in a freezer. They seem just fine. I do not thaw and re-freeze them much, though, that may make a lot of difference. They are also 260Es (double dipped) rather than 260As (single dipped), which might make a lot of difference, too. - I used to keep my balloon supply in the freezer, and there were times when I'd have the same gross in there for a year, or more, and they always worked just fine, even after all that time.
- I have run into problems during the winter when I would leave my performing case in my car over night and when I had to perform the balloons, not frozen but very cold were popping. I literally had to warm them up so they would be able to handle the rapid expansion of being inflated. Just keep it in mind before you grab a bag of balloonsicles and run off to a gig.
- If balloons have degraded from warm temps or age, will freezing "restore"
them?
If you are out working in the heat and sun, and the bag of balloons you are working with feels hot and soft, putting that bag back in the cooler can help. I've had hot bags that seemed bad be ok after they cooled down.
Carrying Uninflated Balloons So They Last
- Carrying balloons around in a coat pocket seems likely to flex them a lot while they are cold. This is definitely bad for them. Ziplock bags are pretty good for storing balloons, they keep the air away.
- Keep the uninflated balloons out of the reach of crowds, and preferably in a cool place. You don't want them melting before you get to use them. If you bring a cooler with drinks, but the balloons in there.
- They make thermally-insulated zipper packs to keep individual juice boxes cool. Again, if you always want to have just a small amount of balloons with you, these might be handy for carrying them in when it's hot out to prevent them from deteriorating.
- Do you carry around balloons wherever you go and make them for kids that you see? I'd like to do this, but the balloons I keep in my pocket get hot and soft and pop when I go to use them. Keeping them in the car is worse, since in CA it's almost always warm enough to ruin balloons on a sunny day.
- A friend of my mom's has to carry around medication at all times, and it must be kept cold. We found a fanny pack for her that has a large zippered pocket on the front. There is a second, smaller zippered pocket on the back of the pack. It came with two small, flat "Blue Ice" containers that fit in the small pocket. One of those ice packs keeps the pack cold for 8 hours. It would be a great way to carry balloons, without them getting too hot. We found it at a clearance sale, but I bet you could find them in Hiking/Outdoorsman/Sporting Goods Stores.
- As a part-time twister, I've been looking for a good way to carry a small amount of
balloons around with me. (I don't need to haul around a gross of each color, yet, but I'm
getting to the point where I want to separate my colors). I came across this:
"Correct Change: For the traveler who can't get their lire and pounds straight,
Magellan's offers the Five-Pocket Pouch by Baggallini. Each pocket has a different colored
zipper so you can store a different currency in each pocket. Carry your marks in the blue
pocket, francs in the orange pocket and be currency correct on the road. $9.85.
1-800-962-4943." (Remember, five pockets can easily separate 10 colors, if you store
a light and dark color together). The pouch is 5 by 7 inches, with two pockets on one
side, and three on the other. It weighs 1 ounce. Shipping costs are an additional $3.95,
but that covers shipping for however many of these you would wish to order.
I bought a Five-Pocket Pouch from Magellan's , and just wanted to say I like it. It's got two pockets on each side, and then one big pocket in the middle. The zippers are color coded, I keep my green, light blue and yellow in the green zipper, for instance. My sharpies (black, red, blue), super balls, hearts and Swiss army knife fit in the center pocket. You can only carry about 3 of each color, without it getting 'puffy-looking' (if you have all of the assortment plus violet, clear, and brown) which is the only drawback. Can't quite carry enough balloons, and you have to re-load after you use it once. But, for non-professional me, it's nice to store in the fridge, and grab it quick on my way out.
- I carry balloons with me in a small cosmetic pouch in my purse.
- I carry my balloons around in a belt pack that I bought at REI (a camping/hiking store) it is small, has several pockets, and attaches to a belt.
- Keep an eye on the Warner Brother's Superstore in your area (if you have one), they also offer a catalog to order from, and a Web Page store on Netscape. Several times a year they get in a variety of bags with characters on them. Almost every one ends up on the clearance rack. Cute stuff, and most of it is excellent quality.
- As for how I carry balloons. I've been very creative so far. A zip lock bag with balls, 130s, geos, hearts and a sharpie tucked inside a regular assortment bag of 260s plus brown and clear I carry this in my briefcase right next to my stethoscope. For parties I use a black army tool bag (pockets on the outside and slots on the inside that hold pens etc., and use the same setup with additional baggies for the hard-to-pick-out colors. This also contains my pogo instant repair kit, Judy the mouse (thumb puppet) some sponge balls and a few packet card tricks.
Aprons
- If you take a work apron (the kind that only tie around the waist ) and double the bottom up you get a large pocket by sewing the edges up. You can also run a few extra rows of stitches on up to create extra pockets (or rip out rows to widen skinny pockets). Then use double sided tape to stick two Ziplock bags together close to the top. Fill each one with a different/contrasting color and slide them into one of the pockets. Do the same for each of the remaining pockets. Now when you want a balloon you reach into one of the pockets and into either the front or real bag. At the end of the day just zip each bag and you've got them stored.
- I bought 2 canvas "nail" aprons at a hardware store $2 a piece and cut the straps off of one and sewed it on to the bottom of the other. Each apron came normally with two wide pockets. I sewed a new seam up the middle of each and got 8 pockets about 3 inches wide. It worked great. Stuffed each different color into a pocket. I had 10 colors but I found that the colors were not evenly distributed in the bag (lot's of purples, not many blacks) so I combined some balloons where it would be easy to identify them (black with white, green with lt. blue).
- I purchased some strong black fabric, black belting, one of those clip together plastic
buckles which open when you squeeze them - they are used on everything nowadays from fanny
packs to knapsacks to SCUBA diving BC's - and I was also able to get 6" lengths of
brightly colored 5/8" wide satin ribbon. I got 11 different colored ribbons plus one
with red hearts on it. I borrowed a friend's sewing machine to stitch the whole thing
together and it turned out very well. I made four rows of three, 6" wide pockets,
with one loop of ribbon sewed to the top edge of each pocket like a little colored handle
that will allow me to pull open the pocket and also tell me what color balloons it holds.
(I added a final layer, not shown below, which gives me two wide pockets in the very front
of it all - for assorted junk) I chose black so that it wouldn't stand out from my
clothing - I usually make my creations for friends or in bars where I don't want to look
like a clown! - but the fabric store does have some very pretty material that could be
used instead - I saw some with Looney Tunes characters on it, and I expect that you
wouldn't have to look too hard to find some with printed (at least round) balloons on it -
or you could just paint your own with that T-shirt decorating paint.
           ______________________________________________________
        [X]________________|                 |___________________[X]
                           |__~__.__~__.__~__|
                           |__~__|__~__|__~__|
                           |__~__|__~__|__~__|
                           |__~__|__~__|__~__|
                           |     |     |  ^  |
                           |     |     |  |  |
                           !_____!_____!__|__!
                                          |
                    front                 |
                                          |
                        |                 |
                        | _               |
                        || _ <----+-------+-- typical location of loop
                        ||| _ <---'           of colored satin ribbon
                        |||| _
                        |||||
                        |||||
                        |||||
                         side (shown before stitching together)
I make my own aprons out of black trigger (a cotton - polyester blend) which is very washable, doesn't need to be ironed and wears like iron. The dimension of the bottom layer is 21 by 15, the next layer is 21 by 13, then down one and one half inch increments. I make five layers of pockets, then sew through all five layers, dividing the pockets into seven inches wide. (outline the apron and layers with double wide bias tape) That way I can get my hand in them to load and unload easily. My 260's are in the top two layers, two colors to a pocket (a light color and a dark color), I load the balloons long wise with the nozzle end sticking up, about one to two inches protrudes from the pocket. Fifty of each color will fit easily. This leaves three layers for specialty balloons, tip pocket, trash pocket, and pocket magic... or whatever. I make these for my clown friends out of their clown costume fabric. The first apron I made four inch pockets, but I had a hard time getting my hands in and out of them, so now, I go six to seven inches wide at least. I also make a little teeny pocket for business cards, and a small scissors pocket, I don't have the hand strength to break them like a lot of you guys do, so I carry a little pair of Fiskars children's scissors with me. I also put a piece of Bounce (dryer sheet) in one pocket because it is VERY dry here and static builds up fast.
- If you do not sew, I do make and sell balloon aprons. I also add three small pockets on
the front of the apron for business cards, scissors, and markers.
Arleenie clydep@primenet.com - Put a tab of Velcro on the apron pockets. Kids have very light fingers and it's only when you see one wandering off with a handful of balloons that you realize you've been had!
- I have a unique, but really effective system for sorting my balloons. First, I use the
T. Myers 5 pocket apron, to which I have added a Velcro pocket on the inside for tips.
This apron is big and roomy. The most important thing though - it is built out of steel. T
his thing will not tear, rip, wrinkle or stretch out of shape. I sort the pockets as
follows:
- (Big top pocket) Geo Blossoms (I use a ton of these)
- (Other Top Pocket) 321's
- (Bottom Pockets) 5" Smileys and Hi-Bounce Balls (I use another ton of these!)
- 5" and 11" plain assorted
- 6" and 11" Hearts ( I should own stock in Pioneer because of these!)
"But Wait!!!!", you're saying "Where do the 260's go????"
That's the unique part. I HATE trying to find the color I want, even when the balloons are sorted two or three color to a pocket. So, I buy solid color bags, and keep them separated on my apron.
The best way I've found to do this is to put 50-60 of each color through the center hole of a 6" geo blossom. Pearl tones work best, they seem to be able to handle the stress of stretching over the 260's better than the jewel tones. This also allows me to "Label" the dark colors - I use a light green blossom to hold the green 260's, a pearl lavender for purple, and so on. I use white blossoms for black, and clear for brown. I have found this eliminates searching for the color I want, and tying to guess green from black from sapphire. I also use a blossom to hold my 130's and another for my 350's.
To attach the blossoms to my apron, I tie two 350's together to make a long elastic cord. I tie the ends of this to the straps of the apron, so the 350 band stretches across the front of the apron. Then I tie the neck of each of the geo- blossoms to this band, spacing them about 2" apart. The resulting apron looks like a GIANT KOOSH, but that's part of my look.
I have found that I can spend 1 hour "Loading" my apron this way, and have enough balloons to last 12-16 hours of restaurant work. The only drawback I is that, when you have fewer than 10 balloons left in a blossom, they tend to fall out on their own. Otherwise, I love this system, and customers are amazed at the variety of balloons I have.
- I use my apron pockets and set up a rainbow (sort of a koosh hula skirt). When it's on and I'm looking down on it going from right to left, I have onyx, white, light blue, dark blue, (new pocket) clear, green, yellow, orange, brown, (new pocket) red, pink, purple, raspberry, 350's, and 130's. I have three inner pockets (1) business cards, (2) 321's, (3) pens. I made it from fabric that is covered with plastic and has a bright print of a shopping mall on it.
- Beenie's cool Balloon Apron - Product Review
I love my new balloon apron from Arleenie Beenie. It is replacing a smaller 3 pocket apron. Her "lap" apron is made out of strong cotton and is about 12 by 16 inches. It has 15 large pockets and a few other small ones. I hate it when I pull out a wrong color balloon, and this apron solves this problem. It also tailors the amount of balloons you can put in it; I usually put way too many balloons in my old aprons. This new apron holds about 6-7 gross comfortably. The aprons are relatively inexpensive and you can choose your own colors. It is very strong. - I had someone make me an apron out of canvas. It is striped with 4 different colors. The apron stripes run up and down with the pocket stripes running sideways. It is real cool and very durable. It has additional pockets at the top, to hold: pens, ball putter, super balls, cards, menu cards, hand pump, and scissors. It is nice to be able to offer a selection of color and being able to get to that color fast.
- I use Tom Myers' 5 pocket apron as my main apron and I also use my smaller 3 pocket apron positioned on my backside (backwards) to hold bee bodies, hearts and my Ball Putter.
Bucket O' Balloons
- Seen at Farm & Fleet: The Bucket Boss. This is a bright red, fairly sturdy canvas apron designed to fit over/around one of those 5 gallon plastic buckets. 35 pockets, 24 outside and 11 inside. On sale for $14.99 (marked down from almost 20 bucks).
- I just made myself a balloon bag that I really like. It is a Butterick pattern #4364 and is called a bucket cover for working in the garden. It has 10 pockets and you could add more (I think I'm going to add compartments on the inside too. I made it out of colorful print and lined it with a solid color. Between the material and the lining I put sewn together sheets of plastic canvas (found in craft stores) for more body. I can fit 3 gross of assorted 260's inside and with the outside pockets I can carry geo's, green 260's, hearts, rounds, brown 260's, bee bodies, and there is a pocket for cards and one for markers and one for scissors. I made the strap long enough that it goes over my head and I think it has past the test.
Carrying Cases
- I don't like wearing aprons because when they're full of balloons, I sweat under all that latex. Not a comfortable way to twist. The way we get around aprons is by using a suitcase. This is one that we found in an art supply store, so it's colorful, sturdy and lightweight. We then attached a flange, pipe and music stand base which screws off and collapses for easy transport. Inside we have divided up the case into 16 smaller compartments with foam board dividers we made. Each section has one color or type of balloon and the blacks, greens, and purples are labeled so we know what is what (by now we know where each color is by heart - its a good system) From the handle of the suitcase we hang a small cutting device and a cinch sack for trash (or to store tips when we empty the hat) Each compartment can hold 1/3 + gross of 260's depending on how tight we stuff them. When it's time to go, we have another foam board piece to cover it all so the balloons don't jumble around in transit, close the case and we are on our way. This is the easiest way for me to be able to give the kids their color choice without driving myself crazy or blind. The other advantage we've found is that when we do set up, we look almost professional, not as much like a street vendor. When we set up this contraption, people seem to know that something will be happening.
Carts
- I constructed a "clown cart" out of an old garden cart I found at antique mall. On wheels, I added two tables with drop hinges. On the left side, I set up my face painting equipment. On the right side I put my balloon box (a bright red tool box filled with balloons sorted into small colored pouches that match the 260 colors). In the middle of the cart I place my promotional materials, coloring page give-aways, and bunny puppet. Because I have a colorful sign that says: I "clown around" at birthday parties, picnics and all types of special events, people ask me about my services, prices and availability. To the right of the cart I place my well-used Pump-O.
Costumes
- I do restaurants quite a bit and I am a clown. My costume is red and white polka dots
and stripes. I was lucky enough to find two purses that are red and white polka dotted! I
wear them criss-crossed over my shoulders and they lay down at my sides. In my left purse
(the larger of the two) I keep all the 260 colors that you can tell by looking at them
once! In the little purse I keep my green 260's and my hearts, geos, and a few
dart-balloons. This purse also has a little pocket on the side and that's where I keep my
Sharpie pens and a pair of scissors. In the left pocket of my costume I keep black 260's
and in my right pocket I keep purple 260's (a few other tricks are kept in these pockets
too)! I have brown balloons, but I don't carry them with me with this set up. I do keep
some in my extra bag, if someone insists I can stop and get a couple.
I also carry a little basket (with a Tomato on it of course) and in this I keep clear 260's, rubber balls and, when I am working for tips, I put a little wire basket in the center for tips.
The kids are fascinated by my red and white polka dotted purses and the fact that they match my red and white polka dotted clown shoes.
For a while I was having health problems and had to use a pump. The guy from "Just for the Fun of it" made me a pump in a fanny pack and it was - ( yes you guessed it) - red and white polka dotted!! I am all better now and blowing the balloons up myself so I leave the pump at home. I will probably use it a lot this summer when it gets hot!!!
- I found very early on in my career, keep my balloons where they can't be seen or
touched. Built into my costume, a dress (I'm a clown), I have three front pockets left to
right. One is deep enough for my pump. Then I have one the exact same size next to it for
anything else, business cards, pocket magic, scissors, etc.. A third pocket measuring no
more than an inch to two inches wide, holds my sharpies.
BUT WHERE ARE THE BALLOONS!!!
Well... this is a little bizarre, but I keep them up my sleeves. That's right. Nothing up my sleeves accept 260's, which go in my left sleeve (I can hold 2 gross). Being right- handed I just reach in and whip out a balloon. People are amazed. "Where did you get that balloon?? they ask. After doing this for the past eight years I can do it so fast _I_ can't believe it sometimes. I keep hearts, or other types of balloons, in my right hand sleeve.
As for how to distinguish what color I'm getting, I say "I just reach in and grab a balloon, I never know what's going to come out - because the greens turn into purples and the blacks turn into green and the purples turn into plaid etc..." This is a great line and it works well. Plus, I don't have to search or pre-sort for that purple/green/black. The kids think they are "Magic Black balloons". I do have enough play in my sleeves however, and have gotten good enough at it that I can see what color I am pulling out, if needed. If the lighting is bad and can't tell what color it is I reach in and pull out a hand full of "Rainbow Pasegety".
The only draw back to this is when I first go out I look like Popeye! But I'm the only one who seems to notice. This works for me, but to each their own!!
Fishing Vests
- They have several conveniently sized pockets. I filled each of the pockets with a different color and/or size of balloon. This works great, and provides easy access. Also, there are Velcro gear straps on the vest, and one was the perfect size for my 2 way hand pump. The top breast "fly pocket" held about a hundred of my business cards. All in all, a very good set up!
- Last weekend I was at a local mall, and I had modified my vest with little stickers identifying the different pockets. I was able to crank out balloons quicker than I have ever been able to.
- The vests usually go for about $20 - $30 dollars. I use the cotton ones, which seem to hold up to more abuse than their nylon counterparts (and are much cheaper, nylons go for around $60 and up). The large pocket in the back holds 2 - 3 one gross bags of balloons, and the elastic or cotton "net cord" can be modified to carry a large pump fairly easily.
Gift Bags
- I use a gift bag like Hallmark Cards carries. One gift bag will hold four round bird
food cans ...to keep balloons sorted. 6" hearts are in one can (with a playing card
down the middle to divide the can... I put white hearts on one side, everything else on
the other ), green 260Q's in another, assorted 260Q's in the 3rd, and the last is for
whatever misc. I decide to carry (sometimes Geo's, usually 130's and most times I'll put
rubber balls there as well.) (my palm pump is usually stored in this can also ). I use the
space between the cans to store scissors and other miscellaneous odds and ends.
I like the bags 'cuz I can usually find one for the current holiday or season. I wouldn't mind switching to a more permanent bag like a Dr's bag or something, but have yet to run across anything that caught my eye.
Making Inflated Balloons Last: Storage
- Putting an inflated balloon in the fridge makes your sculpture will stay fresher for longer. My Father put a one- balloon motorcycle in his freezer on Jan. 1, 1995, and the last I head, (end of June) it was still there, and only looking a little different than when he got it. I got the idea from a client who left his kids' sculptures in the freezer while he went away to Alaska for 3 weeks and returned to discover that they were like new. When I need to save a sculpture for some reason I always put it in the freezer if possible, or the fridge if there is no room.
- The only way to prolong the balloon clarity is to place inflated items in a clear plastic bag. When I was vending out doors, I would place stuffed balloons into clear bags, twist closed tightly to fit snug over the balloon and put a big bow on the plastic bag as well.
- Whenever you blow up a balloon, you immediately subject it to oxidation, its just a fact of atmospheric physics. I do Balloon Deliveries using both rounds and non-rounds. On many occasions we will pre-make a bunch of sculptures for a party when we know there will be too many kids to twist for in the allotted time. The best, fastest, cheapest cure is a plastic bag, 55 gallon drum liners are my favorite. Find one large enough to hold your 260 sculptures and/or the entire delivery and stuff them in, tie with a piece of curling ribbon. Just before the delivery, take everything out of the bag, fluff and fix where necessary and wow them with your product.
- I've used the Rainbowrapper bags for everything from delivery bouquets to transporting String of Pearl Arches and have found them to be WONDERFUL.
- We get our large bags from Viking Paper Products. Our bags are "see-through" and about 72"x48" and cost us about 15-20 cents each.
- We use 55 gallon drum liners (trash bags) that are clear, we get them wholesale for $10 a box (60 per box). It's great to be able to see all the colored balloons in the bag, and it keeps them from oxidizing too!
- A clown friend uses a very large (trash can sized) mylar bag to transport her balloons. It is decorated with balloons and confetti, just perfect for a celebration! She said they're available at most Hallmark stores. They're durable and attractive.
Making Inflated Balloons Last: Products
- Are there any balloons that do not cloud up?
No. All latex balloons are, well made from latex and the characteristics are the same... latex oxidizes, period! One other thing you can do, though, is apply a chemical to the balloon surface, to prolong clarity by weeks. - How can I avoid having that milky coating on my balloons during hot weather? I used STP brand Son-of-a-Gun and it was ok, however, it didn't last that long. I've tried a half and half combination of Hi-Float and water; however, that only streaked the balloons real bad. I've also heard that Armor All works too. Is there something else that I don't know about?
Balloon Shine and Balloon Shield
- I have a sample bottle of a product called Balloon Shine by Maxim, and it works pretty well, but you must buff each balloon you spray it on.
- Balloon Shine and Balloon Shield (by Maxim, Inc.). Also If you can do your balloons in the air conditioning along with applying the Shine or Shield, this will help.
- I purchased Balloon Shine was from my local balloon company. However, STP worked as good as Balloon Shine.
- I used to own a car wash and I know my car chemicals very well. Balloon Shine looks like, smells like, and acts like STP. Balloon Shine also makes my tires look great! So you do the math.
- Balloon Shine is a product made specifically for balloons but, unfortunately, the results are similar to Armor All.
Hair spray
- Hair spray on the outside of the balloon will make it last a long time but don't touch it or it shrivels.
Hi-Float and Super Hi-Float
- Hi-Float: is a gummy, glue-like, resin that you apply to latex balloons to allow them to retain helium for longer periods of time. Once the it dries, it forms a plastic-like coating that adds many more hours to the life of a balloon before it "drops". In the case of 16 inch or 3 foot round balloons, that can mean up to 2 weeks of float time.
- Super Hi-Float: is a liquid substance that is designed to go inside
helium-balloons to make them float longer. If used in 260's, it makes them last for
months. It can be a little messy. Before you insert the gel into the balloon make sure
that you remove all of the air from the balloon first (If you don't then the gel will be
forced back out of the balloon). Don't use very much Super Hi-Float either because all you
need is enough gel to give the balloon a thin layer of protection. The gel takes about 30
minutes to dry. But once dry you've got a balloon that will stay inflated for months.
General Advice
- Any time I am working on a balloon sculpture "exhibit" that I want to stay fresh for more than a day, I use the Hi-Float and water mist (half Hi-Float and half water). I keep the solution in a 6 inch deep plastic bin and use a small submergible pump to dispense it. I suspend the sculpture over the bin and use the hose to get a good covering. It only takes a few minutes for them to drip dry. A slow-speed fan helps to speed up that process. The coated figures stay clear and last for days. Other reasons to use it outside is because certain types of balloon's don't allow the glue to dry fast enough-Swirl/Agate Colors in particular.
- After a short time you'll find that you can put Super Hi- Float into balloons and inflate them in a very short time. It doesn't cost too much either, in England it costs about 6 - 7 Pounds for a bottle full.
- We have used Balloon Shine and while it is good for short periods, our best results have come by using the original "Hi-Float" formula to seal the surface.
- We have used a combination of original Hi-float...letting it dry, then spraying Design Master Floral Spray (formerly Glitter Glue) over that. These projects had not been subjected to direct sunlight and a majority of the balloons were round, but this process was pretty successful for sealing both new and oxidized balloons. Out-of-doors, there has not been anything we have tried that lasted as long as natural latex.
- Some people add HI-Float to the outside of balloons before inflating them to avoid the "dust" that forms during longer periods of times or outside biodegration.
- The largest drawback to Hi-Float, is if the balloon pops during inflation-you get
slimed, and you'll find parts of balloons stuck to every conceivable surface around. It's
water soluble though, and doesn't leave a stain.
Artistic Hi-Float application
- The best reason to use High Float though is to create internal effects with
confetti/glitter. My favorite trick I read years ago in Image magazine was a spider web
INSIDE a clear latex 16" balloon-complete with spider. Everyone wondered how it was
done at the time.
You inflate the prepared balloon-sans plastic spider-with air and allow it to dry. Then deflate the balloon and pull/stretch it 1-3 times. Reinflate SLOWLY with helium and add the spider afterwards - if you do it before re-inflation it'll throttle around and likely break the balloon as well as screw up the "web". I prepare 3 balloons for every "one" good one that I use since it's fairly tricky to get the web to look right.
- Add food color to Hi-float to make swirled colors in a white balloon. Be sure not to
squish the Hi-float around too much or you will have a pastel, solid color interior. I'm
thinking strawberry swirl ice cream... or maybe confetti inside to make it look like
chocolate chips... how about some sprinkles made from bits of chopped up curling ribbon?
Balloon sculptures
- Marvin relates great duration of his pieces to completely covering the sculpture then hanging out to dry. (Mixing 50% water and 50% Hi-Float)
- I use Super Hi-Float in all of my larger models now, and they stay fresh and fully inflated for months on end. One last tip, however, is to coat the knot with the gel (not much is needed otherwise the balloon becomes sticky & messy etc.) otherwise you'll find that the nose of your animal will go down the quickest, as air escapes from the knot.
- Dipping your 260Q sculpture in a combo of Hi-Float and water will prolong the life of
your creation.
Pre-Treating Un-Inflated Balloons
- I often apply Super Hi-Float ahead of time for parties, holidays, etc. Just place them in a plastic bag to limit the amount of air they are exposed to... A zip-lock bag, with the air pressed out of it, keeps the high float fresh for weeks. I've experienced no problems with the balloons.
- Hi-float the balloons, "squish" them, and cover them with plastic wrap to keep out the air. You then have to re-squish (to evenly distribute the Hi-float on the balloon interior) before inflating.
- Pre-treating and storing without inflating... I have simply treated with Hi-float, grouped the balloons (6-12), placed rubber bands around them, placed upright in an airtight container and refrigerated. They can be done weeks ahead of time this way.
- Just Hi-Float your balloons, and use a rubber band to tie 10 or so together, then store them with the neck up to minimize the hi float in the neck. When you're ready to inflate them, rub the balloon so the Hi-Float is redistributed within. We use paper clips (remember them?) to hang 3 or more groups of balloons together from some wire shelving. Some people have done this, and then refrigerated them for up to 30 days!!! Just remember to let the balloons warm up to room temp before inflating!
- When inflating Qualatex 11" Jewel-tone and pearl-tone balloons with helium and
templating to 11", we have found they tend to become a definite pear-shape. We combat
this problem by preparing all of our balloons a day or two ahead of the job: What works
for us is to insert Super Hi-Float, tie 7 or 8 together with some discarded pieces of
curling ribbon, place in a zip lock baggie and store . This allows the balloons to be
blown to a much larger size, and helps to eliminate the pear problem. Refrigeration has
also been suggested to us as a means of extending the time between preparation and
inflation. This simple method has been so successful for us that we do all of our delivery
balloons ahead of time also. In fact, the employees in our shop CRINGE when someone stops
in to order a bunch of balloons "cash & carry"! They simply do not look as
full as the ones that have been prepared.
Pre-Treating Inflated Balloons
- The only advance preparation process recommended in "The Hi-Float Book" is
referred to as "the dry method," abbreviated as follows:
- Treat the balloons on the inside with Hi-Float. Inflate and seal with clips.
- The next day, remove the clips and add helium as necessary.
- Note: It is important to keep Hi-Float out of the stem of the balloon so that helium may be added the next day to fully inflate the balloon.
This technique was developed so that customers could receive treated balloons without the risk of being "slimed" if a balloon popped. It may also be useful for preparation of balloons to be used in a spiral arch or other design with balloons spaced so closely that the Hi-Float cannot quickly dry. Because Hi-Float must DRY to form the helium barrier coating, the balloons must be inflated while the Hi-Float is wet inside.
Sales Techniques
- Do you sell Hi Float or keep it as a 'trade secret'?
I use it as an add-on sale when selling balloons "to go." I always have asked customers if they would like HI-FLOAT, tell them the benefits, and the small additional price per balloon. I think it's a bargain at $3 per dozen balloons and customers love it. - I think all deliveries should be HI-FLOATed, since the longer the balloons last, the longer they will be around to remind people of your business. I like to deliver big bouquets of HI-FLOATed 16-inch balloons to office buildings. That way the recipient is less likely to take the balloons home from work (they're too big!) and more likely to leave them on their desk. (I'm getting paid to advertise!) Let me tell you, a 16-inch with HI-FLOAT lasts a mighty long time!!!
- When selling balloons with HI-FLOAT, let me recommend that you add a tag that explains that the balloons were treated. Otherwise the customer or recipient won't know/remember and will likely develop an unrealistic impression of how long latex balloons last w/o treatment. That can come back to bite you. Ask me to tell you about the disgruntled customer I had once because of this very thing!
Substitutions: Automotive Products
- STP is a water based automotive product for making rubber, vinyl, plastic and finished leather shine. Most people use it for the "Wet tire" look. The important thing is that STP is WATER based. Some of these applications are petroleum based and will eat through latex very fast.
- I do not know if Armor All is water based or not.
- STP brand "Son of a Gun" can be used on the outside of a latex balloon (instead of Hi-Float) to prevent the chalky oxidation that results from long exposure to air. I doubt that it has any of the Helium-diffusion-rate-altering qualities of Hi-Float though. Knowing how slippery "Son of a Gun" makes car seats, it may not have any practical application for twisted sculptures.
- Don't use Armor All until after the 'loon is inflated and the figure is made. I've had hearts and blossoms stay shiny for more than 3 weeks in the mall after being treated.
- Bigger cities have car-washing chemical suppliers. They will have a version of STP in a gallon jug. You will want to ask for a water- based product. The company will have it for a fraction of the cost.
- I don't recommend using STP or those other auto products, they feel oily to the touch and they take time to apply. There is a product called Balloon Shine that does the same thing (retard oxidation) but again, the time factor is too much for me.
PART10
Contractual agreements
- Business Contracts
- Confirmation
- Deposits and Cancellations
- No contract?
- Sample Contracts for Balloon Artists
Business Contracts
- You've booked the job. Now you need it in writing. Many experienced business people
stress that you should have a written contract. It helps you communicate effectively with
your client so everyone has the same understanding. The 5 things you should include in a
business contract are:
- Description of work including ownership of all materials. (what can the client take home and what are you "renting" to them.
- Payment terms, conditions and responsible parties.
- Access to work space and timing of work.
- Strike or tear down arrangements
- Bad weather, cancellation and design change fees.
The QBN business volume also teaches you about income statements, balance sheets, how to price your jobs and make money (and know you are making money).
- My intention in using a contract is to avoid misunderstandings over the telephone, protect me from a customer making changes and forgetting to tell me, and to avoid being sent on a wild goose chase (which happened the day before I wrote this).
Confirmation:
- We send out a confirmation letter. It's extremely simple, showing the party information (place, date, time, etc.), the number of kids, the things we will be doing there, and stating our cancellation policy, as I posted to the list. The customer returns the letter with a 50% deposit and their signature, which in effect gives us a contractual obligation without the fuss and muss of a formal performance agreement.
Deposits and Cancellations:
- Most of the people, in my experience, don't mind paying a deposit if they're going to get good service.
- Require a deposit. After all, these people are asking you to make a commitment to them -- shouldn't they make one to you?
- One approach to handling cancellations is as follows. If the event or performance is canceled, the customer may be issued a "Raincheck if at least 24 hours notice is given. If less than 24 hours notice is given any deposit is forfeit. The Raincheck is good for the same performance or equivalent event within one year that can be worked into the performers schedule. The Raincheck cannot be used unless the performer is available. If the event is canceled and the performer notified within ****Hours**** the deposit will be good for one year from the date of the original scheduled date. This deposit will then be good for any similar event within the year that the performer is available to attend at the request of the customer. If the performer is not scheduled within that year, the deposit is forfeit.
- "You cannot live as an artist if you do not get paid because of rain." Benny
Schuman.
"Business is business." Not getting a non-refundable deposit and not getting paid because of the weather is not business.
- Conditions are always a problem, and I don't allow them. If you're going to hire me, I'm
going to be there.
"If it rains, we don't need you to come."
"Well, if it doesn't rain, I'm going to the beach instead of your party. We'd better work something out." - We just do not accept conditional scheduling since we have no control over the weather and too many other factors that could effect a booking. Use a contract, even for personal events. The contract should state that the sponsor of event is responsible if event is canceled and that they should make provisions for bad weather, etc. They contract for us and we come rain shine snow or whatever. If we commit to your event it means we agree to turn down others.
- Some state laws will allow you to charge for cancellations at the last minute, but normally you have to have a contract in advance saying this is a policy. Again, law in some states will allow this contract to be as simple as a sign at your place of business stating your policy. Check up with your local business bureau. Ever been to a really good hairdresser? How about a tanning parlor? Most of them require 24-hour notice on cancellations, or you'll get billed. You can do the same. Of course, you'll want to take the particular customer into account, as well. If this is a good customer who hires you every year and pays well, you may not want to make an issue of it. At least you know you'll be assured a job next year. If you make a big fuss, you may not.
- On all company contracts we ask for 1/2 down and the rest at the conclusion of the event. The deposit is non refundable. If they cancel 24 hours before the event, we require half of the balance. If they cancel because of rain, we just take the deposit and run. If they reschedule the event, we stay status quo and get a day off. It is good to stay in good graces with all your clients. Don't burn bridges.
- This particular event did pay some deposits to other attractions but they included a clause that the deposit was good for one year. so Thus, the deposit would cover the following year's event in case of cancellation.
- In decorating, my partner & I ALWAYS require a deposit. It secures the spot for the client and it protects you in the event of "elopements" or breakups...... We do not refer to it as a deposit, we call it a retainer.
- Your absolutely right, this is a booking fee and not a deposit, therefore it is non-refundable.
- I have that clause in all my contracts and it works well for me. I don't think people
take you seriously if they can cancel and get their money back if and when they change
their mind.
I also think that because it's in the contract, clients won't even ask to cancel unless it's an absolute emergency. Then it's up to my discretion, if I want to return the deposit or not. Generally it's no, but I will allow them to hold the deposit towards another event or date. It has happened so seldomly to me, maybe 3 times in the last 10 years, that the 50% deposit works great.
I also don't allow clients to change what's on the contract (with the exception of the # of TC). Sometime's they run out of money at the end of planning an event and want to start canceling pieces. I won't let them. They always come up with the money somewhere.
Hope I don't sound hard. I choose my words in these conversations very carefully. I am always professional. Sometimes it's a tough call.
- Although we always have the "non-refundable" clause in our contracts, and also
in our proposals, upon the advice of our lawyer, we changed the word "deposit"
to the word "retainer". I believe it was Pam Steiner who first suggested this
word be used because of the legal implications of the word "deposit". The
average consumer assumes they can get their "deposit" back if they change their
minds. However, the word "retainer" indicates a fee for a service. The exact
wording we use on the bottom of our proposals is as follows:
"REFUND POLICY: The first $200.00 (two hundred dollars) of your initial payment is a non-refundable retainer fee which reserves your event's date and time on our calendar and guarantees our company will be available to decorate for your event. The remainder of your initial payment and any other payments you make between now and your event date, is refundable on a percentage scale based upon the date of written notification of cancellation. The percentage scale is as follows: 6 months or more before your event.......100%, 3-6 months before your event....50%, 1-3 months before your event...25%, and Less than 1 month before your event...0%."
- I'm not a lawyer, but here are my suggestions. Several things that should be in your contracts. Anything outside should contain something about weather, which you should have previously discussed with your client. It should say something about "rain or shine" (which may mean you will be blowing up balloons in the pouring rain) and a cancellation or postponement agreement. I suggest something like a 50% non refundable retainer, deposit, whatever you want to call it (there were some earlier posts about this) You keep the 50% whether or not they cancel. If they cancel they need to do it by a certain time,(Before you've gone to bed early the night before to get up early to do the job) or else they pay in full. "Not responsible for inclement weather, acts of God, vandalism, etc." works pretty well too. If there is a projected rain date that should be included and provided for. (eg. In the event of postponement, rain date is next day same time, customer will pay an additional 50% if postponed by 9:00 a.m., 75% if postponed after 9:00a.m.) The most important clause in your contract, however, is the one that says "PAID IN FULL"
- here are two phrases from my contract:
"Balloons are, by nature, temporary items: Although B'LOONS BROS. uses only the finest quality balloons, some balloons will occasionally deflate sooner than expected and will also be adversely affected by wind, rain, rough handling, sunlight and other uncontrollable factors."
" Due to the unexpected circumstances that can occur with any event, we reserve the right to make changes only in the best interest of our clients. If the facility is not available or set up at the promised time, decor may be left in the nearest acceptable location. Additional time required (if available) to complete the job will be billed at $25/hour."
- During the first couple of years of decorating, we ran into several jobs with the same
consequences you experienced. As a result of the "bad press" we received from
clients (even if we DID refund, we found we still got the "bad" reviews), we
made a business decision to inform our clients that "we NEVER guarantee perfect
results with balloon decor outdoors." However, we further state that we will do
everything in our power to make sure the decor will hold up......from using the BEST
quality of balloons, (Qualatex of course!!!), helping them choose colors and balloon types
(i.e. fashion tone as opposed to jewel tone), and the type of decor that holds up best in
all kinds of weather.
Because of this warning, we DO lose an outdoor job once in awhile, but we have always gained the respect of our client(s),they ALWAYS thank us for our honesty, and have all come back to us at later dates for even bigger and better INDOOR jobs.
Personally, we would rather avoid, at almost any cost, doing outdoor decorating jobs because we know it is very difficult to show our product at its best. However, if our client is well aware of the risks he is taking, and still wants us to do the job......far be it from us to turn down his $$$$ <giggle>. We always include the weather clause as well as the "no guarantee out-of-doors" clause on all our contracts.
- It might be wise to have had a contingency plan that is discussed with the person booking the job. You would need a time, telephone number and contact person who can ok a prearranged design. If you suggest air-filled designs for outdoor work, you can be more flexible and the design can withstand the elements better.
- Just to be on the safe side, it is always best in the long run, to spend a few dollars and have an attorney review your contracts before you use them.
- In your proposal be sure to state what materials are yours and what are the clients. Be sure to include bad weather pricing, cancellation pricing and terms for payment. Also, since you are adding pictures, be sure to have your pictures copyrighted and type copyright at the bottom of your proposal. Add a line for signature of the client and the date to prove he has read and agreed to the proposal. Make sure you bullet each item of decor to be done and the price for each. Also have a second and possibly third decor plan at lower prices to give the client a choice.
No contract?
- Instead of contracts, some people prefer to send out a confirmation letter. It's extremely simple, showing the party information (place, date, time, etc.), the number of kids, the things we will be doing there, and stating our cancellation policy. The customer returns the letter with a 50% deposit and their signature, which in effect gives us a contractual obligation without the fuss and muss of a formal performance agreement.
- I just heard from a job I have on Saturday. If it rains they are canceling and will not be paying me. This is a repeat from last year and it requires two balloonists. I booked a friend for the other times and now they are saying that we will be out of luck if it rains. I did not require a deposit.
Sample Contracts for Balloon Artists
- Additional Material
- Agent Contract
- Client Contract
- Information Sheet
- Liability Release
- Deco and Twister Contract
- 13 Point Contract
- Short and Sweet
Additional Material
- Rain or Cancellations: If the event or performance is canceled, the customer may
be issued a "Raincheck" if at least 24 hours notice is given. If less than 24
hours notice is given any deposit is forfeit.
The Raincheck is good for the same performance or equivalent event within one year, that can be worked into the performers schedule. The Raincheck cannot be used unless the performer is available.
- All outdoor performances must be conducted in a safe manner and there must be an indoor rain contingency plan. In the event of cancellation without such a contingency, the Purchaser must pay the contract in full.
- Cancellations: If the event is canceled and the performer notified within XXXX Hours, the deposit will be good for one year from the date of the original scheduled date. This deposit will then be good for any similar event within the year that the performer is available to attend at the request of the customer. If the performer is not scheduled within that year, the deposit is forfeit.
Agent Contract
_______________ company [Agent]
_______________ Address
_______________ City
_______________ Telephone
Type of Entertainment: ________________
Date of Performance: __________________
Time: _______________
Length of Performance : _______________
Location: _____________________________
Telephone: ___________________________
Contact: ______________________________
Fee due to performer: $_____________ (X hours at $X per hour)
Other information:
_________________________________________________
_________________________________________________
_________________________________________________

                                  Terms
This contract is non-cancelable by any of the parties hereto.
performer agrees to entertain at function as detailed above, and
agrees to exercise reasonable, professional, judgment in the
conduct and content of his/her performance.  Performer assumes all
responsibility for their actions.
_________ company [agent] assumes no responsibility for the
actions
of the client or their gusts.  Performer agrees to this engagement
as an independent entity and may not hold _________ company
[agent] liable for any acts, losses or damages.  Additionally,
_________ company [agent] cannot be held liable for injury
sustained
in relation to this engagement.
It is understood by all parties involved that _________ company
[agent] is the sole booking organization for the performer for all
of its engagements with this specific purchaser and shall be
entitled to a commission for any future engagements resultant from
this function.
Performer must distribute promotional material provided by
_________ company [agent].  Failure to do so will result in the
forfeiture of any future engagements.
Should _________ company [agent] learn that the entertainer has
distributed his/her own materials, said performer will not be
entitled to the total fee due.
Failure to comply with the terms, conditions, and specifics of this
agreement shall result in the forfeiture of all moneys owed to the
performer and may entitle _________ company [agent] to damages.
Signature below constitutes agreement to the above.
_____________________________
___________________________
agent                             performer
Client Contract
Business Contract [underlined]
_______________ Your company [agent]
_______________ Address
_______________ City
_______________ Phone
Date of Performance: ____________________
Time: _________________
Length of performance: __________________
Location: _______________________________
Type of function: ________________________
Fee: ___________________
Service requested by (or contact point): ___________________
Entertainer: ___________________ [by name..."Go-Go the
Clown"]
Type of entertainment: ______________ [be specific, balloons,
magic, face painting, etc.]
Other considerations:
_________________________________________________
_________________________________________________
_________________________________________________

                          Terms
This contract is non-cancelable by any of the parties hereto.
performer agrees to provide entertainer at functions, as detailed
above.
Entertainer is retained as an independent contractor, therefore,
_________ company [agent] cannot be held liable for damages
sustained in relation to this engagement.
*A non-refundable deposit is required prior to performance date.
This deposit shall be forfeited should the event be canceled or
postponed due to weather conditions or other circumstances.  The
fee indicated herein shall not be decreased, under any
circumstances whatsoever, including decreasing the length of the
performance.
Total payment for services must be received on date of performance.
_________________________
________________________
Agent                                  Name...contact point
                                      Authorized Agent of Function
(If due to time constraints, a deposit is not feasible and the
entertainment be canceled, a fee of one third of the total fee
listed above is due.)
[The above contract can be faxed to and from Authorized agent of
function.]
Information Sheet
PRIVATE PARTY INFORMATION SHEET Thank you for choosing ****Your Name**** The Balloon Artist to entertain at your private party. Your entertainment package includes up to 1 hour of balloon entertainment by ****Your Name**** The Balloon Artist, complete with top hat and bow tie, and all of the balloons he uses. Please examine the following information for accuracy and return a signed copy, with your non-refundable deposit, to the address below. Your party time and date will not be reserved until this information sheet and the non-refundable deposit are received at the ****Your Company****. Full payment must be made immediately after the show. Make checks payable to ****Your Company****. CUSTOMER Name: [Customer Name] Address: [Customer Address] Home Phone: [Customer H Phone] Work Phone: [Customer W Phone] PARTY LOCATION Location: [Location Name] Address: [Location Address] Phone: [Location Phone] Time & Date: [Time & Date] Directions: [Directions] PRICES Package Travel Total Price Deposit Due $ $ $ $[Deposit] [Customer Name] Party responsible for payment
****Your Company**** Liability Terms You the customer, by signing the release portion of this document, give your permission for ****Your Company*** /***Your Name**** to work and entertain under the following conditions. You agree to accept all responsibility for all personal and real property, and persons at the event's location. Upon signing this release you are releasing ****Your Name**** and ****Your Company**** from all liability and responsibility for property, persons, and pets at the event's location, before, during and after the event. As a result of signing this release, ****Your Company**** and ****Your Name**** are free of any liability, and you the signing person will accept full liability and responsibility for persons and property at the location. Release Agreement for: ____________________________ Event, at ____________________________ Location, for ____________________________ Date/time I agree to the terms listed and accept the terms of liability. I accept full responsibility and liability for all property and persons at this location and release ****Your Name**** and ****Your Company**** from all responsibility and liability. I under stand that there are dangers to children and pets if balloons or parts of balloons are swallowed. Customer(Print Name) _____________________________________ Signature ________________________________________________ Date ______________________ Phone ________________________ Address _________________________________________________ City, State __________________________________ Zip __________
INDEPENDENT ENTERTAINER/CONTRACTOR AGREEMENT This agreement is hereby entered into by and between ( name, address, and phone number of individual negotiating contract) representing (name, address, and phone number of business for whom service is to be provided) hereinafter referred to as _____________________, and ****Your Full Name*****, an independent entertainer and contractor, representing ****Your Company****, Your Company Address, Phone number (XXX) XXX- XXXX, hereinafter referred to as ****Your Name****. Wherein ________________ desires (A broad statement of the products and services requested, the time, date, and location where products and services are to be delivered) and has requested that ****YOUR NAME**** provide such entertainment and/or decorating service, ****YOUR NAME**** hereby agrees to provide the following: (A complete item by item description of products and services agreed upon). ________________ agrees to provide ( detailed list of all items to be provided by client such as parking, meals, ladders, lift, extension cords, and etc.) The fee agreed upon between ________________ and ****YOUR NAME**** in exchange for said entertainment and/or decorating service is ($______), to be paid to ****YOUR NAME**** as follows: a deposit of ($______), which is non-refundable unless the contract is canceled more than 30 days prior to the date the entertainment and/or decorating service covered by this agreement is to be provided, is to be paid to ****YOUR NAME**** upon acceptance of this agreement. The balance of ($ ___________) is to be paid to ****YOUR NAME**** no later than _____________________ unless a later date is agreed upon in writing prior to the date of the entertainment and/or decorating service. If said balance is not paid to ****YOUR NAME**** as herein required, _______________ agrees to pay to ****YOUR NAME**** an administrative charge of ten percent (10%) of said balance and to pay all reasonable costs including court costs and attorney's fees incurred by ****YOUR NAME**** in the collection thereof. It is agreed and understood between the parties that any and all persons providing entertainment and/or decorating service as provided herein are independent contractors, represented by ****YOUR NAME****, and that no employer/employee relationship exists between such persons and _________________*. ****YOUR NAME****, for and in consideration of the mutual covenants herein contained, hereby agrees to indemnify, save, and hold harmless __________________ and the legal and beneficial owner(s) of the real property and improvements commonly referred to as ___________________________, and their respective partners, affiliates, agents, related entities, attorneys, officers, directors, shareholders, employees, successors, and assigns, from and against any and all claims, demands, causes of actions, suits, proceedings, costs, expenses, and damages arising out of or relating to this agreement or the services to be performed pursuant hereto. _______________________ ___________________________ Signed: Date: _______________________ ___________________________ Signed: Date:
 ****Your Name****, Inc.
  Services Agreement
This agreement is entered into this [today's date] by and between
[Artist Name] for [Artists Stage Name], herein referred to as the
"Artist" and [Signer For Buyer] for [Buyers Name],
herein referred to
as the "Purchaser", with the assistance of ****Agency
Name if one is
used**** for ****Your  Name****, Inc., herein referred to as
"Agency",
for the following services.
1.  Purchaser hereby engages the Artist, subject to the terms and
conditions
2.
as follows:
Event:    [Event Name]
Date:   [Event Date(s)]
Location: [Event Location]
Time:   (Detailed in Attachment No. 1)
Cost:   $ [Total Cost]
Attachments:  One
2.  It is agreed that as full compensation for services provided by the
Artist as above set forth, the Purchaser will pay to the Artist the sum
of $ [Total Cost].  A $[deposit amount] non-refundable deposit will
be
issued with the signing of this contract.  The balance of payment is
to
be made in full, on the day of the event, to the leader of the artist
group in cash, company check, certified check, or money order.
Any
deviation from the specific terms of this paragraph by the Purchaser
shall constitute a breach of this entire Agreement.
3.  All outdoor performances must be conducted in a safe manner
and there must be an indoor rain contingency plan.  In the event of
cancellation without such contingency, the Purchaser must pay the
contract in full.
4.  Purchaser is responsible for providing all permits, licenses and
legal papers needed for any foreign events outside the United States,
in a timely manner.  Such documents must be provided to the Artist
by the Purchaser no later than two weeks prior to the performance.
Purchaser is liable for any costs and expenses related to said
permits,
licenses and papers.  Any delay or non-compliance to this paragraph
will be considered a breach on the part of the Purchaser.
5.  The recording, reproduction, filming or transmission of the
Artist's
performances are prohibited without the written consent of the
Artist.  The Purchaser shall be responsible for the strict enforcement
of this paragraph.
6.  The Purchaser will make available two complimentary tickets per
Artist member for any public events.
7.  The Artist agrees that the Purchaser shall have the right to use
the Artist's name, approved pictures, and other likenesses in
connection with the advertising and publicizing of the engagement
hereunder, but such use shall not be as an endorsement of any
product or service, or for the sale of any merchandise, except with
the Artist's written permission.  It is also agreed that all advertising,
promotion, etc. referring to the Artist will refer to him as
[Artists Stage Name].
8.  The Agency is acknowledged to have performed its obligations
upon the commencement of this  engagement.  The Agency shall not
be liable for any breach, default, or failure to perform by either the
Purchaser or the Artist.  No changes in this Agreement affecting the
Agency's commission of its
payment shall be made without the written consent of the Agency.
9.  Purchaser agrees to be responsible for the actions of the
Purchaser's employees and patrons, and to reimburse the Artist for
any damages suffered due to the actions of the Purchaser's
employees or patrons, including harm to Artist's equipment while
such equipment is at the place of the performance.
10.  The Purchaser agrees that the services as outlined in Attachment
#1 shall not be canceled or modified, except by mutual, written
consent of both the Purchaser and the Artist.  The attempt by one
party to cancel this Agreement without the permission of the other
party shall be a breach of this Agreement.
11.   Should either party to this Agreement fail to carry out their
obligations under the terms of this Agreement, the other party may
bring legal proceedings to enforce the terms of this Agreement.
Interest shall be payable to the non- breaching party on the amount
of damages suffered, calculation at the rate of 12% per year (or the
maximum legal rate, if such rate is lower that 12% per year).  Such
interest shall begin to accrue as of the date of discovery or notice of
the breach of this Agreement by the non-breaching party.  Should
either party find it necessary to commence legal action in the case of
breach, or to otherwise enforce the terms of  this Agreement, the
prevailing party shall be entitled to an award of court costs,
expenses
and attorney's fees incurred in such legal action, in addition to any
damages or other legal relief awarded.  The parties agree that venue
for any legal action by either party shall be in ****Your****
County,
****STATE****.  Both the Seller and the Purchaser agree to be
subject
to the jurisdiction of the courts of ****Your**** County,
****STATE****
for purposes of any legal action.
12.  This Agreement cannot be assigned or transferred without the
written consent of both parties.  The waiver of any breach of this
Agreement shall not be deemed to be a continuing waiver.  This
Agreement contains the complete agreement between the parties.
No modification, or change to this Agreement shall be valid unless
made in writing, dated,, and signed by both parties,  The validity,
interpretation and enforcement of this Agreement shall be governed
by the laws of the State Of ****????****, regardless of the place
of performance by the Artist. The terms Artist and Purchaser as used
in this Agreement shall include and apply to the singular and the
plural, and to all genders.
13.  The person signing this Agreement on behalf of [Buyers Name]
hereby warrants and guarantees that he or she has the authority to
sign this Agreement and bind [Buyers Name] to the terms of this
Agreement, whether [Buyers Name] is an individual, partnership,
corporation or some other entity. All copies of this Agreement must
be signed and returned to ****YOUR COMPANY**** with the
above
mentioned deposit, within 14 calendar days of [today's date]. One
counter signed copy will be returned to [Buyers Name] at the
address
below.
  This contract must be returned by the Purchaser to the
Agent.
One countersigned copy will be returned to the Purchaser's address
below.
  Accepted and Agreed to by:
_________________________
  _________________________
[Artist Name] for     [Signer For Buyer] for
[Artists Stage Name]    [Buyers Name]
[Artists Address]   [Buyers Address]
******************************************************
********

Attachment No. 1
Services are to include;
[Hours of Roving Per Day] Hours of roving entertainment per day
by
[Artists Stage Name].
[No. of Stage Shows] Stage performance(s) by [Artists Stage
Name].
All supplies used by [Artists Stage Name].
Times of performances will be as follows:
Short and Sweet
****YOUR COMPANY**** SERVICE CONTRACT ****Your Company**** contractually agrees to have _____ Entertainers at ____________________________ on ________________ from _________ to __________ to entertain children and/or adults attending _______________________________________________. In exchange, __________________________________ agrees to pay ****Your Company**** $_______ per hour (_____ total hours, ______ total amount) for the above time, and $______ per each 15 minute section exceeding the above time, if desired upon the end of the period. In the event of a cancellation, ________________________ agrees to notify ****Your Company**** at least 72 hours in advance or forfeit the deposit previously paid or agreed upon ($______). **Package includes: Strolling creation of balloon animals and crazy balloon hats, all balloon supplies, travel expenses, and fun costumes ** Make check payable to: ****Your Company**** ________________________________________ _________________ Client Date ________________________________________ _________________ Date Please sign above and mail to: ****Your Company**** Address of your company
Full time twisting
Tom Myers Article
What you are thinking about is going into business for yourself. If you ask a hobbyist to write down his expenses you get a shorter list than someone twisting to make a living. The hobbyist is not likely to include medical, dental, life and auto insurance, retirement plan, kids education, social security, taxes, bookkeeping etc. For a full time twister to make enough to raise a family is difficult and risky. He has to put in more hours and/or get paid more per hour than other twisters. If the buyer thinks he is just buying balloons, the full timer's job is at risk to less expensive hobbyists. It seems to me the advantage goes to the twister who has a regular job and twists for fun and extra income. He can pick the ripe fruit off the tree of jobs. He is not desperate for a weekday work but happy for a weekend of profitable activity. Everyone has a level of ambition and there is nothing wrong with being a part time twister. There are lots of part time, good pay jobs out there and it's fun. An ambitious balloon twister will find there are very few full time, high paying jobs in his field. If you don't have the skills for an above minimum wage job, I'd suggest you work at whatever you can, twist when you can and use the money for more education or training for a better paying job.
How Much Preparation Do You Want To Do? Different work situations call for different styles. You have to look at each situation and make decisions about which figures to offer, whether to sell figures or work for tips, whether to do a show or set up a line. As a part time twister, I look for situations that will require the least time in preparation and make me the most money per hour. I don't mind working hard and I enjoy talking to the kids and being in front of a crowd. The $250 to $350 I can make in a day working for tips at a well attended art fair is satisfying but not necessary for my survival. That I am not doing this for a living makes the whole experience less stressful. If it rains or the crowd is stingy, it is not so bad. The preparation consists of getting permission, tossing my pump, balloons, menu poster and tip basket into the car, driving to the fair, carrying everything in one load to the work site and going to work. My main money limitation is the number of balloons I can twist in a day. If I wanted to make more money in the 'sea of heads' type art fair, here are some things I'd try.
1. Investigate selling twisted balloons in your state. Some states are easy and some states are hard with sales tax, business license, and insurance requirements. In a large crowd, once the balloons are out there and a demand is established, you'll make more by charging a set price. It is chancy, sometimes a set price will scare customers away.
2. Run a crew of twisters. This requires a large crowd and setting up the situation.
3. Make a supply of Angel or Feather sticks (see True Inflations #21). They can be made in front of the TV and they can speed up the point of sale. Other add on sales like Yo-yo balloons or Tattoos can work well with help from non twister employees.
4. Be willing to travel to more fairs.
Each of these ideas increases the preparation time, effort and expense but they can all pay off. The More You Work, The More You Work Besides fairs, twisters often find work in restaurants, company picnics, trade shows, business promotions, etc. By working in public, business cards and word of mouth will naturally bring opportunities to work. It's The More You Work, The More You Work. It's like a natural law. The situation you want to set up is to have them ask if you are available. If someone asks you to work for them, the negotiating power is on your side. If you are asking someone for a job, the power is on their side. How are your sales/negotiating skills? What about your bookkeeping skills? The more you rely on working for yourself the more non-twisting skills you need to have. You have to convince potential buyers of the benefits they will experience by hiring you to twist balloons. If they have no experience with balloon twisters, few buyers have the imagination to understand or believe these benefits. Promotion by anything but a personal demonstration is difficult at best. Two things you should find out before you quit your day job:
1. If your market can support a full time twister.
2. If you have the skills to make it work.
Try looking at twisting as a second job with the goal of working everyday. Keep good records and save your twisting money. After a year, see where you stand. Could you live on that? If you quit your day job how much more twisting work would be available to you? By trying for a year, you will have some idea of your business skills, the possibilities and difficulties in your market and hopefully a nest egg in savings. I know this sounds discouraging. It is so easy to have a big weekend that full time is a temptation. Full time twisting is not impossible but it is far from easy. I just want you to see where you are stepping.
The Up Side It's fun. Fun to learn, fun to create, fun to do for people. Most people, especially kids want what you have made. You experience being the center of attention in a group of people. The ability to be at ease in front of a group is a valuable asset in nearly any field. Getting past your own fear allows your expertise and preparation to shine through. When you twist in front of people you are on stage. The more time you spend in the on-stage mode the less intimidating it is. As you get bored with worrying about yourself you can pay more attention to how they respond to what you do and say. You get to know and shape your character. You get to experiment with timing and reaction, something that's hard to do without an audience. You will be faced with business questions when you twist for pay. You'll have to negotiate with the buyer and be responsible. You will have to have your supplies and yourself in order. It's an opportunity to make money without too much hassle. Extra income generally makes life easier. Twisting can be a family activity that is more valuable than money.
Beyond Twisting OK, you're going into this full time no matter what I say. Expand your services to include balloon decorating, bouquet sales and delivery and entertainment. Bouquet sales and delivery is probably the easiest to add immediately. Check the article in True Inflations # 22. There is a whole world of balloon decorators out there. Start by offering to work for them. You wont get paid well as a crew member but you can learn a lot. The decorator may have use for your twisting skills. As you learn enough to sell a decorating job, you can end up subcontracting each other. Learning to be an entertainer is serious work but everyone has to start somewhere. You have a start by being comfortable in front of an audience. Join the clown or magic club in your area and go from there. Offering more than twisting gives you a better chance at making a sale. Each of these skills can enhance the others. These skills can be developed part time and turn into a major part of your business. It depends on what you are good at and the needs of your market.
Larry's Response
You talk about how hard it is to make a living as a full time twister. Have you ever thought about how hard it is to make a living as a full time *anything*? I have a bachelors degree in computer science and a masters in elementary education. Getting a job isn't a problem. In fact, I've been offered some fairly high paying jobs. But that only makes sense. I dedicated 4 years of my life to learning about computers, and 2 years learning about teaching. During that time I had computer jobs, and I had minor teaching jobs that barely paid the bills. Does that mean that I should have been happy as a hobbiest computer teacher and flipped burgers for a living? Only after you know you've become an "expert" in your field are you in a position to make a serious living.
You suggest that anyone stuck flipping burgers spend whatever extra money they make on education to better themselves. Why does that education have to be academic? If I spent 6 years after high school and $20,000 a year on magic and balloons, where would I be now? I've heard people say about some magicians, "he's only a big name in magic because he was able to spend the money on stage illusions." I've never heard anyone say, "he's only got a $60,000 a year engineering job because he went to school for 8 years to learn the field."
I agree with you that nobody is going to be an overnight success in the twisting business. I also agree that most people won't be able to spend $120,000 to get their balloon career started. I don't know of anyone that offers scholarships for it. I do believe whole-heartedly that anyone that has the dedication, and the time to put into it can succeed as an entertainer every bit as well as a programmer. In fact, an artist creates the need for his own job. Once the artist is good enough, he can work anywhere. A specialized field may require your talents in only a few places.
I put myself through school as an entertainer. It was only after I did that successfully that I realized how happy I was and how I should do that for a living. It's not easy, and I have a long time to go before I'm making what I would make as a programmer. I don't care. I enjoy what I do.
Other Responses
Of course, my full-time twisting business has been difficult to create, and difficult to maintain. But like with any self-made business, I am terribly proud that I created it all on my own (with a little help from my friends and family). I especially love that feeling I get when I am entertaining clean adult crowds in fancy places, and everybody is having a great time. I was on cloud nine early on in my business when I entertained at the Fairmont Hotel! Going places twisting can only come about by hard work. Besides creating this all by myself, what's wonderful about having my own business has been that I am in control of my own destiny. Of course I have to please my customers, but I am my own boss. The only unrealistic expectations going on in my business are mine, and those can be dealt with. Tom, you mentioned, "An ambitious balloon twister will find there are very few full-time, high paying jobs in his field." What's great is that I've found it. I live in a choice area that has given me enough gigs, and enough to go around for all the other types of entertainers. I did a few hundred gigs last year. I think that the only way to make sufficient cash on balloons has been what I have done - - lived and breathed balloons day and night, until my friends were sick of hearing me talk about them. I don't see myself as being much different from the local full time magicians and clowns - they are making a living, have families, own homes, and are sane. Granted, I'll need a good dose of stamina to get there. Funny thing, I've only been able to afford my master's degree in counseling because of the Almighty latex balloon. Balloons have been my only dollar for three years, and has been full time. . My ballooning will be what carries in me into what I'd really like to do in the future- - -balloon therapy- - no, I mean balloons and therapy. Ballooning has supported me and will get me to the place where I will enjoy each of these professions equally. That will still probably mean at least a few gigs a week. And crazy as it has been, these two professions of mine grew (inflated) simultaneously and proportionately. Amazingly, the business skills that I have been learning from running a balloon business will transfer to any job in the future AND my counseling business. As advanced therapists tell me, it will be the dual careerists that will survive in the awful world of managed health care. Personally, it surprises me, Tom, that you're cutting the profession that you've been building for several years in the national community. I think it's wonderful you've given a wholesome look at full-time twisting. You're right, there is a lot to consider. But your whole business revolves around those items that enables others to increase in their twisting. I believe that everyone on the balloon HQ list would agree and desire that the world's twisters be **MORE PROFESSIONAL**. Don't you cringe when you seen a clown in bad makeup doing terrible balloons? Getting part-time twisters to be more professional will be difficult if they cannot model after full-timers. If anything, part-timers need to be as well-seasoned as possible. But, how would you like a part-timer to set fine adjustments on your car brakes or take pictures at your wedding? In many cases, it's the full-time professionals that provide the utmost quality work. The balloon decorating community and Qualatex is beginning to recognize twisting professionals a lot more. IBAC is the best example of this. It was primarily the full-timers that spent time there. With the increased participation, communication, and visibility of twisters, Qualatex begins to grant new products, new colors, and provide more visibility to our product, the 260Q. Products such as the gray 260Q and the imprinted 260 would have never occurred if twisters didn't have a voice. Hobbyists and part-timers usually only provide a minimal voice in these issues, and other long-range concerns of the twisting community.
If you just do what everyone else does, you will not make it in the entertainment business. You have to find something unique about yourself that separates you from the rest. It might be the balloons that you make, or your personality, or your looks or who you know. It's your uniqueness that separates you from the pack.
If you wait at home for the phone to ring you will never make it in this business. Every day I am making calls, mailing out fliers, thinking up places to contact, etc. 75% of the entertainment business is done offstage. This is a BUSINESS. If you notice, all of us have other things that we do just in case. T has a balloon mail order business, I am a magician, radio talk show host, dinner theatre producer, and manufacturer of my own magic creations.
If you are single, willing to travel, have no ties, you may make it as a twister exclusively. Keep plugging away!
"What is my profession?"
- It's difficult explaining to people what we do, and why it works well in a party setting. If you are having a hard time explaining to customers about how you entertain while making balloons. What better way than to ALWAYS carry balloons and SHOW them! (I'm usually NEVER without balloons. I carry a few in my purse/briefcase.)
- Clown? Magician? Balloon Bender? (I like that one!) The Promotional Printing Problem....
- First, a Basic Question: What do you consider yourself to be? Can you fill more than one
role?
I am a magician and a balloon twister. (I like that one too!) My cards say Magic, but I always verbally add ballooning, and often hand out cards when ballooning. When I book a show it's for either magic, ballooning, or both. (Usually both.) I have, in the distant past, done clowning, but I charge more for that and since I do so much clowning around in my show they haven't sprung for it for years.
- Can you be a great clown? Would you want to be known as one? Could you do a whole gig as a clown without balloons--gasp! I can feel the heat!--even if you never had to? Then hey, put it on the card. Can you do ballooning without a clown costume (colorful clothes allowed, but clearly not a clown) and still feel you're terrific? Then hey, put it on the card. Are you a whiz with a kitchen knife and can cook for a hundred at the drop of a hat? Well, maybe not on this card...
- I get this stuff sometimes too - "ooh, the clown's here, the clown's here." I just let it roll off, but it does bug me too. However, I usually just tell kids and adults, "I'm not a clown, I'm Pat in the Hat." I make my own category. That's why I think it helps to be a performing character and break the stereotype. As long as your client understands that you'll be doing balloons only, and not a clown show, then I think it's ok. Sell yourself on the fact that you're a balloon entertainer, and not just by declaring that you're not a clown. Define yourself by what you do, and rather than what you're not. I do think one thing that affects you out in the South is that possibly people don't have a mental picture, a common idea of what a balloon twisting professional is supposed to look like (my guess, of course). You see, out here, we have several restaurants with college kids who make a buck twisting, so the public is very accustomed to seeing twisters in restaurants, out in public. It's very much in the public eye.
- I'm wondering if you'd be able to create your own image and run with it. Be confident! Clowns don't have to be the standard of anyone who does kids parties and private gigs. I think we need to establish ourselves with the image of being balloon artists, and in our own right, and not as a lesser type entertainer. I think balloons have historically been associated with clowns, but look at Steve Martin. He didn't have to be in clown. He did such a great job in his shows, and in the movie Parenthood, establishing himself as an entertainer who used balloons, and was a natural clown. Go out there and break a leg! (not a loon)
- I take this terminology very seriously. You're definitely not making it a big deal, it's important stuff. I began my business by looking at what I had to offer and how I could sell it. In my opinion, the public does not understand what a balloon twister is, and there is confusion in what a balloon artist does. A balloon artist can decorate or twist. I am in one of the more unique categories, and understand myself as a performing character. (see my web page to get a better idea - http://home.earthlink.ne t/~balloonart) My specialty is balloons. I don't do magic, fire-eating, face-painting, nor cat juggling for that matter. I sell myself as a balloon entertainer. I don't just want to be know as one who makes doggies. Though you do things that a clown does and wears, it sounds like you don't want to have to deal with the other expectations for clown stuff, such as juggling, magic, etc. Market yourself as someone who specializes in balloons. Here in the Silicon Valley, I've seen some techies avoid their serious job title at a technological firm for something fun. For example, one young lady had her title as a camp counselor. It was funny enough that I remembered it. You can also look up terms or something similar in the guide. There's some in there. Try any of these on for size, or one of your own making: Balloon bender balloon entertainer balloon tie-er balloon folder balloon stacker (oops) I really like balloon sculptor, but it's a bit vague too. balloon arteest is good.
- Are you a clown or are you a balloon artist? If you have to ask the question, you should already know you're a balloon artist. I do both. I twist balloons as a clown, and I work as a twister out of make-up, so I take no offense at anything you've said about either. As I've said in prior postings, when I do it as a clown, I perform differently.
PART11
Balloon acts, parties and games
General Advice On Acts
Twisting at Parties Without an Act
Developing a Character
Developing Your Balloon Act
Entertaining and Showmanship: Keeping Your Audience Amused
Entertaining the "not thrilled" Customer
Storytelling with Balloons
Balloons and Comedy
Kid Language, Adult Language
Balloons and Magic
Balloon acts
General Advice On Acts
If you do shows, remember: FIRST, you are an entertainer. Second, you are a balloonist. If you are going to do different things in your act (juggling, magic, etc.) and balloons, save handing out the balloons for last. In my experience, once I started handing out balloons it was almost impossible to stop. There always seems to be a constant stream of people wanting balloons once you start making them. Also, balloons are toys. You have to expect people who have them to play with them. I've learned that I can't give out balloons during my shows. I twist balloons during the show, and I give out balloons at the end sometimes, but if I give them out in the middle, I know they're going to make noise.
A good show is like a novel. It has a beginning, a middle, and an end. There is a very good book out called 'Magic and Showmanship' which deals with setting up your routine and presenting it in a show. It is rather long reading and best taken in small chunks but there are some real gems of thought in there for the performer. If I were to perform magic, do a few tricks, then pick up the violin and start playing, I would lose people just because there was no consistency in the show. The same would be true of someone performing magic and then saying 'Okay, now I'll twist animals for everyone'.
Start thinking like a good skit; Beginning - Middle - End (a kicker something to leave them smiling and wanting to have you back). Try making one last "special thing for the birthday child" and announce it is your finale. Or you might make a balloon ball and start them in a game of "Keep it in the Air" (as you sneak out to do your business with the parent).
Performing magic really makes me the star. However when I'm twisting, the balloons are often the stars. So I set up my entertaining to include both balloons and magic. For parties I would throw in some games which involve balloons. I do a magic show with balloon animals between each of the four routines. Doing magic, then doing balloons, you lose them. The act must be routined and not just lots of bits. If I do a trick with rabbit cards, I then, flash of inspiration... why don't I make a balloon rabbit. And so it goes. Then I remember that I forgot the birthday card so we make a magic one - then, of course, I forgot the present, so I make a super-duper balloon animal. And so on.
Your act should be an ever-evolving entity. It should be in constant change, little by little. If you pay attention to stand-up comedians while they do their acts, and then you see the same guy a few years - or even months - later, you'll notice that the routines have changed a little, and maybe entirely new ones had entered as well. It's just the evolution of the show. It keeps it all fresh. Sometimes a routine just needs a little maintenance and at other times it'll need a complete overhaul. You'll be able to tell from audience reaction, and from your own reactions, as well. Change should be done for your audience, and to keep the material fresh for you. Slow evolution of material, with occasional influxes of totally new stuff still keeps that air of familiarity. Kids like repetition with a twist (change), because they can sing along, talk along, or anticipate what comes next, but still be surprised from time to time with something new.
Make every twist an interesting experience. Pay attention to what you are doing as you twist and really keep an eye out for things you do that gets the attention from everyone in line... remember that 'thing' and use it often.. soon you'll build a tool kit of bits and pieces (besides balloons) and find yourself in more and more demand.
It is a good idea to throw in a few other things that make the show well rounded. Magic is not my strong suit so I do it as Clown Magic and tell the kids that clowns don't have any magic. I have to get my magic from them and they make up the magic word (my favorite is Pickles in your Pudding!) I also tell them that I do an educational juggling act - I tell them that when I say Ta Da! or anything hits the floor then that is when they should clap! Then I drop something to see how well they learned that lesson. They really get into it. Especially when I do a few drops at the end and then say "I just loovvve applause!"
When I first started performing as a juggler one of the most important things that I learnt was not to take my inspiration solely from other jugglers. To get an original act one should have a look at different art forms, music, dance, poetry, origami, gardening, stand up comedy, cooking whatever. Sure we need to learn a certain amount of technical stuff from those better at our particular field but the source of good performance is much deeper than that.
If you ever have the opportunity to do shows from a stage or anytime you are back from your audience you need to be able to do larger figures so that they can be seen. I have worked elementary schools where you are on stage. If you do single 260 animals they are real difficult for the kids to see.
Twisting at Parties Without an Act
Before you go in front of an audience to keep them amused for an hour, KNOW WHAT YOU ARE DOING! Don't take this personally but just because you know "how" to make balloon animals doesn't necessarily mean that you should accept doing birthday shows. Since you are going to be charging for this service. Be as professional as you can be. Hundreds of kids play the piano but they don't all go on stage.
Don't accept a job that you can't handle. Birthday parties are looking for ACTS. Either develop an act or don't accept the job.
Some college students around here are advertising themselves as balloon twisters and jugglers for birthday parties and they have no act. I see this type too. Their whole show can be described just like their price, cheap. On the plus side is that because of their very nature, they don't last long. Unfortunatly, they can give entertainers a bad name. A person hires them and then they are disappointed. They have a bad taste in their mouths about hiring balloon artists or magicians. Another metaphor I could use: just because you can play neighborhood basketball doesn't mean that you should play with the Bulls.
I don't see the problem. I got my start by going to a couple parties that a friend did and taking part in a few things to get the feel for it. Then, with his help, I put together my own show. So, I've never done a party without an act ready to go. But, for the person that advertises as a balloon sculptor, that's fine as long as the prospective client realizes that's all this person does. When people tell me on the phone that I charge too much, I suggest they look for someone with less experience that might be in a better position to help them out. I don't tell them to find someone cheaper. They get the idea that they have to pay a higher price for a better show. If they really can't afford me, they'll probably be happy with whoever they get, just because it's better than nothing. If they're not happy, they've been warned. Several of the people that I've sent elsewhere have called me back later, and thanked me for being polite and giving referrals, and then hired me or passed my name on to some community group they're part of that has a larger budget. If you've got a show to sell, you should be able to sell it no matter what sort of competition is out there.
Developing a Character
You have to develop a character first. Then develop a routine around it. I know amateur magicians who just dabble in tricks and their friends hire them to entertain the kiddies. They flop and don't know what they're doing.
Develop a character: When my wife doesn't want to put on her clown make-up for walk around restaurant work, she becomes Arlene the Balloon Artist. She wears a painter's smock with brushes and balloons and crayons decorating it. She wears a beret painter's hat and takes on that personna.
I feel that the most important part of any pitch is that it is natural and a part of your character, or amplification of your own personality. If you don't feel comfortable with your own pitch; change it.
Make your twisting easier; define your character as yourself. If you are trying to be someone/thing else all day you are using a lot of energy. Make your character bigger by finding the things people like about you and emphasising that part of yourself. Your dress can be clean and comfortable and you can still create visual interest with a balloon hat and decorating the area. If you have a good place to work, you will have a line for balloons whether you look like yourself or like Barney.
For me, the pitch is what makes you a performer and not just a balloon factory. I'm not talking about tip pitching; what I really mean is the ability to chat up the line while you twist. Joking about your balloons, kidding and playing with the crowd, that sort of thing. If I could sum it up it would be, having FUN and showing that you are having fun with it. A few good lines for when the balloon pops, or when you get a crazy request or comment about what you are doing. That is your pitch (in magic we usually call this patter, what you say as you do the effect - the thing that gets them to come to you and to hang around long enough to be entertained and feel that you are worth some of their hard earned cash). There are times when there are so many kids and so little time that you don't have time for a lot of interaction but you can still be a "personality" that is fun to be around and look like you are enjoying your work.
Frankly, I get a kick out of twisting, and I get a kick out of making kids smile and laugh. I let that show when I perform and that makes it special for me and them. (I do have several "bits" that I like to do: poofing up the last bubble on a poodle tail, taking a bubble off a balloon, tickling a kid with the end of a balloon as I inflate it, forgetting to tie the knot or tying the knot on the wrong end, tearing the balloon in half and giving away free samples (that fly away when they try to hold them) etc.). This makes it more than just twisting for me.
Developing Your Balloon Act
Ideas for a balloon act:
- A little history about balloons
- Safety tips
- A little lesson about each balloon that you make
- Some balloon science tricks
- Games with balloons
I take the kids on a trip to the balloon zoo or to the woods in balloon world and they can see all the animals there. Sometimes to the balloon circus, where balloons do all kinds of tricks.
Look for a "Gag Bag" in your magic stores, catalogs, whatever. It is a bag similar to an egg bag, but it turns in on itself four or five times and each section is a different color. Put a balloon in the last section, and in the other sections put a bone, leash, etc. Then you can produce a "doggie" from your "doggie bag": 'I keep my doggie in this blue bag with red inside;' no dog, turn bag inside out; 'Oh, this is Tuesday (whatever), on Tuesday I keep him in my red bag with yellow inside;' no dog, find leash or bone in bag; 'but we are getting closer;' turn bag inside out, 'this is afternoon'... continue with similar patter until you get to the last section and find the balloon. You can then inflate the balloon and make the dog, or continue with the trained dog routine (sit up, speak, roll over, play dead).
- sit up - Hold the untwisted balloon horizontally, and subtlely pinch it so that the nozzle end goes up.
- speak - rub it and make it squeak.
- speak - I say that my animals are house broken and they never bark, "Well....OK they bark, but only once." (pop part of the figure.)
- roll over - blow on it.
- play dead - I just drop the dog on the ground.
- play dead - I drop the dog on the ground and stomp on it.
- heel - after the "dog" plays dead, I put it by my foot and tell it to heel. People either crack up because they think it is funny, or because they can't believe a grown-up would actually resort to such corn. It helps if you make a really dumb face while you are doing this.
Here's more:
- Sausage Dog - he has to choose the child to go home with. each time I put him down to look, he falls over...and so on. Then I talk to him about being good, he nods. I look away and he shakes his head...etc...etc...
- Rabbit : he won't do bunny hops today. I then poke his front legs out like he's doing a hop...etc...etc
- Giraffe: I know what all animals look like, and giraffes have short necks...OH NO THEY DON'T!...so, maybe slightly wet right fingers and STRETCH the neck - excruciating noise that kids love and adults are scared of "long enough?" I ask, "NO?" etc...
- Parrot on Swing: even in tough parties I challenge them to tell me if this one is so good it can go to the birthday child - never lost yet.
- Heffalump: actually a one balloon butterfly. "Who likes my heffalump?" The quick ones know they might get it if they say yes, plus the by-play with 'he said it's a flutterby' and 'she said it's a blutterfly'...
- Ploodull: no pompom on its tail? Child gives me one, I turn round, creating a bubble as I go...
- Dog on a Leash: you can take it for walks, make it bark (rub its tummy) ("does your mom mind noisy animals in the house?", asking a noisy child)
When I do a Clown show I always make my assistant a "Super-Duper, Really Spectacular, Very Colorful, and Extremely Silly Looking, Helpers Hat.
I have giant bubble wands to make bubbles and so that the kids can help me make them. Two year olds LOVE BUBBLES. Older kids love bubbles, but they like to play with them.
Other: Face painting, magic, juggling, puppets, singing, crafts, games, jokes, running gags, skits and stories, music.
One of my favourite pitches is to sing (badly) kids songs about the figure that I am busy making. I have songs for most of my animals (How much is that doggy, Teddy bears picnic, Butterfly Flutterby, Six little ducks, Never play cards with a cheetah, Don't shake hands with an Octopus etc.)The kids will often join in with the more well known songs. If your singing is as bad as mine you can even use nursery rhymes or just use the lyrics of the songs as a poem.
One routine I sometimes use on stage is to get six kids and give them each a balloon which I have half twisted into various animals but that are still not recognisable. We then sing 'I knew an old lady who swallowed a fly' and I finish the fly, spider, bird, cat, dog, horse as they fit into the song.
Here are some routines that have been posted to the mailing list (what a terrible word for an act... would you pay to see somethine that was "routine" ?
Entertaining and Showmanship: Keeping Your Audience Amused
Having balloons makes you colorful and interesting, it gets the people to come over to you: whether they stay or not depends on what you do when they are there.
Don't ever give the impression that you are trying to hurry the people through the line. Be casual and easy when speaking. No matter how long the line is, I always interact with everyone that I am doing balloons for. It's a real part of the experience for them. I usually have the person I'm making the sculpture for help me. It involves them in the performance and makes the wait seem shorter. If I can't do that, I put the balloons under one arm or hold them between my ring finger and little finger. Be outgoing and energetic. To be a wonderful entertainer, attitude is everything.
Most importantly, talk to anyone that wants to talk to you. You can talk while you twist. If you need a break, take it while talking to them. They're your audience and they want to meet the entertainer. You never know which of those people is going to hire you for something later. The biggest problem with street entertainment is that you don't get breaks. As long as people see you, you're working. You may take a break from twisting for a few minutes, but you're still under the spotlight. In fact, a lot of people came to me and asked how I got started in balloons, how did I learn, etc. They enjoy finding out about what you do. When someone asks how they can get started I direct them to the books by Aaron Hsu-Flanders (for now anyway) since they're easy to come by. This is also a good time to point out that you can be available to do workshops if they know of a group that might be interested and have a space you can work in.
When doing animals for others I try to avoid dogs/giraffes/etc, simply because that's what people expect. Swans are a favorite of mine. But beware of the trap that beginning magicians frequently fall into; perhaps the ballooning meets are fostering their own version of it; in magic it is known as: "Performing Magic for Magicians." I will label our version as: "Ballooning for Ballooners." In magic, an altogether sad truism is that the simplest self-working (read basically no skill required) tricks often TOTALLY AMAZE AND 'BLOW-AWAY' the lay audience, whereas the incredibly difficult and subtle sleight-of-hand move that takes years to perfect will often barely register a nod of interest from a crowd of spectators. Of course, any magicians present will be 'drooling' over the flawless execution and novel technique. Folks, it is DEATH to fall in this trap....death, that is, if you want to ENTERTAIN and amaze and amuse the average audience member!!! Stay in touch with your audience. If you are in a contest with other ballooners to outdo each other, that is fine. Just do not assume that the very latest and greatest creation is what it will take to please the toddler with the outstretched hand and a bulging diaper, whose mother has been patiently smiling at you for forty minutes!!!
Until this last weekend I would have said that too. People waited all day for an hour or more to have a 3 braid hat made for them. When they got to the table I heard comments like "long wait, but it was worth it", "I've never seen balloons made like this before, this is great". Being remembered as a performer is a real good objective. People that remember will book you in the future.
I used to be happy making just a "plain dog," then I started working for tips. Believe me, the customers do know and appreciate the complexity of the balloon sculptures. As my sculptures became more elaborate, the tips got larger. You must use some common sense in the number of balloons and the time frame to make a sculpture. I wouldn't do the sixteen balloon Roger Rabbit at a table. I enjoy taking some time at a table, entertaining and telling my dumb jokes. A three to five balloon sculpture is about right, time-wise, and it allows me to feel creative, have fun and enjoy what I do. When performing at a festival or large event, it is back to the fast one balloon figures, slap 'em on a leash or hat and go on to the next. So it is not a matter of what figures you do, but using the appropriate ones for the situation. And what is wrong with being a balloonist's balloonist. Hey if it makes you happy! I enjoy the challenge of learning the fifty balloon power rangers.
Good vs. bad entertainers?
- Good sculptors can inflate the balloon the proper amount for the sculpture they're creating.
- Good sculptors have moved beyond the "dog with exaggerated features" school of balloon animals. The sculptures they create should look like what they're supposed to be.
- Good sculptors have some variety in the types of creatures they create. If someone asks for a dog, the response should be "what kind of dog? Poodle? Dachshund? Beagle? Sitting? Standing? Jumping through a hoop? Riding a bike/unicycle?"
- Good sculptors have a friendly patter appropriate to their audience.
- Good sculptors pace themselves. They work as quickly as their abilities allow so as to entertain as many people as possible, but they also make each customer feel special when it's his/her "turn."
- Good sculptors enjoy the process of making their sculptures, and would rather be doing what they're doing than anything else while they're doing it. (Psych yourself into this frame of mind if you want your tips to be great. If you don't like making balloon animals, there are much easier ways to earn low pay with low prestige!)
- Lorna. PatNtheHat. Larry Hirsch. Daffy Dave. Chris Lawton. Ed Kennedy. Different people. Different patters. Different styles. Different reasons. Some of the greatest twisters I've ever seen.
There are many okay sculptors, which is what you are when you first start out. Your patter isn't polished, your repertoire is limited, but we all started there. With practice, anybody can become a good sculptor.
What's a bad sculptor? I saw a clown in Sacramento last fall who made nothing but helmets (with three-twist poodles on them) and swords. He charged a buck apiece. No patter. No smiles. Slapped a kid's hand for grabbing at a balloon. I'd call that a bad sculptor.
I was recently able to watch and talk with several street performers doing balloons (all clowns). Here are a few thoughts, as an observer of street performers:
- many, including all but one of the clowns doing balloons, had dirty costumes (we're not talking a bit faded here, dirty and up close smelly) BIG TURN OFF (this was mentioned by several of the other people walking by as well)
- one of the clowns was doing "adult sclupture" with not too subtle patter, lots of kids around. (I may be a prude, but in an open setting, t his was at the Fisherman's Warf, balloons attract kids and this kind of sclupture and patter seemed WAY out of place.) Yes if it didn't work (ie make money for the guy) he probably wouldn't be there with that patter so there must be some demand. But it really bothered me and not a few parents who were dragged over by their kids (mommy a clown with balloons!!) walked off ticked, and will be a bit more hesitant to approach a clown in the future.
- personality counts. One guy was making pretty good stuff, but just sitting (literally sitting on the sidewalk) with no real pitch and no real business. Another was doing nothing special but did blow bubbles at the crowd and joked with them and he was making some money
- As has been mentioned, balloons sell balloons. The guys with lots of balloons festooned upon themselves or their stuff seemed to have regular business, the others were far more sporadic.
As I was told by the Amazing Jody Baran, the difference between a good magician and a great magician is well-shined shoes. Appearance makes the first impression. In our profession, that's important, because you get about 10 seconds to surprise and delight people enough to stop and watch you (and tip you).
I learned a great lesson about the relative values of skill and presentation. Twisting for the multitudes at IBAC, one of the IBAC delegates (Brad) came up to me, and asked if he could help me. Since I had a line clear across the room, I wasn't going to turn him down. He had never twisted before, so I had him ask the child what they wanted and inflate the balloons while I twisted. Problem was, he didn't know how to say, "No, I don't know how to make that". One child asked for an alligator on an airplane. Brad looks at me, I say "no way" (We were limited to quick two and three balloon sculptures) But Brad decided to try it anyway. The resulting mess looked just like you would expect it to; lumps of green and white everywhere. But, the kid loved it. After that, Brad decided to just make anything he could think of - he just twisted balloons together into abstract forms and named them - "Nuclear reaction at dawn", "Cherry inside a lemon merangue pie", "Elephant eating a hubcap" It didn't matter what the sculpture looked like (and it never looked like it's name)- it was his personality and presentation that made the kids want his sculptures. It was a real eye opener for me.
I approach each animal in an artistic way and NOT as a churn-em-out quick balloon. Each animal is made in a very showy way and always decorated with a sharpie (not quickly but rather with extra special care) making sure that both eyes look alike and the mouth makes sense. When I make 3+ balloon creations I put on a real "street show" so everyone pays attention to all the hard work I'm doing. Anyone can pick up a balloon kit and make dogs or cats. You have to show the staff that you are not only a balloon twister, but an entertainer.
Advice to those who only make one-balloon animals: make them slowly and look as if there is some effort to your work. You'll get bigger tips.
Entertaining the "not thrilled" Customer
Sometimes you get hired by a jerk (let's call him the instigator) to entertain a recipient. It's like guys who get strippers for strait-laced friends for the bachelor parties: it's a chance to get a cheap laugh at the expense of the recipient. Remember that you're there only to entertain the birthday person, not the instigator. If the birthday person doesn't enjoy it, no one in the crowd will ever hire you for their spouse's (kid's, boss's, etc.) birthday (they don't need the grief).
What do you do, when you're dragged into the middle of a situation like this....?... First off, IMHO, it's a no-win, stand-off situation...no matter what happens, someone is almost certainly going to be unhappy about it... If you 'embarass' her, then he's happy...If you don't, than she's happy. (unfortunately, I think that's their 'goal' here, to embarass the other person...)...and if you refuse to do it, least in restaurant work, then you run the risk of upsetting the person making the request (usually 1 of 3, the management, the wait staff, or the customer...all 3 of which I want on my side..especially the management/wait staff)...
I've tried to set guidlines for handling it....1st) I want total control.. I don't want someone else telling me what to do... I have to be able to 'read' the situation and act accordingly.... If the person is not 'into it' which is the way the lady in Arla's case sounded, then I have to be able to soft-pedal and retreat if necessary.... 2nd)..while I'll try to stick to suggestions, I pick the moment to do it..and the place if possible. 3rd) I can/will refuse it if it doesn't feel right, but how do you really 'know' that it isn't right......?... I try to go with 'gut-feeling', but that's certainly not 100% right either.....
I was a waiter at Farrell's Ice Cream Parlour in Tustin (when Farrell's was still a chain). We'd blow the whistles and bang the drums for any reason you can think of, and people were always trying to embarrass others at their table. The problem was, you never really knew how people were going to react. So, you have to be prepared to turn the situation around.
- Appeal to their better nature.
When it's a person's birthday, they are expected to go along. Encourage that right from the beginning. "Wow, you're really a good sport to put up with this!" "Man, they try to throw you a curve and you hit it out of the park!" "Look here everybody, here's a lady with _style_."
One time I was reaching over some people in a large group to serve someone in the corner, and a banana split boat on my tray poured ice cream and chocolate syrup down the neck of the unfortunate gentleman over whom I was leaning. The table erupted in laughter, and I quickly said "Oh thank God this happened to someone with a sense of humor! I'd hate to lose my job over this!" Got him a warm, clean towel, comp'ed his ice cream. Got a huge tip, and he'll always have a story to tell. They even came back the next week. When you give people a chance to be heroic, they'll usually take it.
- If the subject is really hostile, take his/her side. Turn on the instigator and try
these techniques:
"Yeah! What in the hell did you think you were doing, hiring someone who could twist something stupid like this?" (Twist something very cool, very fast.) "Or this?" (twist twist twist) "Your idea of a good time is watching someone do this?" (twist twist twist twist twist) "I mean, grow up! This is a person of high culture, who would never be amused by something like this." (twist twist twist)
"I mean, a woman lives to be (insert age 10 years younger than actual age -- it's cheesy, but always goes over well) and all you get her is the most popular clown in the tri-state area?" (Bay Area, Wichita, United States, you pick it.)
"You know, you really owe her a huge present now. Or maybe something small and precious." (Twist earrings, a ring, whatever, and put them on the person instigator.) "Hint, hint." A variation might be to make the instigator a bow tie and tell him to take her out to a fancy meal.
Make a sword and say to the birthday person, "You hold him down, and I'll thrash him."
If it's all adults, make the dirty dog and tell the instigator that he can keep it if it "likes" him. (If you don't know the dirty dog, e-mail me privately -- it's simple and embarrassing.)
- When all else fails, turn the embarrassment your way.
Engage the crowd, and take the attention completely away from the birthday person.
"I know, you're asking, how can an adult make a living by crashing people's parties in oversized polka-dotted clothes. The fact is, I always dress like this. I learned balloons to keep people from staring at me...."
Get them all to sing: [nuh-nuh-nuh-nuh-nuh-nuhhhh-nuh-nu'] They say it's your birth-dayy! [nuh-nuh-nuh-nuh-nuh-nuhhhh-nuh-nu'] Happy Birthday to you! [nuh-nuh-nuh-nuh-nuh-nuhhhh-nuh-nu'] They say it's your birth-dayy! [nuh-nuh-nuh-nuh-nuh-nuhhhh-nuh-nu'] Gonna have a good time! (etc.)
To end your routine, go the sincere route. Make a bouquet or a teddy-bear or something so unutterably cute that it has to be accepted, then say:
"(Instigator's name) wanted me to come here today because he loves you, and he wanted to do something extra special to show it. Thank you, (birthday person) for being such a good sport. Everybody! Happy Birthday to you! Happy Birthday to you...."
Remember that the instigator is not likely to hire you again (been there, done that). You want the birthday person to appear to enjoy your performance so that others in the crowd will want to hire you. And, if all else fails, you already know the important lesson: payment in advance!
Storytelling with Balloons
I tell interesting facts about the figure or animal I'm making in a way that reveals the recognizable shape just as I finish the story. People are so used to hearing tall tales that they expect it. With the truth as your resource, you'll have a library of material at your disposal and they'll fall for it every time!
I was watching my Mike Decker twisting video last week during which he mentioned that Shari Lewis had produced an audio cassette tape of 1 minute bedtime stories that could be adapted to tell while twisting.
storytelling with balloons. kids give you the major hero. (twist him) and major obstacles of the story (twist them, or pop the corresponding parts of you hero, if it's a gory story), and together you, the balloons, and input from the kids creates your 5-minute epic.
I've heard of twisters with 'morph' balloons, they twist a balloon, and retwist it, as the sortie evolves into recognizable other things in the story.
Harvey Potter's Balloon Farm is a good book to use for story telling. A lot of action where you can use the balloons as you tell it.
My main gig is storytelling, and I use balloons as a prop/giveaway. It has been very sucessful for me!
My younger daughter Michelle (age 9) performed in the school talent show last spring in her clown costume & make-up and made a balloon sculpture (she's been inflating them by mouth since she was 4 1/2 ) as she told the story of the Ugly Duckling. The sculpture: Michelle starts off with an un-inflated balloon, casually displayed as she starts the story. First a small puff of air, to make a 2 inch bubble near the center of the balloon. Cupping the oblong bubble in her hands, with the ends threaded through her fingers and hidden behind the hands, she talks about, "Once there was a nest with a single white egg..." adding more air she proceeds with the sculpture as she tells the story (short version), timing it so that it is completed as she finishes the story and holds it up for display with the final words "...but was really a beautiful white swan all the time." (A single balloon swan with two loop body).
Why not write your own story? When mom or dad seem unsure as to the price of $100.00 for an hour, I suggest the balloon story at $75.00 for 1/2 an hour. They give me all the names of the kids that are going to be there & I formulate a tale using their names for all the balloons I make. I limit it to 10. Extra kids are $5.00 each. If they have 5 more, you've just made your $100.00, and in less than an hour. You should see the kid's faces when I say "Susie the swan". "Your name's Susie? No! What are the chances of that happening?" It really gets going about the third or forth kid. By then I'll be pouting while I say,"You just don't want to wait for a balloon. That's not really your name, is it?". "Uh huh! My name is too Tommy!" You can time the story by putting the long narrative parts where you need to spend a lot of time twisting the critter.
A fun variation would be to twist balloon costumes for the kids, and have them act out their role. This would quickly devolve into chaos, particularly when the characters on stage outnumber the audience, but if you roll with it, everybody can have a great time. I would have a story in mind, but I wouldn't be married to it. If one of the kids comes up with a clever line or suggests a different direction for the story, I'd go with it (especially if I knew a twist to go with it!)
For another twist, there's a routine I like to do verbally, but would work well with balloons. It's a sort of "mad-libs" routine where I tell the story, but let the audience fill in the details. (I stole this from Kevin Nealon, who was one of the headliners in a comedy show I was in 13 years ago, before he went to Saturday Night Live. I...didn't go on to Saturday Night Live.) It goes kinda like this:
"Something weird happened to me on the way to the party today. I was walking up...um...what's the name of this street?"
Audience: "Maple."
"Yeah, I was walking up Maple street, and right there in front of me was a little barking dog...what do you call them...the little dogs with the long bodies...wiener dog thing...."
Audience: "Dachshund!"
"Yeah, a dachshund! It had a long nose, two little ears, short legs, lonnnnnng body, short hind legs and a frantically wagging tail. So I tried to get around him, but I had to go into the street and I was almost hit by a...a...um..."
Audience: "Car? Motorcycle? Elephant?"
"Yeah, an elephant! He had a long trunk like this, two big ears like this, two big legs with piano keys on them, a big fat body, two more legs and a tail! He was rampaging down the center of the street because he was being chased by a...a..."
Audience: "Tank? Zulu warrior? Power Ranger?"
"Yeah, a Power Ranger!"
You get the idea. After a while, they get into the swing of things, and start suggesting stranger and stranger items. If you want to make something specific, give them more clues ("it had a long neck, spots, rhymes with carafe..."), but if they name something you know, you can make what they say, and give it to the child who suggested it, and let the story grow organically.
Not for the faint of heart, but it's a lot of fun, and it guarantees that the kids will get a unique story because they're part of the process.
Balloons and Comedy
I would question the wisdom of doing balloons in a comedy routine. Only for the reason that whenever I think of balloons and comedy, Steve Martin comes to mind. If I were to stand up in front of a bunch of people and perform I wouldn't want them saying I was a Steve Martin wannabe. Comedy uses few props. The props that are used are usually unique to a performer and hardly ever repeated. (Who else is smashing fruit with a mallet like Gallagher?) I'm just curious as to how you could do a routine using the same props as Steve Martin and keep it fresh and unique to you.
I identify Steve Martin with a banjo, an arrow thru the head, and balloons to a lesser degree. I don't think that because it's been done, that it can't be done again... It shouldn't be re-done, re-hashed, or copied....but I can see a lot of directions that balloons can go in, and it would mostly depend on the personality/character of the performer which one (s) to choose.. Anyways, the point is that I think you can do/redo anything you like if you put yourself into it...it has to be you, or at least major components of you. I love Steve Martin, but I would never try to do his stuff, it's not me. but balloons is/was only a part of the whole package, why can't other folks take balloons as an ingredient in their package.
Adding hats, earrings, flowers, etc. to the space you are working in, as you present your stand-up would be a great addition to your act. Having twisted for people in many different bars. (local country bar, in the bar at an academic conference, in a ballroom, out west for coal miners and hunters, and hangin with old college buddies) I can say that balloons liven up any bar-scene.
Working in comedy clubs I found that a balloon act is no good unless you also do COMEDY. That's what the club is for. Of course the funny look when you look at an odd shaped balloon will present itself to a funny bit. I found that making odd hats, clothes, handcuffs, etc to someone that joins you onstage will create some great bits. The few times that I did a set with balloons, I was telling story jokes while I was twisting.
Here's the best advice I can give about comedy clubs and novelty acts: I was the only magician hired at a comedy club in Rhode Island. When I asked the club booker why he liked to book me at the club he explained that I had more laughs per minute than any other magician he ever saw. "Most magicians take 3 minutes worth of set up time and then the climax of the trick has a laugh. Too late for me." As Bozo the Clown always said....KEEP EM LAUGHING!
Country and western singer Mel Tellis had (has?) a genuine stutter and like any great performer he used adversity to his advantage. Anyone who has a stutter would be well advised to take advantage of the comedy possibilities. But.... if your stutter is not genuine I believe that it would be in very bad taste to use it for comedy. Mel Tellis made stuttering famous. He pauses or stutters at a moment in a joke or story that leaves you hanging. It really makes him special and people love it. I heard he went to speach therapy and conquered it but returned to it for his audiences' sake. Play it up instead of down - it could be great. Another good example of this is WC Fields. He was terribly sensitive about his nose in private company but used it frequently in his comedy.
Throw-away lines: You say them so fast that most people don't realize what you've said until you've moved on (there's usually a two-beat delay before the laugh). It's something you say as you're arranging the kid onstage, getting set up to do the stunt.
Don't take a throw-away joke and extend it into part of the act. It's not funny when it's given too much of the spotlight. It's obnoxious. That's why so many people hate clowns - they've seen too many of these hacks who don't know the difference between a bit of business and an act.
A lot of magic tricks and clown skits that use an audience assistant are some sort of a "sucker trick". Personally, I think a "sucker trick" is OK once in a while as long as the whole act isn't just "sucker tricks" and that there's no hard feelings. After all, we are there to entertain others, not use others as entertainment.
I don't do "sucker tricks" in my magic show because I want my helper, child or adult, to get the applause for making magic, not being the butt of the joke.
one of my fun items was to have the swinging end of the animal bop the kid on the head as I completed the rear legs, which usually makes them laugh, but yesterday I started doing it to myself, which was even more fun!
Kid Language, Adult Language
There is an underlying flaw in some children's performers. Some clowns think that when you perform for children you have to be very broad in your mannerisms, wait for them to get the joke, explain it if they don't laugh, etc. Kids are too sophisticated for that (not just now, they always have been). Mr. Rogers doesn't talk down to kids, Beakman and Bill Nye don't talk down to kids, Soupy Sales never talked down to kids. If your act is not entertaining to adults, then the kids won't like it either (that does not mean doing so-called "adult" humor - look at Winnie-the-Pooh, Animaniacs, Rocky and Bullwinkle, and Beany and Cecil for humor that appeals to both adults and children). So when you do a bit of business, deliver it with respect for the wit and intelligence of the audience. Don't draw it out and overplay it to be sure that they all "understand." Expect them to stay with you. You'll be shocked at how much they'll catch and how little you can get away with.
Watch Mr. Rogers' Neighborhood with a three-year-old sometime. They are absolutely transfixed. Mr. Rogers knows how to talk to pre-schoolers with respect for their minds. He uses words they can understand without talking down to them (as opposed to a certain large purple tyrannosaur). I wish I were half as good with children as he is.
Do a Kids birthday party well and you'll learn an awful lot about yourself, your act, your timing, your abilities. Hell, I do alot of my kid show stuff when working at the bar and get VERY good results. Yea, I'll use some blue language with the adults that I would not dare do for the kids, but the comedy/entertainment is not a result of the language, it's there only to be able to fit with the environment... it works just as well regardless of the language.
If one is looking for repeat dates, etc, follow the route of the big names in the business... Do not use "adult material". Youn will severely limit your potential horizons for future engagements in the entertainment business. Why grovel in the dirt as others do... Those who stay around in this business do not need to stoop to this level. Look at Red Skelton, who is the King in the clown business! If you follow his lead, you have nothing to be concerned about!
I was a singing waiter in Newport Beach (CA) for a couple of years, whipping out my ukulele during slow times and entertaining with a wide range of novelty tunes. Most of them were Tom Lehrer, Homer and Jethro, Dr. Demento kinds of things, but we always did a set of sing-along limericks in the bar at least once a night. I adjusted my content for the current group, and if there were children in the bar area, we saved the limerick song for later.
The key here is to use *funny* material. Blue material is not inherently funny. In fact, it is inherently a low form of humor. Look at Eddie Murphy's "Raw" for an example of a truly gifted, funny comic wasting his talent.
On the other hand, I've seen several ventriloquists who slide very easily between G and X ratings. In both cases, though, they do essentially the same routine, with appropriate twists for the current audience. Their core schtick is funny.
Since balloons are identified with children, it's usually most effective to use double-entendre rather than 4-letter words, and play an ingenuous character who doesn't realize that others might "misconstrue" what's been said. That doesn't work for everybody, but if you can pull it off you can get away with a lot of material that's entertaining for both children and adults (see the Simpsons, Animaniacs, Pinky and the Brain, and Rocky and Bullwinkle for examples of humor that works on several levels at once).
I would encourage anyone thinking of working for adult groups to work on being funny first, and only introduce blue material if it enhances the performance. In most cases, it won't help, and will reduce you to the level of the drunken hecklers we all love so much (keep in mind that if they feel you're on their level, they'll act as if they're superior to you and will probably create situations that will escalate into shouting matches and fist fights).
Most associate "adult" with "not appropriate for children under 17, 18, 21, whatever." This is not necessarily the case. You may simply be looking for ideas that would appeal to and hold the attention of audiences who are not children. To use an example: If I'm playing music for a group of people, I'll usually play any of a variety of my usual repertoire (traditional), but if a wee one comes up and is enraptured, then I'll very often (in a blatant display of enlisting the child as a co-performer) play "Mary had a little Lamb" or "Twinkle, Twinkle" little star. The kids love them (usually). Now, I think of those tunes as "kids tunes," and by extension the others as "grown up (or "adult")" tunes. That's only because of the fact that few adults like to sit and listen to "Mary had..." and the little ones like hearing a tune they know. Neither is "inappropriate" for the other, just more accessible. I've a feeling it's similar for balloons. I know it's similar for, say, cartoons: to wit, Animaniacs. Kids enjoy it, but there are some lines, cultural references and the like, that'll go over their heads. *That's* "adult" material, isn't it? But hardly something "inappropriate" for young, shell-like ears (If you don't know the show, just remember the original WB cartoons. Aren't there bits in them that you find funny now, that whizzed past in ages past?). Similarly for stand-up comedians. Kids like jokes, adults like jokes (even clean ones), but often different tastes. How often do you hear Jerry Seinfeld telling knock-knock jokes for a whole set (even particularly funny ones), how often does Steven Wright appear on Mr. Rogers Neighborhood?(and if he did, how did I miss it)
Short summary of a too-long diatribe: Adults and kids have different tastes in entertainment. Some things overlap, some don't. Some things may be "inappropriate" for little ones (can't think of an example of an inappropriate for adults but not children), some may be OK, but not appeal to one group or another (Power Rangers Movie Marathon, anyone?).
I've always felt (very strongly) that you are not worth much in comedy until you can make people laugh with a routine that's 'clean'. (and I say this with over two-years of street theatre/ improv experience, with many of my old troupe members taking classes... and doing quite well with The Second City)
I think the clowns, magicians, and family-oriented twisters will agree; anyone can stand up in front of a crowd of frat boys and yell cuss-words to make them laugh.
My advice would be to keep it clean and fun, and build a reputation on solid, good comedy. But that's just my choice. I do know there is at least one balloon book out there with adult material in it. If T. Myers doesn't offer it, I'd guess he could give you the reference.
Balloons and Magic
I read this in "Laughmaker's" a while ago and regret that the issue in question is not at hand that I can give proper credit for this idea.... The trick requires Don Alan's "Comedy Egg Can" (your favourite dealer or Mak Magic... wholesale). The effect has the performer cracking an egg into a can, covering and inverting the can on a volunteer's head, whipping the cover out (it being the instructions), discovering that was the wrong thing to do (the instructions say "Do Not Remove") and (with magic) whipping the can off the volunteer's head to reveal no mess but a load (in the usual performance of this trick, candy). I put (on the suggestion of the anonymous wise magician) 260's in the load chamber. This trick comes after the magical birthday present production and leads into the balloon animal conclusion of my birthday party show (or some daycares). NOTE: Through trial and error, I discovered boys from 5-7 years work best for this trick... the volunteer MUST hold the can still while it's on his head (pre-schoolers fidgit) and the way I build up the (imagined) mess factor in this trick, girls often panic... would you want YOUR party dress drizzled with egg goop?
When I do the egg can routine I like to spruce it up a bit and add some funny glasses, ofcourse they are to protect the eyes of the volunteer from all the egg mush. I also pull out a bib with ketchup, mustard, etc stains and place on the volunteer. I say that this trick usually works all the time..... but just in case (as I put the bib on).
I also use the EZ hat loader. Same principal as egg can but are secretly loading your balloons into the hat as you sprinkle magic dust. I did this routine today and produced all the balloon which led into the balloon portion of my show. Went over well. Depending on how many balloons you load you can load streamers, eggs, what ever will fit. However, I do have once question. Does anybody have any ideas/suggestions for a noisless load as you drop the laod from can to hat? Also, what kinda hat do you use? Some hats which have a plastic bottom make a "kerplunk" when the load lands and if the hat bottom is to soft then the load will show an indent when the load lands. ANY IDEAS???
PART12
Your Act Comes Alive, With the Sound of Music...
Music is a universal language and children respond so well to it. In my act I do comedy/magic/juggling - some to talking, some talking with music and the rest to music only. I don't just use it as pad behind the actions, but I work with it integrated into each bit, actually choreographing my movements. I'm kind of fanatical about getting "the right" piece of music for each segment and it takes a lot of rehearsing to know the music well. But it has been so worth it as the kids really respond to this.
If there are words in a song, I tend not to talk, having chosen the words to match a theme of what I am doing (example, "Pretty Paper", Willie Nelson, for a paper tear trick).
When you use music in the act, consider the many working magicians using music. Watch Copperfield, watch old magic show vidios. Get a book catalog from Magic Inc. (1-312-edi-bull) and find books that explain how music is choreographed to a show. The music should underscore the act, not overpower it.
There is lots of good music out there. Or if you are like Blackstone, have some guy with a MIDI keyboard sit in your orchestra area and just accompany your act with incidental music. I also play guitar and sing in the act and have even had friends write and record music for me that I use.
Play a balloon by controlling the amount of air released from the balloon while holding the nozzle to create a squeaking sound. (Do the same bit, only put one of those bird squeekers in your mouth to do the song. No one will know the difference. Learning the mouth squeeker is easier than learning the delicate instrumentation of the balloon.)
I have an entertainer friend who maintains that he has played balloon "professionally" in a bar band. He uses a round balloon, and rubs his fingers along it at various speeds to create sounds. I've heard him do it, and while I wouldn't call it enthralling I've heard worse things labelled 'music'.
I've experimented with blowing up a 6-12 inch bubble in a 260, trying it, then stepping on the knot and pulling the uninflated part taut, and playing it upright (plucked) bass style. I haven't quite managed a real scale (and probably won't) but it's a nifty bit anyway...
Pull (stretch) one of the inflated fingers on an inflated surgical glove and then let it thump back down, for a base beat. Inflate a 260 3 inches, and make a 1 inch tulip twist,and pass it thru the center hole of a large Geo. Stretch the uninflated portion and strum it for a really cool bass!
While twisting on long jobs I always play tunes on a blaster or portable sound system. I also use music stings in my stage shows.
DJ's and dance halls are not the only ones who need to pay music royalties; ASCAP and BMI will actually send people around to restaurants to check if music is being played. If you are offering music as any part of the service you provide & collect money for, the law says that you have to pay royalties.
You can (and it has happened), be fined $5000 per song *YES, $5000 per song* you play. In fact the law provides for damages of not less than $500 and not more than $20,000 (or more if infringements are WILFUL) for each song infringed, plus court costs and in the court's discretion, reasonable attorneys fees. Word to the wise: get ASCAP/BMI real soon.
A dj's licensing only covers him when he makes the money himself, or is playing at a wedding or party were he is the only one making money off of the music played. If you work for a club/group/assoc that charges admission, both you and the club/group/assoc must pay ASCAP/BMI licensing fees. Everyone making (well, at least charging) money must have the license.
ASCAP and BMI (two separate and to some degree competing organizations) act as agents for the music copyright holders, who are the writers/arrangers/artists or "their" music publishing companies. ASCAP/BMI serve as a clearing houses whereby the copyright holder can get a return on use of their material without having to deal directly with thousands of users, and the users can meet their obligations with without having deal directly with thousands of copyright holders. It also provides a standardized and non-discriminatory arrangement and fee schedule.
One may asssert that ASCAP and BMI are big bad "monopolies," but the system is fundamental to the way that the music industry works, at least in the US. When you switch from playing records for your own enjoyment, to playing them in a public venue or as part of your "business," you also switch roles from being a musical "fair use" consumer to being a part of the industry and you need to understand the rules.
The Canadian version of BMI, SOCAN, soaks all musicians, agents and hotels, halls and anyone who might book a band or DJ. If you perform at one of those places you are covered. IN CANADA: DO NOT succumb to the entreaties of SOCAN to pay YOUR dues if your principal business isn't playing or booking music. YOU DON'T HAVE TO. However, if you are on the road with a huge stage show which incorporates non-original music... think twice because you'd hate to get nailed someday.
In the ACSAP/BMI Q & A flyer it reads:
- Is my business affected by the copyright Laws?
Copyrighted music is a property and its use must be paid for as any other neccessary business expense.So as long as your business plays copyrighted music, you must pay a license fee. This includes aerobics, dance and exercise studios; hotels; discos; nightclubs; shopping centers and malls; hospitals; colleges; restaurants; country clubs; cruise ships; industrial plants; skating rinks; trade shows; conventions; expositions; meetings; telephone music-on-hold systems; and radio and television stations---as well as many others.- What if I only play from the radio or a tape?
Wharever the source of music ---tape, record, compact disc, live musicians or the radio (over the speakers, to include your phone) --you still must pay a licensing fee for the right to play that music as part of your business.- What happens if I continue to play music but refuse to pay?
BMI will check your music programming, and when our music is played we will take approiate legal action. BMI is committed to protecting our writer's and publisher's right to the full extent of the law. And the penalties for copyright infringgement can be substantial...from 500 to as much as $100,000 per copyrighted work. So paying a norminal fee now can save your more money in the long run."
If you are using music in your act in a public place and getting paid for the act, ASCAP can tap you. I have found two sources for tapes which the fees have been paid and you are able to use the music in your act. There are probably more sources out there. . Steve Kissell in Norfolk, Va also carries some tapes. This music is either in public domain, or the fees have been paid for the music to be used for performers in public. I have a couple of the tapes, the music is cute and upbeat. Out of respect for performers who make their living in music, using these types of tapes is just the right thing to do.
Any music in public domain can be used without paying royalties. I use a lot of classical music in my act. A great one for kid's shows is CHILDREN'S FAVORITES, The Carnival of the Animals, London Records
Chum up with your local radio station and ask them about POWER PARTS or CENTURY PARTS. These are CD's with thousands of musical interludes, sound effects, atmosphere sounds that they use in commercials and production. I have used many of them in my act.
I have found some great background music on the following CD's and tapes: TELEVISIONS'S GREATEST HITS, 65 TV Themes of the 50's and 60's by TeeVee Tunes Lonetown Productions, Distributed by TVT Records. Each song is about a minute. Everyone recognizes these themes - Mission Impossible, Mister Ed, I Love Lucy, Hawaii Five-O, Woody Woodpecker etc. There are also a lot of CD/tapes out with short sound effects (anything you can imagine).
There's a great CD out called "The Idiot's Guide to Classical Music" which features 99 well-known classical themes (just snippets, not the whole piece). Most of them last 30 seconds to a minute. I use the CD a lot in video production, but it's worth a glance for those of you seeking quickie music bites. The best part? The CD costs 99 cents at Tower Records; I've seen it elsewhere, but never over 5 dollars. It's a promo for their line of classical music for people who hate classical music.
I use a lot of classical music, but it can be overwhelming to pick out in the record store. One of the best is the Carnival of the Animals but another good compilation is: CLASSIC GREATEST HITS by RCA Victor (Boston Pops, Chicago Symphony and Boston Symphony) It has William Tell Overture (Lone Ranger show), 1812 Overture, the Sabre Dance, Flight of the Bumblebee, Blue Danube (Skater's Waltz) plus others which I have found work great and the recording is good.
THE CARL STALLING PROJECT Vols. I and II - Hal Wilner (SNL music producer in the Golden Age) has assembled two treasure troves of music cues from the Warner Brothers ("Looney Tunes") cartoons. Great stuff and well-mastered. 2.HANNA BARBERA COLLECTION: THE MUSIC Vol 1 - Rhino Records (surf the net) has put out some outstanding collections and this has tons of USEFUL cuts between the familiar jingles.
In "The Linking Ring" Richard Wayne Productions offers a "Magician's Easy Edit Music Kit Vol. I" on CD. The COPYRIGHT FREE music on the disc is designed for cross editing, looping and other fancy stuff that makes the package seem ideal..
Also, HOOKED ON CLASSICS by K-Tel, has snippets of great classical music all strung together - really fun.
I use Joannie Bartels tapes a lot in my shows. Both for children and for retirement center gigs. Try her Dancin Magic and her Silly Time Magic. I think they are tops - she has 3 or 4 others, but these are definately tops in my book! Dancin Magic has a real "jazzed up" version of the Hokey Pokey that is a lot of fun, especially for a clown.
When I started using music to my show I preferred old jazz and swing using Les Brown, Ray Bryant Combo with some yakkaty sax and Ray stevens (everything is beautiful as closing) If you are a clown, why not use the caliope music found in Laugh Makers and WCA magazines?
The Top 18 Signs You've Hired the Wrong Clown for Your Child's Party
18. By the end of the party, he's got every damn kid doing the "pull my
finger" trick.
17. Clown car must be started with breathalizer device.
16. Keeps screaming, "My name's not BO-zo, it's bo-ZO!"
15. References to Kierkegaard and Nietzsche are lost on most 5-year olds.
14. Props for his "disappearing" trick: a moving van and your wide-screen TV.
13. Scares the holy hell outta the kids during the "Severed Limb" trick.
12. Tells the kids he killed Barney in a blood match in Newark.
11. Didn't bring any balloons, but manages to twist your dachshund into other animal
shapes.
10. Prefaces each trick with, "here's a little number I learned in the joint."
9. Not exactly the Peewee Herman impression you were expecting.
8. Wears a T-Shirt that says, "Drug-free since March!"
7. More interested in squirting seltzer into his Scotch than into his pants.
6. Those huge ears look too darn life-like, and the entire act consists of showing charts
and complaining about the deficit.
5. A sad clown is one thing -- a clown who spends the entire party with a gun to his
temple is another thing entirely.
4. Only balloon animals he can make are a snake and a "snake on acid."
3. Business cards include the phrase "From the Mind of Stephen King..."
2. Price list includes "lap dance" and "around the world."
and the Number 1 Sign You've Hired the Wrong Clown for Your Child's Party...
1. All the balloon animals are ribbed and lubricated.
Balloons at Parties
Planning a Party
When someone calls me for a gig, I ask them what they would like me to do. And based on how many kids, adults, etc., and the type of party, my response varies.
When I get a call for a birthday party I have found that the parents usually don't have a clue as to what they want other than entertainment and fun for the birthday child. When I get a call from a frustrated mother who has never hosted a party, I tell her I have the perfect answer - my birthday planning guide. I've been using a Birthday Party Planner for about 7 years. The book in which I found the idea for the planner is: The Happy Birthday Business by Frances Marshall.
Why do parents wait til the after-school-time, even on weekends? I now suggest on weekends that people have their party between 12 noon and 2pm, or 1 and 3pm. Otherwise the kids get all wound up waiting all day. It's proved highly successful, I fit more parties in at weekends, and it enhances the "I'm a professional, I know what I'm doing" approach.
Birthday parties go rather quickly; in two hours there's just barely enough time to play pin the thing on the picture, eat cake and open presents - you don't have to fill the whole time (after a couple of hours, the kids go ape anyway). Just make your part the highlight of the day.
If you can do many bits, you can offer people an "act menu" to choose from, but you could tell the client that you have a 30 minute minumum. Then they can mix and match what they want. I have an hour minimum and get a higher rate because I dress as a clown and I figure in the time it takes to put on my face.
My policy is to state the maximum amount of time I will work (1 hour for private gigs). This gives me an escape from those large & rowdy parties that would keep me there for days and avoids awkward situations at small parties where the kids get all the balloons they can get into their parents' car in 30 minutes. But I rarely stay less than an hour.
I tell parents that I do a 30-40 minute show plus I make balloons at the end. Unless I have someplace to be immediately after the show, I usually stay for an hour. I plan for a 45 minute show, but if the show runs short because the kids didn't respond, I've still done what I said I would. If it's a good group, I'm happy to go longer.
Our parties are an hour long unless we do facepainting. Our show can be shorter if we feel we need the extra time to make the balloons. We don't estimate according to how many children are at the party, we time ourself so we can get the job done in an hour. I usually recommend 1 hour for 20 children or less. If they are planning on having more then 20 children, I tell them an hour won't be sufficient. I make more extravagant balloons depending on how much time I have and how many children are there. I was hired once to do 1 hour of balloons for 2 children!!! On the other extreme, I was hired for 2 hours to do a party at Bally's Hotel and Casino for 500 people (I let them know that it clearly wouldn't be enough time for everyone to get a balloon hat, but they said that was fine).
What to do at birthday parties
This is what I normally do at a typical in-home birthday party:
- I'm very "up front" with what I do at parties. When the host knows what to expect, everyone is happy. I first find out how old the child is. For the younger children a clown is sometimes REAL scary. I usually suggest a 20-30 min. show followed by a balloon for everyone. Most hosts would like hats and animals for all the kids, and even the grown-ups.
- Most people just want a twister, but I arrange party games for those who want something more than that. I arrange games to play with the children, depending on their developmental age groups. You can find textbooks for teachers that specifically tell you how to teach certain games to certain age groups, and so you'll know whether to use Hot Potato, or Steal the Crowns, or Midnight (my favorite and the favorite of most kids).
- I only do balloons at parties. I advertise just balloons hats and animals, and book mostly balloon parties for 2-6 year old birthday children. I ask the parent, or whoever is in charge if they want a show or just twisting ("twisting" has a nice ring).
- I don't normally do major sculptures for private parties, unless they are specifically requested.
- Don't limit yourself. Some people love having balloons and a little something extra.
On party day
- I typically arrive about 10-15 min early. I tell the parents to occupy the children for about 5 min. in another room so that I can setup for the show.
- One of the things you can do to add value is arrive before the party and make decorations - more elaborate creations with several balloons or just a *lot* of one-balloon wonders. This gives the birthday kid a special one-audience show and a treasure trove to play with for a few days after the party's over.
- I bring a 1' x 2' poster board (neon colored) with colored pictures of about 20-30 different creations that I am offering for that day. This REALLY helps the child pick something, and the shy children can just point.
- Ask that the kids wear name badges (or provide them yourself) with their names printed on them in large, bold lettering, so you can always call them by name and know who they are. They love it when you say their names and usually forget that they're wearing a badge, so they're amazed that you know them, even when you don't yet.
- I sometimes enter "looking" for the Smith wedding and do a whole bit about having worn my best outfit for the wedding and after I find the bride or groom, I ask which guest are they marrying. If the kids are around 4 or 5 this works pretty well to establish that I am a confused, silly clown.
- It's always good to have a Birthday card (etc) for the guest of honor. If it's a kid's birthday, I like to have "little present" too. Just little package with little cheap toys... i.e. superballs, brightly colored pencils, plastic spiders, whistles. etc. For a buck or two you can put together a pretty cheap gift that the kid'll love forever. And I usually make cards out of construction paper and crayon or felt pen. I draw a simple drawing, and then write a little message...Nothing fancy. sometimes just balloons on strings, with dots and squigglies for confetti. It adds something personal to the day. Of course, the guest of honor, gets the biggest hat at the party!!!!
- I bring a large balloon sculpture as a gift for the birthday child. You can stop on the
way to the party and purchase a big bouquet of helium-filled balloons (in the 5 dollar
range) for the birthday kid, or bring a gaggle of helium balloons with long ribbons and
turn them loose in the house (whatever it costs you, mark it up and pass the cost along to
the hosts); each kid gets to take home one of your creations attached to a helium balloon.
Or rent a helium canister and fill them yourself. I have taken a balloon bouquet for the
guest of honor - this is five balloon flowers made with 6" geo's and placed in a
16" geo vase. I also make these for hospital patients and other gifts. For a girl I
bring the ballerina with the clown head. For a boy I make a palm tree with a monkey
hanging on it. Or a large bicycle. When other children ask to have one I tell them to have
their mommy invite me over for their party and I'll bring one for them.
Show
- put them thru some kind of "aerobics" first.... something to get all that extra energy burned up before sticking my head into the "lions' mouth".. :*) I like T. Myers idea of having a "chase the balloon contest" before doing a show... not necessarily a full out gut busting exercise session, but still it keeps them occupied and allows them to run/jump/scream. It's important to get children worn out when you need them to pay attention. there must be a hundred tagging games that kids enjoy that you can organize when you need to wear them out. Yes, a little aerobic activity prior to the show can work wonders, but be sure to temper it at the end with something that winds them down. For example, you might end with a yelling contest to see how loud they can be, followed by a whispering contest to see how quiet they can be. If you leave them wound up, they'll be loud and fidgity throughout the performance.
- Make it very clear from the start that its is the Birthday child's SPECIAL DAY, so his hat/animal/whatever will be better than anyone elses. This only makes the guest of honor feel that much more special. The others can still have special things, but when they ask for the same thing as the guest of honor, tell them that you'll do something similar, but not as big, because you want everyone else to know that the birthday boy is special. Maybe on their birthday you'll be able to do something extra special for them too.
- I present my balloon twisting as a show. When I tried strolling around, I found I never got out of there. With a show, there is an ending time.
- My show starts with 15 to 20 min. of facepainting when I first get there (this allows for the kids to chat and socialize and for the late comers to arrive without interrupting a lot).
- Then I sit the children down in front of me and have them take the "Pledge to never, never, ever, ever, put a balloon in their mouth." I also talk to them about not letting any younger brothers or sisters at their house from putting them in their mouths.
- I usually begin parties with several special balloon creations for the birthday child, get into my show (magic, juggling, etc.), then finish by making balloons for every child. During the show I get the birthday child up to help with the first routine, usually something small but fun. I also get this child to help me later on for a big routine in which I dress them up. Most children love it and the parents love the photo opportunities. For boys I will make them into a complete pirate with hat, sword, scabbard and parrot that sits on their shoulder. Or make them into a helicopter (this works well at company picnics only I do it to the biggest bigwig I can find-first asking if they have a good sense of humor).
- The birthday child gets the biggest and the most, this is what I tell the parents and the kids so if little Johnny wants three balloons and it's not his birthday I tell him "this is Bob's special day that is why he is getting bigger balloons and more than everyone else. When it is your birthday you can get the biggest and the most balloons" This is a quick plug such that little Johnny will want you for his birthday.
- I do a 15 or 20 minute show such as the crystal cylinder (FUN Technicians) where I proceed to inflate the balloons without tying them and put them into the cylinder and put the cover on and they magically appear inflated.
- I also have a running balloon gag thru the entire show about making a tazmanian devil or some such thing. I never seem to get it right and I get them to use their imagination about what could these balloon bits could be. This is a lot of fun!
- Finally at the end of the show I grab all the pieces that I have been piling on the floor and turn them all around and say "lets see, what can we make out of all of this" and then I proceed to put them all together to make a 6' pink flamingo. This leads me into twisting balloons for every child.
- I give the kids rules and the choices of animal balloons, and then I spend the hour twisting. I have them line up and I make them a balloon animal or hat of their choice. These are usually one or two balloon sculptures. I tell jokes while making the balloons, or I make a "game" out of the balloons - having them guess what I am making. The correct guesser gets the next balloon - and if one of the older kids who already has a balloon guesses what I am making, I suggest that they pass their "win" on to one of the smaller children. They seem to like that!
- I give each child a balloon (3/4 filled) and teach them how to make a dog. Sometimes, instead of this, I put a pile of 3/4 inflated balloons on the floor and have the children work together to make one large sculpture.
- I twist balloons for the last 15 - 20 minutes. This way the kids don't start beating each other with their swords through the rest of the show and so if anything pops, I don't have to replace it later on.
- If there is time left at the end of the party, I will make some big hats for the kids, more swords, or hats and flowers for the adults, or else a large construction, like a Bugs Bunny, etc.
- Another approach is to bring a bag containing at least as many balloon figures as there
are kids at the party (to be given out later by the host). Find out how many children to
expect and make up a few more than that number of figures in advance. I make figures
appropriate to the age group and the occasion and take them in a large plastic bag. During
the show, I choose and make a variety of detailed figures as a part of the entertainment,
telling the kids a story while I twist each one. I keep these figures near me. All of
these are for the birthday child or person for whom the party is being held (or they can
all go into the bag when the show ends). I leave all of the figures with the parent or
sponsor to be distributed to the children after I am gone. It works well and eliminates
the hassle of repairs and replacements. Plus, when it is time for me to go, the kids are
busy with the host, not me and I make a fast retreat.
Ending
- We do a flower for the birthday child to give to Mrs. Mommy to thank her for the wonderful birthday party.
- After all the balloons are made, I have the parents take the children to the food and present opening while I pack up.
- I use the elephant line or whatever animal I think of- "I have to go. It's my turn to feed the elephants! They get really grumpy when their dinner is late!! "(If they are older 10 or 12 and they persist in trying to make you stay) try- "The last clown that was late is now called lefty (pull your sleeve over your right hand)"
- I stay and "help" them sing the birthday song - which can range anywhere from Jingle Bells to Row, Row, Row your boat until the kids help me get it right.
- Don't forget, most children's parties include a grab bag to be taken home. Make sure you talk the mother (or who ever is going to make them up) into letting you include your business card in these. If you've done a good job, the kids will be talking you up like crazy. If your card is brought home, it's a cheap way to get your name out to others with kids.
- Ahead of time I tell the parents to hand me an envelope with my payment as I am leaving. This way they can tip you.
- After all is said and done, I mail them a "Thank You" and an evaluation form. This little extra pays off.
The Entertainer : Child Ratio
Before the party you must find out how many guests are expected, and their age group. I ALWAYS ask how many will be attending. But I find at 95% of the parties there are 12 children.
We suggest that you invite 1 guest for each year plus 3. ( A 7 year old would have 10 guests.) If the child is over 4 years old , and you have good help, 8-15 may be ideal for the most fun.
I like to have about 10 - 12 at a party - I have had as many as 30, but I don't really like to do that many.
I do a one hour party show (max) comprised of face painting, balloons and magic. I tell the host/hostess that I can do all three if I have under 15 guests but if there are more than 15 then THEY need to choose what they want cut out so that I only stay an hour. Sometimes I cut the magic down or limit face painting to only the simplest of designs. If I have under 10 guests I do more silliness before I begin anything else.
I can only twist 1 simple balloon per minute so I take one clown for every 25 guests to ensure that everyone is happy. This should give you enough time to make more elaborate designs and even time to clown around and repair broken swords before you make your exit. I have booked 2 parties with guest lists around 30 and have started using another clown to help. We throw in a couple of skits if time allows. My wife and I go to all the parties together. It gives us a reason to ask for more money than the single clowns, it allows us to work much larger events and parties more effectively , and it solves the problem of deleting portions of your act to have time to make balloons for every child. Some of you might want to look for a full-time partner or a part-time partner to work with when the parties get big.
There aren't many ways to twist lots of balloons in a short amount of time. Here are tips on dealing with the all too familiar situation of too many kids, too little time:
- Make yourself faster
- Practice, practice, practice until you can do it in your sleep.
- Learn the speed twisting techniques that conserve the number of twists you have to make. I remember reading some speed-twisting tips in a book that had a section on cranking out animals when surrounded by kids. Things like making legs using a fold-twist (elephant ear), rather than twisted side by side bubbles (standard legs); and lock-twisting by squeezing multiple folds of the balloon(s) together without first twisting individual bubbles (eg. S-twist sword).
- Make one balloon animals and not multiple-balloon creations. We do not do any exotic multiple balloons for the children at the party. We do mainly swords, dogs, bunnys, girafes, etc. The multiple balloons are wonderful but I save them for doing a big presentation when you have a lag, or if there is a special party. If we have a party with very few children, then we can get fancy and make multiple balloon sculptures. This doesn't happen too often.
- When the lines are long and I'm doing only one balloon per child, I make hats with a basic animal face at the front; small nose, ears, neck, and front legs then around the head and lock to body with excess being tail sticking up behind animal head.
- If it is really busy I don't give them a long list to choose from. I ask them their favorite color and when they say - I offer them a choice of two or three things. I usually don't have any problems with that.
- In a rush situation I won't take requests, I'll mention that it is "clown's choice" and make something neat but simple ie. a few twists with a flourish and a laugh and on to the next table.
- Use a menu It really speeds things up if your customers know what they want by the time you are ready for them.
- Use a faster pump.
- Bring preinflated balloons to the party. We put them in a 55 gallon clear trash bag (sometimes called clear drum liners). When you walk into a party with an enormous bag(s) of color, the guests know something fun is gonna happen!
- Bring SOME pre-twisted figures and pass them out after I have made the birthday child's balloon plus several other figures. The kids do like to watch you make the balloons.
- If we are doing a preschool with over 100 children, we preblow balloons and make them into doggies. Each child that comes to get their doggie blows on the tail and we "poof" it so the child has a brief interaction with the clown. We always make too many doggies and those that are left over we quickly "poof" each tail just in case the preschool needs it after we leave.
- Have the kids help you do your work
- Bring preinflated balloons and teach the kids to do a three twist dog. Bring more balloons and they can make hats and all sorts of figures that are very easy. It keeps them involved and they love stuff they have made themselves.
- Have your friends help you do your work
- Recruit your friends and work in teams. Using 2 or more persons works well but you must charge an amount appropriate for 2 or more clowns (also, scheduling between 2 performers and a birthday mother can be tough!).
- Stay longer and charge more
Give anything a try. What works best for one isn't always right for another. When you can't keep up you just have to do the best you can and keep smiling all the time.
General Advice
Do not drink a lot of sodas before your show! Brush your teeth and use the bathroom before your show.
Bring a few bags of balloons, so that you have spares in case you've gotten a bad batch.
Parents like it when you get the kids involved - the more the better.
Chances are that you will be second guessing yourself with decisions (cost, effects, time, patter etc.) Go with the flow and have a hoot. Be creative, cool, crazy, colorful, and of course be yourself. Don't think too hard about it. Just stay calm and think FUN!! Have fun with it. Fun is contagious. If the kids know that you want to have fun with them, they'll join in. I just go with my style. Don't be afraid of doing parties as long as you can keep them entertained. When they hire you, they already have a good idea of what to expect, because they've already seen you perform, wherever you were at when you gave them the card, so they already like you. Be yourself, or be your character, and just run with it, while keeping up professional standards.
Make a plan. That way you at least know what you would _like_ to do, but be prepared to change according to the children's needs (some have a little more energy then others). I usually have some sort of list made up with a few extra items in case I run short. You want to give them enough but do not try to stuff all that you know into one show. Leave them wanting more. That way if you get a referral for another show, you have not blown your whole act.
Kids really love to see you make hats for the adults at children's parties - giving Grandpa a hat is a great way of getting a laugh. Don't forget to give out a calling card with each balloon you give out. The calls will start rolling in.
Be careful not to make anything with 3 balloons if you are not going to have time to do this for everyone. (Except the birthday child -he/she should always get something extra special)
Maintaining Control at birthday parties
The goal is not to be just an adequate performer, but a hero, so that parents will recommend you to others, kids will beg to have you come to their parties, etc. We really are heros; we're paid superb fees to do the impossible. We takeover a bunch of kids whose hearts are set on a riot. Therefore we have to be able to handle ANY problems. The adults are visibly delighted when we turn up. They're so grateful even if you can only handle 99% of the kids.
Who has the responsibility for maintaining control over the children at a party? You as a performer at a children's party assume the responsibility for control over the children that you are hired to entertain. It's part of the job. Each of the parties that you do is the best opportunity that you have to be hired for more work based on what you do and how you do it. We all need to be concerned in how we are viewed by the people that hire us. If we make a lot of demands on the folks that pay us (like - you are responsible for controlling the kids, etc.) then I'll bet that in the future they will pay someone else. Always remember that when you are working with children at a party, they are going to be in a very "up" condition. They are excited by the party and by the balloons that you do. I know that it's hard to be compassionate toward a creepy kid when you're concentrating on doing your act, but I contend that you're not there to make balloons or pull rabbits from hats, you're there to ensure that everyone has a good time (including "bad" kids).
Bored children of a certain age will wack each other with whatever is at hand. In a birthday party setting, I ask for 3 things: That the children remain seated and refrain from blurting out requests since _everyone_ is getting a balloon; that the children take very good care of their balloons so they can show their parents what they received; and that Mom take any balloon blugeons away and put them with the goodie bags. This "orderliness" tends to allow us all to have more fun, since I get to know all the children in turn and we all share some laughs.
If the kid starts to cause a real problem, tell him plainly, in a friendly, loving, but not joking tone, that you won't tolerate that behavior. Don't be rough, don't hit, don't yell and don't frown, just smilingly, firmly speak to the child in a kind and loving way (I know it sounds funny, but if you're thinking this as you do it, your body language will communicate it). If the child continues to cause a problem, take the child to *another* parent (if the child's actual parent is there, play dumb and ask someone else if he's their child) and ask for assistance in keeping the child back while you're performing for the other children. This tends to chagrin both the child and the adult, and while they're standing there sort of stunned, walk quickly back and let the kids gather 'round you again. If you can get most of the kids twisted and happy, you'll have some extra time for the problem kid at the end (and the problem kid probably needs some extra attention, even if he's a pain in the ***).
In all cases that I have run into in over eight years of children's party experience, children can be handled with no direct threats or insults directed at them or the adults. Learn from each bad experience that you have. Early, calm and creative action can prevent an enthusiastic kid from becoming a problem in the first place. If at all possible you want to handle this without involving the people who are paying you to be at the event. They will give glowing recommendations, and tell other parents "Cap'n Denny made great animals, and he even handled Billy Buttsticker!"
The key is to be patient, but don't wait until you're ready to blow your stack. Tell the child *one time* to behave. If he doesn't, lovingly force him to comply. Stopping it early without rancor will go a long way toward ensuring that everyone has fun.
Usually I can get the kid under control, by giving him another balloon, and telling him that I need him to blow THIS one up for the next hat...every few seconds I "check on him" to see how he's progressing. "No progress yet?!?!?! Keep on trying!"
People do invite the trouble-maker kids. S/He's a neighbour, child of important adult friend, friend of the birthday boy or girl, the class bully, or a classmate when they invite the whole class. Handle the problem kid in such a way that you get sympathy and help. If you spoil the fun for the terrible kid who is a friend of the birthday boy or girl, you're also spoiling it for the host. Also, the birthday kid IS often the problem.
For a problem with a kid that won't listen -- A tactic, not to be used immediately (it works well but loses impact if used too often), but definitely before calling in the host of a large event, is to stop and explain that you just can't continue without everyone's cooperation. In almost every case, the other kids will ask the troublemaker to stop. This works with hecklers of all ages too. If you can somehow indicate to your audience that the heckler is disturbing you, the crowd will take care of things for you.
Here's another trick I use when I want to get the attention of a group of kids. I start whispering something like this: "Here comes the bulletin this is the most important thing I'm going to say today I hope everyone is listening because I'm not going to say it twice and then you'll be sorry whoooo-boy will you be sorry because everyone else will have heard this wonderful thing and you'll sit in a corner and gnash your teeth and beat your chest because you didn't hear me say it.." etc. I do this in a nasal, high-pitched monotone that sounds sort of like a television test pattern (some of the younger browsers probably don't even know what that is {X^{|} - gettin' old's a b*tch, and vice versa). When they settle down to hear what I'm saying, I launch into whatever it was I was going to say. Keep in mind that this technique will work a maximum of one time. Once they're on to you, you'll have to try something else.
Now, if you are hired to make balloons... yes you are being paid, but not by the person receiving the balloon, and you have no control over who you are going to twist for. Since the munchkins don't have to fork over any of their own money, what do they care if they trash the balloon and demand another... they have lost nothing. You on the other hand can get swamped with these balloon grubbing little monsters, and will find yourself not being able to get to kids who really want a spiffy balloon, AND find some creepy kid/parent complaining to who ever DID pay you about how you will not make a balloon for their little darling who wants their 40th balloon.
You must get rid of the brat if he/she is ruining the show. Get rid of the problem by calling in an adult. Keeping 8 out of 10 kids under control (by calling for help) is better than 2 out of 10 (because the bad kid keeps on..). Even with experience there'll always be the odd kid. There are usually enough adults around that this sort of thing doesn't go very far. (I hear many fellow magicians complain that all to often, they are used as baby sitters. The show starts and the adults vanish.) But remember if you have to call the adults in, while they may not blame you, they won't praise you either.
Make it clear in your contract that there is to be a responsible adult who will maintain ultimate control over the children. If things get out of control, the show ends at the point, and you as the performer still get paid in full. (it's not YOUR fault you have to end the show). If you get food being thrown around and more than half a dozen kids heckling and moving around (which I hear is not that uncommon!), then quit.
Here's a tip if you are twisting at a small party. Enlist an adult assistant. Its easier than you might think. Just as you are about to start twisting, point to an adult and ask "would you please line the kids up so I can make them balloons?" Works like a charm. They do it every time, and keep the kids under control for you. Even if they have to leave to do something else, they almost always find someone to replace themselves. It helps to size folks up earlier on, look for someone who really seems to enjoy interacting with the kids.
When a "brat" starts in, I usually ask the parent or adult in charge to handle the little problem. Our job is not to babysit (although some people think we are) but rather to entertain. The parents job is to make sure that the kids behave so we can entertain. I would have looked up and said to the person in charge " could you help me with this child so I can continue my performance?" I never put myself in the situation of babysitting. In fact, when someone books my show I send them a Birthday Party Planner that includes some words about parents or adults should be in the room when the performance is on to take care of any problems that may arise so the performer can do his show without interruption.
Turning to an adult for help should be a second line of defense. Turn to the host when all other venues have failed. Your last resort should be to take the child to the host (preferably a dad) and ask for help so that you can complete your performance. By this time, the child's behavior should have been so egregious that the host will be understanding. If the host won't help, I'd pack up, but I wouldn't charge for the party (yes, I know, I've lost opportunity time and I did show up and do some of the act) because if I get any bad word of mouth from the event (and I will, because I didn't live up to my end of the bargain for whatever reason) I want to be able to explain it in a way that makes me come off clean.
I don't like to make swords at parties. Every time I pull out my balloons the first thing yelled out is "can you make swords?" I usually respond that since swords are sharp, the balloons keep breaking! Then I start making animals. I have NO problem with youngsters having toy swords and guns, its just that kids will be kids, as soon as they have swords ALL control is lost and the parents decide that perhaps balloons were not such a good idea after all. IF on the other hand I am getting NO help from the adults in maintaining the little darlings, I will start to make the swords. When it looks like a lamp or two is in mortal danger I suggest that they play with the swords outside (much to the relief of the adults) while I make the animals for the kids who really want them.
Balloon Games
- A 3 fold dog with a large loop for arms will climb a 260 (straight or with a flower or tree top) by moving the straight 260 in a circle and letting the dog swing around it. This works with just a 260 tied in a circle and a straight balloon. Passing the circle from one kid to another can be a formal game or rowdy play.
- Shooting balloon seeds out of balloons. With pre-made seeds. (Watch this because kids may figure out a balloon will shoot anything that will fit inside. 260's are great for sticking pencils in acoustic tile ceilings.)
- Shooting the balloon off their finger is big fun and you can make targets and games.
- Balancing a straight 260 on their finger.
- Dump a big pile of balloons on the floor and
- see what they do, or
- instruct them to together make one big twisted balloon. Then
- let everyone break it, or
- leave it for the mother to enjoy.
- Let them take turns adding balloons to a hat you are wearing.
- I teach kids how to make a simple animal (their own three fold dog). After that I make
them each a balloon animal of their choice. I discovered that when they made their own
animal first, they were less likely to take apart the one I made for them. I want kids to
know that anybody can make a balloon animal. It's like playing the piano - everybody
doesn't have to be Rachmaninoff to enjoy playing chopsticks. And playing a little bit of
piano makes you appreciate the great masters even more. Making an animal is a real esteem
builder for kids. It's a safe, silly way for them to be successful at an artistic
endeavor. If they can be successful at this, maybe they can try drawing, sculpting, or
something else that's creative. You may actually give a child the gift of a lifetime hobby
or career just by teaching an 8-year-old how to make three loop twists. We have to keep in
mind that the act of making the animal is simple. What makes a great twister is practice,
good lungs, practice, shared ideas, practice, a winning smile, practice, charming patter,
and practice. Teaching kids how to make an animal doesn't take away the mystique of your
performance, it gives them a new appreciation for it.
Other than a 3 fold dog, there are a lot of figures which only need a fold twist or an S twist. These are easy figures for kids to make.
- Put the dog on a 260 leash.
- Hats - First give a warning about not making elephant trunks (they can pop snap you in the eye). Show them how to make a basic hat, then give them 3 or 4 balloons and look out.
- A 4 petal flower.
- A heart in a basket/pacifier/heart hat (You tie the heart to the 260)
- A sword and scabbard - "S" twist sword or pirate type sword
- A laser gun.
- A simple alligator.
- A heart hatchet.
- A heart on a stick.
- A Bee or Hummingbird.
- The Twisted Wrister with a heart, dog, or smiley balloon on top.
- The Spear - they could help each other to wind 2 balloons.
- A ball could be pre-loaded into either of these last two, to make it more interesting but more work for you.
- Have party-ers hold 1 or 2 round balloons between their legs while trying to do a certain dance (often to outrageously fast music). When they lose the balloons they have to sit down. Last couple remaining on the floor wins. I think this could also work with little kids dancing freestyle (and it might be a good way to tire them out before the show)
- Pass a balloon under their chin or other parts of the anatomy! Use of hands is not allowed.
- Balloon dog races - a relay race of two person teams who will race back and forth from table to table creating balloon dogs.
- Relays: Use the cheap round water bomb balloons. Line 'em up in two rows. Kids have to run to the other side of the room (yard), inflate a balloon, sit on it and pop it, then run back.
- Relays: Line 'em up in two rows. Give the kids an inflated balloon. Have them put it between their knees and try to walk across the room. (After they struggle for a while, tell 'em it's easier to *hop* across the room than try to waddle.)
- Put balloons on a bulletin board and have them throw darts for prizes (lots of supervision, small prizes from Affordable Treasures in Los Gatos - great store, like an Oriental Trading company without waiting for the mail). Since you're not in the carnival business, don't make it *too* hard for them to hit the balloons, and be sure to fill them tight so they're easier to break. Have some consolation prizes available, and maybe some cooler prizes for kids that break three.
- Have a water-balloon toss (definitely clear it with the parents in advance and be sure it's an outdoor party), similar to an egg toss. Have kids break into teams of two and have them throw a water balloon to their partner. Those that survive take a step back and throw again. The team that throws it the farthest without breaking is the winner.
- Another big hit with older kids (7+) is to teach them how to make their own three-twist poodle. I've done this a couple of times at school carnivals. For 50 cents, I give them a bag of 5 balloons with a xeroxed set of instructions for the basic dog. I show them how to blow up the balloon and guide them through the 3-twist dog, then the standard dog. You'll have to blow up the balloon for some of the kids, but they're really thrilled with the balloons they make themselves.
- If you use these ideas, or some others of your own, organize them into party "packages" with set prices for groups of "up to 20," "up to 50," etc., and put them together in a flyer you can pass out or send to parents when they inquire about your services. This will give the parents the secure feeling that you've thought about what you're doing and you're not just some hack.
- At a birthday party, tie some twisted birds to helium balloons and had the kids blow them around an obstacle course or across the room in a relay race. I let each kid start 10 seconds after the previous kid, so there wasn't much standing around. The whole thing pretty much broke down into giggles, and everybody got a prize.
- Balloon Releases. You can give the kids pre-stamped postcards, have them write their address and a message like "If you find this card, I sent it to you by helium balloon! Please mail the card back and tell me where you found it!" Attach the card to a helium balloon, stand out in the yard, countdown and release! Over the next few weeks they'll go back to the birthday kid and tell him/her that they got their card back from Phoenix, Sydney, Zanzibar, etc. Don't use the mylar balloons.
- The Over/Under game is the game where you line all the kids up, give them an object, and the first person takes the ball and passes it under their legs to the next person, who passes it over their head to the next, and that person passes it thru their legs, and so on, till the last person gets the object, runs to the front, and the 'action' continues. Some kids really enjoy this game, other times, it simply bombs. Anyway, it is a lot of fun with big, long, awkward balloons - especially 350's. The rule is they've got to hold the balloon with two hands, one on each end, as they pass it back - and believe me, it makes things rather difficult...
- This has 'laugh riot' potential: works great as a relay type race, but 20 kids at the same time would be pretty entertaining, too. Make a couple of parrots-in-a-swing with longer-than-usual tails. Racers must balance the balloon on their noses while racing. If the balloon falls off, the racer must stop until the balloon is balanced on their nose again. No hands! Great laughs and challenging because the faster you go the more difficult it is to keep that balloon birdie on your snoot.
- Do the "see who can shoot the balloon the furthest" game. Teach them to make a three fold dog and have a prize for the best one. Have "them" make a free form sculpture and have them vote on the one they like best.
- Take one of the latex 18" balloons and put several 1/2" balls inside. Attach a uninflated balloon to the knot. That's it. Use the uninflated balloon to bounce it or whirl the balls around inside demonstrating centrifugal force and several other scientific phenomena. Try to single one ball out of the bunch to whirl. I have found this to be an hours of fun toy for the adult programmers at work.
PART13
One-liners for balloon creations
- Retorts for requests
- Hey, that doesn't look like a XXXXX!"
- Retorts for repairs
- One-liners for kids
- What do they eat?
- General
- What to say when a balloon pops
- One-liners for pumps
- One-liners for balloon dogs
- One-liners for balls in balloons
- One-liners for adults
Retorts for requests
- "Name a animal, I will make it out of this one balloon." When they say dog, I say " that's easy give me a real tough animal." They give their reply, pause for a minute, look puzzled and say "A dog you say!" It usually gets a laugh.
- I use this when working a line or at parties. When anyone asks..."Can you make me a doggy?" I step back a couple of steps from them, get a very serious look of my face, thrust my hands forward towards the person, utter a few magic words and say "you're a doggy!!!!!! When it fails, I get a real confused look on my face and then look at them and say " Oh, didn't work....you're still a little girl". I then make them what they asked for.
- "Make me a doggy!" I pull out my wand, wave it and say "There.....now you're a dog...... ohhhh it may not feel like much now, but wait 'til you get home and look in the mirror.."
- If when I'm leaving a table, a lady at another table says "Hey! where's my balloon?" I'll walk over dig through my bag, pull out a balloon, reach over and very carefully hand it to her, then walk off. It's "abuse" for the sake of entertainment and fun, but I "suck up" big time afterwards.
- I heard of a cool button that I would love to have.. It says "Clown - Plain Clothes division"
- Kids always ask me for snakes. Sometimes because that's what a balloon reminds them of, but usually because they are trying to be witty. I make a big deal about how a snake is HARD to do. Lots of laughs. I ham it up. I blow up the balloon all of the way, look at it, and say "Nah. Looks nothing like a snake. Let me try it from the other side." Then I walk over about 3 feet. Turn sideways, and repeat the gag. More laughs. Finally, after encouragement, I give it one last shot. I wrap the balloons around my fingers and inflate it into a curly-Q and make a Cobra. Gets a great reaction.
- When The Mask was released, a friend of mine warned me immediately about the scene where
a balloon is morphed into a fully operable Thompson submachine gun. His assumption was
that now that people were going to see this in a movie, I'd get requests for it and I
better come up with a way of making the gun or have a good line to answer with. Later that
same day he offered a suggestion for a line.
"Can you make a gun for me?"
"Sure, but there's a seven day waiting period." - Here's a way to handle the 'I want' statement from the children (to point out in a subtle way that it's a little rude): I thump my chest and say 'I Norm, glad to meet you Want'.
- Today I made a cat for a cute little girl who asked for an otter. I told her I couldn't make an otter, because otters love to eat sea urchins, and sea urchin spines would pop a balloon otter. (She actually bought this, and asked for a cat!!) So, as I was twisting up the cat, she asked me what would happen if the cat scratched itself. I thought quickly and replied "Nothing, all my balloon cats are de- clawed."
- After making an animal balloon, hold it up and say "Did you hear that?" Then hold the balloon out for the person to hear and say "Mooooo". Look a little puzzled and say "Hmmm... I guess this balloon was supposed to be made into a cow"... not a dog (bird, frog, etc.)
Hey, that doesn't look like a XXXXX!"
- "Of course it's a lion, you can tell because it's purple. If it was _pink_ it would be a panther, but it's not so it _must_ be a lion." (it's a Zen kind of humor, I think.)
- There is a great Groucho Marx line from "Duck Soup" that could be used; "Who are you going to believe, me, or your very own eyes?"
- You could do the "trained dog" bit, if you're not happy with the sculpture... "Of course it's a dog; it just got back from obedience school. Watch" command "Rollover" (action is semi-obvious here - if needed, blow a slight puff of air at the figure with your mouth to help) command "Speak" (squeak the side of the balloon) command "play dead" (put it on the floor and stomp on it.)
- If your character is capable of getting away with it, hold the dog next to the heckler's face and say to all other spectators, "Yeah, I think we can all see the resemblance. No, wait a minute." Turn the balloon around. "There we go, perfect!" This puts the victim into the position of having to be a good sport. Of course, if the subject of your humor isn't a good sport, you may get your butt kicked. Part of the fun. If you're skittish about putting your audience on the spot, do the same gag, but hold it up to your own face.
- "Oh, a dog, I thought you said ________" Fill in the blank with whatever it looks like. If it really *doesn't* look like a dog (or whatever), say that it was an abstraction, but your art is horribly misunderstood by the unwashed masses. But that's okay, because you're getting into Pop Art (pop it and make another whatever, but do it right this time).
- "Yes, it's a Latexian Schnitz-hund. And, if I say so myself, a perfect rendition."
- "It's in its larval stage. Take it home, put it in the closet for two weeks and it becomes a St. Bernard."
- "It's a cross-breed."
"Shhh - you'll hurt its feelings." - "My God, you're right. Here, you try." (Careful - they may be better than you, and you'll stand there performing dueling balloons for half an hour) (then again, you might learn something, and you'll look good if you have good humor).
- "Hey, it looks more like a dog now than it did five minutes ago."
- "Everybody makes dogs that look like dogs - mine are a novelty."
- "Actually it's dog DNA; take it home, put it in a warm, dark place and in a million years it will evolve into a dog."
- Whenever an adult says 'Just pretend it's a dog' or a similar comment, I pull out my Sharpie marker and take the balloon back. I write 'DOG' on the side of the balloon. I hand it back with a big smile and say 'I am always prepared for the imagination impaired or challenged.'
Retorts for repairs
- My balloons are guaranteed against popping for 30 seconds or thirty steps whichever comes first.
- When children come back with your creation now shaped like a string of sausages I usually wipe my brow for effect and say "It's a good thing I took Surgery 101 back at balloon school!" then twist it back together shouting things like "Forceps!" "Clamp!" "Scalpel! - No, wait!!!! - No Scalpels! Sponge!" "Suction! No, wait!!! - Pressure!" "Suture!", etc. A 3M brand hardware-store dust mask tucked into your apron, and donned at the appropriate time would surely get a huge laugh.
- Have you ever made a balloon animal and just as you're making the last twist, it pops? Take the deflated balloon and hand it to the person and say: "Well here's your bunny rabbit. ... It's a little deflated but you saw what it was right?.... OHHH you want one with air in it. OK I'll make you another one." People laugh at it.
One-liners for kids
- Here's an oldie but a goodie for when your creation won't stand up: I believe it comes from *Roger's Rubber Ark*, "If your legs were made of rubber, you couldn't stand up either."
- From Roger's Rubber Ark: "And believe me, I am not lion to you. Now there's a funny lion you can use to make someone roar with laughter."
- Do you know how to mend a broken heart (balloon)? With "ticker tape".
- Do you know what Daffy Duck's favorite flower is? Of course, the daffydill. Did you know the daffydill couldn't ride his bike. Yeah, he lost his petals. The tulips just smiled.
- When making a rabbit or Bugs you can ask: "How do you catch a unique rabbit? Unique up on him!" "How do you catch a tame rabbit? Tame way!"
- When making a chicken: "Why did the chicken cross the basketball court? He heard they were shooting fouls."
- While making an energizer bunny rabbit, Do you know where the energizer bunny went after he got married? He went on his bunnymoon where he lived hoppily ever after.
- How come we have a Jelly Fish, but we don't have a Peanut Butter Fish?
- During clown magic, I let the balloons "surprise" me. False tie a balloon and then "surprise" it flies away when I let go of the end. Same effect when breaking a balloon in half and asking a child to hold one half which flies away when you hand it to him/her.
- Refer to the broken balloon bits all around a twister are called "clown droppings" Have the kids help you pick them up.
- What do you call a little dog who drinks coke? A soda pup.
- Don't forget to make your dog 'heel' by placing it by your foot after he has done his other tricks.
- The fish in True Inflations has been going over well lately, so I started asking the kids if they know how to get in touch with a fish, told them - drop him a line, and have heard more jokes from them - a few have stayed with me. Now the fish is from Sharkago where he goes to the tuna-versity and he hates Fry-days.
- Pig one-liners off the top of my noggin'
- Would you like to date a real Babe?
- You look like you need a shave, so I'm making you a razorback.
- When they told me I'd be "makin' bacon" this wasn't what I had in mind.
- I was lucky to find this location -- do you know how hard it is to find a porking place in this city?
- I was going to make just a plain motorcycle, but then I decided to go all-out and make a hog.
- (Does anybody make a pig on a Harley? Then you'd have a hog on a hog.)
- Please, keep safety in mind. Never play leapfrog with a unicorn...
- Don't point that finger at me, there's a nail on the end of it!
- When measuring a child for a balloon hat, I'll start with asking the child's brain size. They usually don't know, so I'll wrap the balloon around the child's head and (holding the loop) I seriously inform them, "This is your brain size. Will you remember it, or should I give you the hat so you'll have a guide?"
- After handing the Teddy Bear to a little girl, I reach out and squeeze the nose,
concealing the squeaker in my hand. "I think you got one of the squeaky
balloons!" (to Mom/Dad) "That oughta keep her busy for awhile!"
I use a D-Light and make parts of the animals light up or I reach into a drinking glass and remove the Firefly or whatever.
- Hang on for a sec. I need to catch my breath. After all, I've been giving it away all
night.
One-liners for kids who want more balloons
- There's a special line for kids who want a second balloon. It begins at the end of this line. Everyone else will be waiting for their first balloon, but when it comes time for second balloons, you'll be first in line, and you won't have to wait at all!
- I'm trying to spread the joy of balloons to all the world's children one at a time. If you want a second balloon, you'll need to get in line behind New Zealand.
- But you've hardly had time to enjoy the first one! You don't want to hurt its feelings, do you?
- That _is_ your second balloon. The IRS got the other one. If I make you a third, they'll come and take away your daddy's car.
- A second balloon?! Ach! Kids today! Do you think rubber grows on trees? (Of course, it grows _in_ trees.)
- I'm sorry, I could only buy one balloon for each person because I paid with a rubber check.
- Sorry, I'm so short on balloons I had to melt down my shower curtain to meet the demand. By the way, you'll need to bring that [dog] over to my house when you're done with it or I'll never be able to take a bath again.
- You know the old sailor's saying, "One balloon, sing a merry tune, Two balloons, eaten by baboons." Let's not risk it, okay?
- The first one is free. You have to earn a second one by singing and dancing the Hokey-Pokey -- _solo_. (While the kid's doing the dance, you can handle a couple more customers, and if s/he does it, hell, make another balloon.)
What do they eat?
- Care and feeding instructions that I learned from Frank Thurston: If the animals are hungry, feed them a little evaporated milk, by the way, they love donut holes, but don't let them have too many or they will pop.
- "balloon animals eat the air out of the holes in Swiss cheese." (from One Balloon Zoo I think)
- Balloon animals love to eat bubble gum, but they hate pop-corn.
- "I've never been bitten by a balloon animal"
General
- When you wrap a balloon around the person's head to size them for a hat, wrap it around in front of their eyes and tell your audience, "It's Jordi LaForge from Star Trek!" It's even funnier if they know who your talking about. :) Best to ask them if they have seen Star Trek, The Next Generation. :) (Warning: this idea can be funny and get a good reaction, but many balloonists will advise against it due to the dangers of a balloon popping and striking someone's eye. Use it at your own risk.)
- Remember to mention that latex balloons are all-organic, biodegradable, and using them supports NOT cutting down trees in the topics... very earth-friendly.
- Mouth inflation sets you apart from the smart aleck that says "I want to make my own". I usually give them one or more un-inflated balloons and continue. They're better than a stooge at bringing laughs (and respect) to the artist when they fail at inflating the 260. I sometimes like to follow that up by mouth inflating three or four 260s at once and then asking them if they smoke.
- I call what I do "Airigami". The art of folding air in special latex containers.
- Many people will ask me "How did you learn to do this? Did you have to go to school or something?" and my quick reply is "Oh yes, I had to go to Balloon U and major in Ballonology. See my nametag, I'm a certified Balloonologist. I have my Ph.B! I even minored in Airagami."
- I like to take a slightly different route with this question, "How did you learn this...?" my reply is usually "...actually I skipped school to learn this.." (said with a wink and tongue in cheek) (I also go on to briefly explain learning from books, videos, this list and T. Myers' lectures. I don't want to put our art in a bad light, there's a shock value to that reply that gets the kind of reactions I want. Plus it fits my performing character.)
- Same kind of thing with "..when did you start doing this..?" look at my watch and say .."'bout an hour ago....." (then smile stupidly) That type of reply is _old_ as the hills, but still works great for me....
- Make a balloon person and say: inflation is the sincerest form of flattery!
- if you gotem, blowem
- All it takes is years of practice and self-denial and you too can blow up balloons for a living.
- If they ask if you designed a sculpture, I usually say, "It's like being a musician, sometimes you play your songs, sometimes you play someone else's, or variations on someone else's... the important thing is how well you play."
- When someone says "Oh, I didn't know you were a clown."... I look all over myself then look at the person and say "Is it something I'm wearing?" Then inform them I only do Balloons.
- The line "must have been a sudden gust of gravity" is a nice throw off for any time you drop something.
- When the balloons really start squeaking say: "forgot to oil my hands again"
- You will notice my fingers never leave my hands.
- Ask a kid to hold out his hand (...no the clean one... that was the clean one).
- "Did you go to school to learn this?" And my favorite line from the movie "Benny and Joon": "No. I got kicked out of school for this."
- I psychically select the balloons for each person in advance. You don't want to jeopardize your karma by taking someone else's balloon, do you?
- If you are a clown, you can always whisper to the rude/obnoxious people and kids "Remember, I know what you look like... do you know what I look like without make-up?"
- "What goes oink-oink & smells like your..?", as you raise your arm & put your nose in the pit. You might even follow it with a, "peeeyeww!!" A joke at anothers' expense is no joke; making a joke at yourself can even help people to loosen up and enjoy the show more. I inflate 3 balloons at once by mouth occasionally for the "oohs & ahhs". Sometimes I follow this up with my grossest routine. I take one of these 3 balloons that I've let all the air out of & say, "If you think that was hard, watch this." I then proceed to place it to my nose and inflate it. I keep several of these handy when working for tips. If a person asks me, "Are these free?", I point to my tip button and tell them, "I work for tips." If they say, "That mean I can get one for free if I want to, huh?". Without batting an eye, I say, "Sure, here you go!", as I inflate it by my nose and make a dog. I always keep the right attitude and a smile.
- plastic surgeon - rubber surgeon jokes.
- Heb 13:2 Be not forgetful to entertain strangers: for thereby some have entertained angels unawares.
- Here, I'll come up a new balloon song:
Who can take some latex...
Make a twist or twooooo
And make it into any creature you'd see in a zoo?
The Latex Maaaaaan, The Latex Man caaaaaaaan
The Latex Man can because he's full of hot air that makes the world smell good.Who can take a Geee-oooooooooh,
Three 260 kyooooooooze,
And make a fancy sculpture that gets on the evening news?
The Latex Maaaaaan, The Latex Man caaaaaaaaaan.
The Latex Man can because he huffs and puffs and blows to make the world smell good.The Latex Man bends, all his latex friends,
Blows them up between his two lips.
This he does for just a few tips.
Cleans his ears with fresh, new Q-tips.[spoken: Hey, what do you want from a song that was just written on the fly at 8:00 in the morning...?]
Who can make a fortune, a dollar at a time,
And never tell the IRS that he has made a dime?
The Latex Maaaaaan, The Latex Man caaaan,
The Latex Man can because his cash gratuities don't have an audit traaaaaiiiil.
What to say when a balloon pops
- "May you rest in pieces!"
- "I sure got a bang out of that!"
- "That was a weasel. It went pop."
- "I told you I was going to BLOW it up!"
- "Shhh, don't tell anyone how I did that!"
- "Sorry son, the dog was rabid, had to put it down" (from movie The Mask)
- "Don't worry, I'll make sure that the Doctor puts him back together again."
- I say my sharp wit pops the balloons.
- I thought that all balloons had a hole in them!!!
- When a balloon breaks for an Optimist, he just says "Great! Now I have two!"
- What do you call a balloon dinosaur with a hole in it? Extinct.
- When I do shows I usually have a gun in my pocket... the kind with the little flag that pops out that says "bang" on it. When a balloon pops I grab the gun quickly and fire at it and say triumphantly, "got it".
- Hold you hands to your chest saying, "He GOT me!"
- The most obvious source of balloons popping is "bad breath"
- Remember, every time a balloon pops, an angel gets its wings!!
- I also snapped an empty balloon into my face as I was attempting to blow it up. I would grab my nose and make a horrible face and a shocked face at the same time. Always got a good laugh.
- When blowing up the balloon, I would comment somewhere that "You have to be careful with these things...they have a hole in one end!"
- Which reminds me of another bit I have used.... The balloon inflated, and held at the mouth end, and have everyone do the "lift-off" countdown. Great laugh getter.
- Festive pop-line: "You've heard of Christmas crackers? Well this is a Christmas banger (or fire cracker)!!"
- When a balloon pops...show the remaining balloon in one hand and a new balloon (uninflated) in the other hand and say: "This is your balloon..(show the new balloon)...this is your balloon on drugs..(show broken balloon)...any questions?"
- The sound of balloons popping in the distance are music to my ears. I usually turn to see if an adult in line turns toward the noise. If so, when they look back, I make eye contact and say with a small smile, "Job security.".
- "Don't they last forever?" I'm asked. My reply is, after a subdued laugh, "Now you know why I chose balloons for my art form. If it lasted forever, you'd never need to come see The Balloon Man, ever again, and we can't be having that, now, can we? I have two kids to feed too."
- Popping balloons can be a pain in the you know what, but try looking at it as a challenge for the balloon paramedic in us all. Tie off the balloon, so the air won't escape and try to repair it. Sometimes I even use the rest of the repair balloon to enhance the original body of the creation by giving it more depth, longer leg, etc. You can't always save a popped one, but people love it when you play veterinarian.
One-liners for balloon dogs
- Squashage dog: cos I can't say 'sausage'!
- Walking stick dog: has a long tail curved up which, when you waggle it up and down, causes the dog to appear to walk.
- Sad dog: has a long nose curved down, needs a friend who won't laugh at it.
- Stilt dog: very short body and long legs.
- Happy dog: ordinary dog, hold it with your thumb on its tail and waggle it each time it looks towards the chosen recipient
- Seeing eye dogs are always allowed in restaurants so no matter what type of balloon you have it should be described as a seeing eye dog.
- Tell the kid you will make him a German Shepherd Police Dog, and really talk it up as you are twisting. You twist your usual poodle or hot dog. When you are done, announce that the police dog is 'undercover' working as a poodle (hot dog, etc.).
- When a kid asks for a puppy I usually try to make it into the most special "puppy" ever. _This_ special puppy is very smart and it can learn tricks! While I twist it I make sure that it makes lots of noise and I tell them that it has learned how to "speak". After it is finished I lay it in their hands and show them it knows to "play dead"; I then stand it up in their hands and show them how it will follow my command to "lay down". As a final aside I tell them that teaching it to roll over is a bit more difficult but with a little nudge it will be able to learn that too! I often have several kids in line request a "special puppy" after that.
- "Puppy Love": take two poodles with the little balls on the front feet and tie the noses together and twist the feet together to make them kissing. You can event add a 6" heart to the knot at their noses. This always gets an "Awwwww" from the ladies and little girls.
- Bruce Fife's "Creative Clowning" has something you might like: use a second 260, nearly fully inflated, to make a hoop by tying the ends together. By squeezing the poodle's legs together and releasing them spring-like (and moving the hoop so the poodle goes through it), you can get the poodle to do a back-flip through the hoop. Kids love this.
- A great invisible dog (a 260 leash + collar) also goes over big.
- Dress up as a poodle, and make little balloon people...
One-liners for balls in balloons
- For kids I never say the word pregnant. I always say "A dog eating an apple" or an orange, etc.
- Sometimes people ask me how I got the bubble inside the dog. I say the dog ate it.
- I put a balloon ball in a Teddy Bear for restaurant work, and tell folks "..and you can tell he's been out to eat...see his tummy's full.."
- I like to do this trick with a small, wrapped candy, such as a peppermint, and I just say that the dog has a sweet tooth!
- foil wrapped chocolate coins might be cool to put inside balloons. It might not be too "hot" of an idea in the summer.... "melts in your balloon, not your mouth..."
One-liners for pumps
- We're here to PUMP YOU UP!
- No, that's not a pump, I'm here giving flu shots...
When using a pump, people say "You're cheating" or ask "why don't you blow them up". I have several replies:
- I smile back and say "You're right, I cheat.....and the Emergency Medical Technicians are pretty darn happy about it too....."
- "I was bottom of the class at clown school because I couldn't"
- "You don't want a balloon I spit on, do you?"
- "Let me ask you something...did you walk here or take your car?" - the response is always " I took my car." so throw it back at 'em with: "Oh...you cheated!"
- When people comment about the pump, I tell them I stayed up all night blowing air into it.
- Once I replied "yeah, some people can blow these things up without a problem. It always impresses me." On that, I grabbed two balloons and inflated them at once. "I guess it's something I should practice." Several mouths hung open, but no words came out.
- With adults I sometimes say I have two reasons and just give one above. If they don't ask what the second one is, I wait a while and say "you don't want to know what the other one is do you?" and of course they do. Then I get very apologetic and explain that it wears me out or I whisper "don't tell anyone I'm no good at it".
- Whenever someone who is having trouble blowing up a 260 that I have given him asks me "how do you do it?" I answer "I do it pretty good!!!!"
- When someone points to my pump and says "you're cheating" I reply, "I'm a clown not a fool". This seems to quiet the hecklers immediately.
- I use the Qualatex hand pump and put a kiss sticker on it and tell everyone it's my extra set of lips. Either that, or when they say, "why aren't you blowing them up" I don't say anything, just pull out a balloon and try to hand it them, usually they won't take it and just laugh.
- For those who say "Wouldn't it be easier to use a pump? I respond, "Yeah, but pumps are for girlie men; I'm a REAL GIRL I don't have to use a pump."
- "I've had to use a pump ever since the operation."
"Operation?"
"Yup. Surely you've heard of it... a clown operation?" - "You must learn to breathe before you can blow up balloons." -Bo Tzo, Ninja Clown.
- "I can't blow up a balloon and make fun of you at the same time." (Heckler)
- "I can't blow up a balloon and kiss you at the same time." (Handsome/Pretty Man/Woman)
- "I can't blow up a balloon and sing opera at the same time." (Frightens off large crowds)
- "I need to be ready in case anyone needs mouth-to-mouth resuscitation."
- "I'm not filling it up with this thing, I'm just sucking out the vacuum."
- "Puffing builds your cheeks; pumping builds your pecs."
- "Ewwww - have you ever tasted one of these things?"
- "It's not the blowing up, it's the blowing *in* that's the problem."
- "I don't know where that balloon's been, and I'm not certain where it's going to go."
- "I blew out a lip in Poughkeepsie when I first started, and I never recovered from the trauma."
- "Blowing them up orally gives you worms."
- "I tried blowing them up mentally, but I'm not enough of an airhead."
- "I eat a lot of garlic - one of my poodles popped last week, and a kid passed out."
- "By day I'm the congressman for the 47th district; I need to save my hot air for the floor of the House of Representatives."
- "By day I'm a field sales representative for Voit, and my contract specifies that I use their equipment."
- "By day I'm a wine taster and have to keep my palate clean."
- "I have to save my strength if I'm ever going to get that third little pig." (beat, beat - oh, you got it!)
- "I once had one backfire on me and my nose grew six inches."
- I'm always telling them not to put a balloon in their mouth after it's been in mine, because their germs might not be bad & my germs might not be bad, but if they get together we could have germ warfare, and I know your mom & dad would not be happy.
For adults
- "My mother told me never to put anything this shape in my mouth."
- "You should know that it costs double if I use my mouth."
- "When I start, I never know what part of the animal I'm blowing into."
- "I think the balloons enjoy it a little too much when I do it orally."
- "I tried to blow them up orally, but the plunger was uncomfortable."
- "Blowing them up orally was too easy, and I got arrested the last time I blew one up the other way."
- "I've got the lung power - it's my bladder that can't handle it."
- "I once had one backfire on me and my ass grew six inches."
One-liners for adults
- I get a big laugh from people (usually in restaurants or bars where I am waiting or drinking): They always ask 'Where did you learn that?' I usually reply well, I was bored on my last job and practiced making these when I worked for the Trojan Rubber Company.
- Take a dark and a clear balloon, make a dark baby (what Larry calls a meatball) and stuck it in the clear balloon, then made a dog out of the clear balloon, and a rather well endowed male dog from the rest of the dark balloon. Announce "Here's a pregnant dog... and here's the one that did it!"
- An old Steve Martin gag - mumble unintelligibly while inflating a balloon. Say, "I like to talk while I blow them up. Then, if it pops, it says 'Goddamn it!'" (Adults only - I don't curse in front of kids, and I don't want to encourage them to pop my creations.)
- When called "Balloon Dude" by a waitress in a breakfast restaurant, I respond with "Yes, Pancake Chick?"
- Make a rabbit's head and ears. Pause and say, "How do you like my rabbit ears... I usually get a good reception!" (When only one or two grown ups laugh I usually crib the old chestnut, "Thanks, I need the pity.") I explain to kids that this is a grown up joke.
- In a bar, I made a hat for someone and I said: Excuse me I have to measure your head. I
put the two balloons around his head and then took them off. I looked at them puzzledly
(like I was reading a measurement or sizing it up) and said "Wow, size 145!"
Then after a second or two I said it would have been larger if you had a brain.
For secure and fun-loving adults I might ask what their ego size is... if that gets a laugh from the person's companions, I'll size the hat and mutter something to the effect of "Extra hefty."
- The following is something I've been using if I have a 'friendly' heckler in the crowd. Twist a dog/poodle but with long front legs. Now wrap this around the heckler's lower leg and tell him that this is what he reminds you of (with a smile on your face). Funnily enough, they love it and nine times out of ten they stop bothering you.
PART14
Balloon science 101
Latex is anything but simple. Here are several material science discussions about balloons, ranging from the highly technical, to the easy to understand.
- Stupid Pet Tricks
- Hysteresis effects in Latex
- Entropy and the second law of thermodynamics as applied to latex
- Effect of water and ozone on balloons
Stupid Pet Tricks
Here's a real winner for "Stupid Pet Tricks"; Get some liquid nitrogen and drop a pet balloon dog into it. The liquid nitrogen is so cold that it will condense all gaseous oxygen and nitrogen in the balloon, causing the animal to shrivel up. If you then carefully remove it and set it on the table, it will re-inflate in front of your eyes as it warms up, and the twists will stay intact.
Or take a bell jar connected to a vacuum pump. Inside the bell jar put a round balloon. Turn on the pump. The demonstration shows the balloon inflating as the vacuum pump worked. Next make a balloon dog for the demonstration. This works really well - the students can't wait to see the dog blown up. The whole laboratory filled with cheers when it popped!!
Latex hysteresis effects
T. Myers showed me one of the demos he does at his workshops. He inflated a jewel tone
260 and:
bent it over on itself one way,
then straightened it,
then bent it over on itself the other way at the same point,
then straightened it.
He then drew my attention to the darker band and the slight variation in balloon diameter which remained at the location of the bend. (actually, you get this band from twisting and slowly releasing the twist in a balloon too.)
Tom writes: "In the workshop I'm making a point about keeping the balloon as strong as possible so you can weaken it to help control its shape. The more of a difference in strength between the inside of a curve and the outside of a curve the better the curve will hold its shape. So I bend a balloon to make an angle and them back again to straight. The balloon gets weakened in one spot, all the way around. I would expect that spot to be more relaxed and make a bulge. That's not the case. It gets slightly narrower.... Yes, I think the color change at that spot is due to (a change in wall) thickness."
Tom said that the balloon wall was thicker at that band.
I believe the dark band is due to a wall thickness variation caused by hysteresis in the cyclic stress/strain response of the latex. If you slowly twist a balloon in torsion in front of a light, you can watch the dark section of balloon develop. A torsion stress state in the wall of a thin tube can be resolved into perpendicular tensile and compressive stresses by a construct called "Mohr's circle." You can see this physically when you wring a wet towel - there you can squeeze someone's fingers in the folds (compression) or rip the towel perpendicular to the folds (tension). Anyway, when we make a twist, we keep applying torque until the resolved compressive stress in the balloon wall exceeds the buckling limit. If you twist very slowly, you'll notice that the balloon darkens in the location where the first buckle subsequently forms. This makes sense because we expect the latex to be thickening there. In between buckles is the portion of the balloon carrying the resolved tension and that is lighter in color, again as you'd expect. Completed twists are themselves very dark, because there is a fair amount of latex in compression in there. In fact, you can suppress the buckling and darkening by pulling axially on the balloon as you apply the torque. And, you can get rid of a resulting dark band by pulling on the balloon. I think all these observations support the "_thickness variation_ caused by hysteresis in the cyclic stress/strain response" reasoning.
The band could have been the result of damage (crazing, etc.) caused by the high local stress/strain at that point, except that the band disappears upon applying a tensile stress so it can't be.
Put something in and you get something out. Here, as a result of applying stress we get "Strain". Strain is the engineering quantity proportional to the deflection or "stretch" that occurs when you apply a stress (remember that stress is proportional to force) to anything. When you inflate a 260, the diameter and length each increase by 500 to 600 % (we say this is 500 to 600% "hoop strain" and "axial strain," respectively), and then you reach a point where it gets very difficult to blow up any further. If you continue to inflate it further, it will burst. If we graphed the stress vs strain (think of it as force vs stretch) for latex we would get a sigmoidal (S-shaped) plot like the following:
     ^
     |
     |
 S   |                           (*) < == ultimate strength,
 T   |                            {      or burst strength
 R   |                            |
 E   |                            }
 S   |                           /
 S   |                         ,"
     |                       .'
     |               ._ - '"
     |     , - ~ '""
     |  ,~
     |,'
   0 +-------------------------------->
     0
             S T R A I N
Well, when you stretch latex to a point below it's ultimate strength and then slowly release it, the latex doesn't retrace its "stretch curve." Instead it relaxes along a new curve.
     ^
     |
     |
 S   |
 T   |
 R   |                            |
 E   |                            }
 S   |                           /|
 S   |     stretch             ," /
     |      curve            .'  "
     |               ._ - '"   .'
     |     , - ~ '""        _-"  relax
     |  ,~           , - ~'"     curve
     |,'    , - ~ '"
-----+--_-" -------------------------->
     ,~'
             S T R A I N
     |
     |
Note that the "zero" of the relax curve (the point where the relax curve crosses the Strain axis, where the Stress is zero) does not occur at zero strain! Instead, it occurs at some positive strain - this is the permanent stretch you see after blowing up and then deflating a balloon.
If you've read the chapter on how balloons pop, you know that inflating a balloon stresses the latex to a certain level. Draw a horizontal (constant stress) line through our graph.
     ^
     |
     |
 S   |
 T   |
 R   |                            |
 E   |                            }
 S   |                           /|
 S   |     stretch             ," /
     |      curve            .'  "
-----|--------------------'"---.'--------constant stress line
     |     , - ~ '""        _-"  relax
     |  ,~           , - ~'"     curve
     |,'    , - ~ '"
-----+--_-" -------------------------- >
     ,~'
             S T R A I N
     |
     |
Note that this constant stress line crosses both our stretch curve AND the relax curve. Thus, if I asked you "how much has the balloon stretched upon inflation and twisting?" (what is the strain at a particular stress level?), you could give me 2 answers! This means that sections of a balloon at the same stress can have 2 different values of strain! All our advanced twisting and shaping tricks depend on this property!
Note also that to get back to the initial size (zero strain) we have to apply a compressive (push) stress!
If we had some way to apply one complete stretch-relax-compress cycle, we might be able to get a closed loop called a "hysteresis loop"
     ^
     |
     |
 S   |
 T   |
 R   |                            |
 E   |                            }
 S   |                           /|
 S   |     stretch             ," /
     |      curve            .'  "
     |               ._ - '"   .'
     |     , - ~ '""        _-"  relax
     |  ,~           , - ~'"     curve
     |,'    , - ~ '"
--- ,+--_-" -------------------------- >
   { ,~'
   |/        S T R A I N
   { |
   | |
     |
     |
     |
Many processes and behaviors found in nature trace out hysteresis loops when they are graphed on appropriate axes (because most things are not ideally reversible - they are functions of the path taken and not just their final state). Here, the area enclosed by a hysteresis loop is representative of the energy lost in the process of stretching-relaxing-compressing the latex. Where does the energy go? Well do this experiment: Take a balloon in both hands so that you have about two inches of unsupported balloon between your hands. Press the unsupported section of balloon lengthwise against your lips. Then move it away from your face and completely stretch and relax the unsupported section 10 times, as quickly as you can. Immediately after the tenth time, press the unsupported section of balloon lengthwise against your lips again, and you will notice that its temperature has increased. The energy wasn't really lost; rather it was converted into heat.
Entropy and the second law of thermodynamics as applied to latex
The first law of thermodynamics says that the change in internal energy (dE) is equal to the change in heat absorbed (dH) or released plus the work done on the system (dW). dE = dH + dW.
The second law of thermodynamics defines a quantity called "entropy" which is a measure of the randomness of a system. A highly ordered system (like toys in a toybox in a child's clean room) has low entropy. A random system (like toys spread randomly all around a child's room) has high entropy. Suffice it to say that in natural processes, entropy stays constant or increases.
The second law of thermodynamics says that for a reversible process, the change in heat absorbed (dH) is equal to the Temperature (T) times the change in the entropy (dS). dH = T * dS
An adiabatic process is one in which no heat is transferred to/from the surroundings. For an adiabatic process, dH = 0. The first law then tells us that the work done on the system is converted entirely to internal (stored) energy.
After a little calculus, the second law tells us that for a reversible adiabatic process, T * S is a constant. The product of two variables equal to a constant is the equation of a hyperbola, where when one variable increases, the other must decrease.
If you've read the chapter on how balloons pop, you know that latex has a structure composed of many coiled-up, intertwined, chain-like molecules. Since the chains prefer a random, curled configuration, their initial degree of order is low and their entropy is high. However, when a tensile load is applied, the entropy decreases as the chains become straightened and aligned.
What does all this mean? Let's do an experiment.
Take a balloon in both hands so that you have about two inches of unsupported balloon between your hands. Press the unsupported section of balloon lengthwise against your lips. Keeping the balloon pressed against your lips, stretch the unsupported section as quickly as you can and hold it. The balloon heats up!
Stretching the balloon quickly allows us to call the process adiabatic because there is no time for heat to be transferred to the surroundings. The first law tells us that all the work we've done stretching the balloon has gone directly into internal stored energy in the balloon. The second law tells us that if the entropy decreased, the temperature has to increase!
Now, keeping the balloon stretched, remove it from your lips. Hold it stretched for 30 seconds, so that it cools back down to room temperature. Then press it back against your lips and relax the unsupported section section as quickly as you can. (Don't punch yourself in the nose!) The balloon gets cold!
Relaxing the balloon quickly allows us to call the process adiabatic because there is no time for heat to be transferred from the surroundings. The first law tells us that all the internal stored energy in the balloon was converted to work done on us as we relaxed the balloon. The second law tells us that if the entropy increased, the temperature has to decrease!
Effect of water and ozone on balloons
Tom writes:
Tyen the Magic Mime of LA called me twice with an interesting problem. He is convinced
that 260Q's don't hold air as long as they used to. He's been making poodles and marking
the dates. They only last him a couple of days.
Adrienne writes:
I have noticed that the animals I leave lying around the house are dying faster than
usual. I have a Winnie the P**H given to me by Dave Lewis, and it died before I even had a
chance to disect it. They seem to be lasting about 4 days before they really shrink up and
are gone. It doesn't effect the quality of the balloons we are making for people, but I
have had to stop telling people that they would last for weeks if they keep them in a cool
place out of sunlight.
I haven't noticed a change in the time that Qualatex balloons stay inflated, but then I haven't looked for one either. Are the balloons thinner? I don't know. Did they change the formula? Here's what Tim Vlamis of Pioneer wrote two months ago:
Date: Thu, 21 Dec 1995 18:20:53 -0500
From: TimosV@aol.com
Subject: Re: Balloon quality query

In response to the question of whether or not we have changed
our "formulas" I can give both a short and a long answer. The
short answer is "no". We know that our business relies solely
on making the best quality balloon (our prices tend to be higher
than others, so we *have* to be better) and we would not endanger
our business (or yours) by "cheapening" our manufacturing processes
and formulas.

Making balloons is in many ways like baking a cake. We work with
hundreds (if not thousands) of separate raw materials and variables
in the manufacturing process. Our main ingrediant (latex) is a
natural product with all the vagaries of other natural raw materials.
In some senses, our formulas are like recipes, only far more
complicated and larger in scale. Each "formula" for each color
(over 50 in the Qualatex range) or size or shape (etc.) is slightly
different. Depending on other factors including changes in raw
material supply, environmental changes (temperature, pressure,
humidity), what else is running on that manufacturing line, color
sequence, etc., we may "tweak" our manufacturing formulas/process
to maximize the quality of the product. So it isn't strictly fair
to say that we don't change, in fact, we are changing all the time.
Balloons are special in that they are organic, they are alive. They
change depending on the circumstances they are in. Most of us have
tried to use 260Qs that have sat in a car during the summer for a
few weeks and have experienced this!  :-)

Tim
What else could cause balloons to lose air? Degradation? Am I the only one who noticed that Tyen the Magic Mime lives in LA, and Adrienne V. lives right next to LA? LA, smog, ozone, hmmmm... It is well known that ozone attacks latex.
In their retailer kit, the Balloon Council (of which Pioneer's Dan Flynn is Chairman) literature says "Balloons are biodegradeable. The stress that occurs to the balloon when it's inflated speeds this process which begins almost immediately. Exposure to sunlight quickens the process, but a combination of oxygen and ozone will attack natural rubber even in the dark. Deterioration can be seen clearly only a few hours after a balloon is inflated, as it begins to oxidize or frost;"
But then LA is also next to the Pacific ocean. Ocean, water, hummidity, hmmmm...
The Qualatex book "Design" says that the chalkiness or "oxidation" which develops on latex balloons which have been left out for a few hours or days is due to humidity and the "quality" of the ambient air. Does "quality" mean ozone level? Is there any correlation between humidity (what "Design" states as the cause) and ozone levels? (well, I know that in a thunderstorm, humidity and ozone levels are both high... )
Above, Tim Vlamis wrote that humidity affects balloons during manufacture. Others have written:
The "oxidation" is caused by ozone in the air. I think you'll routinely see cautions about ozone degrading rubber in most materials texts.
Warm temps, heat, sun will cause oxidizing to start. Once started, it won't stop.
Here in the New Orleans area we're 3 ft below sea level and 85-90% humidity is normal. Latex doesn't take long to start breaking down in these conditions. Sometimes I even have to Hi-float air-filled arches and columns when they aren't in good A/C. You really know the humidity is high when you have to high float 260's in a hospital arrangement (not an easy task).
A couple of years ago someone wrote that twisters with years of experience say that humidity makes a big difference in the feel, resilience, and workability of balloons. It was also posted that round balloons can even be inflated to much larger sizes on a cool foggy day than in any other weather. This example was given: you can inflate a standard 16" round party balloon to 22" diameter on a 65 degree foggy day when the humidity is around 80-85%.
Four months ago we had a discussion on here about the workability of pump versus mouth inflated balloons. Dave Beedy wrote:
Earlier Lorna wrote (in part):
> When a balloon is pump inflated there seems to be a lot more air in
> the balloon; the latex is tighter, and therefore less space for
> twisting.

I normally mouth inflate, but have a pump that I use on ocasion. I had
never really noticed the difference in balloons inflated one way or the
other. After I read Lorna's posting I got my pump out and inflated both
ways. Lorna is right!!! The pumped balloon are tighter and of a larger
diameter than the mouth inflated.

Good observation, Lorna!!! This can have impact on balloon twisting
instuctions and a lot more. Maybe some of the "M.I.T." types on the list
can tell us why there is a difference.

Dave "Buttons" Beedy
and James Dewitt replied:
Dave and Lorna,
     When you use a pump, you are putting room temperature air into
the balloon.  The air stays the same pressure and doesn't contract and
the pressure stays the same inside.  When you mouth inflate, you are
putting air that is around 98 degrees (probably higher since it is
from deep inside your body, Doc?) into the balloon.  The balloon is
surrounded by cooler, room temperature air, therefore it cools quickly
and contracts, which decreases the pressure inside the balloon.  And
that's basically why mouth inflated balloons are softer and thinner
than pumped balloons.

James Dewitt
Yes, this is part (probably most) of the answer, but the air you exhale is also loaded with more water vapor than the air you pump. I never responded to Dave and James' discussion four months ago, but about six months ago I posted the following question to several chemistry and materials science newsgroups on Usenet:
From: Mark Balzer
Newsgroups: sci.materials,sci.chem,sci.polymers,sci.eng.chem
Subject: Help with humidity effects on latex rubber?
I recently read in a manual published by a balloon manufacturer
 that the chalkiness or "oxidation" which develops on latex balloons
 which have been left out for a few hours or days is due to humidity
 and the "quality" of the ambient air.   I have also heard that humid
 conditions during balloon manufacture can even affect product quality.

 Balloon workers with  years of experience say that humidity makes a
 big difference in the feel, resilience, and workability of balloons.
 There is also a difference in the feel of balloons blown up by mouth
 and by pump - blown balloons contain warm moist air from your lungs
 while pumped balloons are filled with drier ambient air.

 Balloons can even be inflated to much larger sizes on a cool foggy day
 than in any other weather.  If you ever wish to impress someone,
 you can inflate a standard 16" round party balloon to 22" diameter
 on a 65 degree foggy day when the humidity is around 80-85%.

 Does anyone know why any of these effects occur?
 Are there any mechanisms that would explain them?
 I would really appreciate any explanations or references I could look up
 to find an answer.
and I got the following responses, the first one from a chemistry professor here at the U. of Illinois:
From: Rich Masel
Newsgroups: sci.materials,sci.chem,sci.polymers,sci.eng.chem
Subject: Re: Help with humidity effects on latex rubber?

> I recently read in a manual published by a balloon manufacturer
> that the chalkiness or "oxidation" which develops on latex balloons
> which have been left out for a few hours or days is due to humidity
> and the "quality" of the ambient air.   I have also heard that humid
> conditions during balloon manufacture can even affect product quality.

I have some related observations which may help explain this.  My company
makes latex rubber bands for orthodontics.  We usually saturate the rubber
bands with water, so their elastic properties are constant when the rubber
bands are put in a patients mouth.  However, if we dry the rubber bands
the color of the rubber bands changes from a milky white to brown.  The
elastic constant also increases.  The process can be reversed by soaking
the rubber bands in water.  (the rubber bands swell!!).

Our observations then are that water is slightly soluble in the rubber,
and the presence of the water acts like a filler to reduce the elastic
constant of the rubber.

At first sight one would not think that water would be soluble in
rubber.  However, natural rubber contains about 2% of water soluble
components (surfactant and protein).

Rich Masel


From: Kirk Mueller
Newsgroups: sci.materials,sci.chem,sci.polymers,sci.eng.chem
Subject: Re: Help with humidity effects on latex rubber?

   Latex rubber, like many materials, absorbs moisture.  The moisture
changes the structure of the rubber making it more 'rubbery' and
stretchable, in the short term.  It usually increases the material volume
and undoubtedly increases the balloon's thickness here.  In the long term
the balloon's life is shortened by moisture exposure.  However most of us
don't care to have a balloon last more than a couple days anyway.
   For some compounds, including latex rubber, the moisture causes
irreversible chemical reactions, what we call lack of 'hydrolytic
stability' in the Defense industry.  (We are required to use
hydrolytically stable materials for Defense as I can't count on dry air.)
The reaction byproducts may be what you're seeing on the balloon.  The
white residue might also just be mold release or something similar
however.  Usually moisture reaction products degrade the original
compound.  I suspect the balloons loose their stretch and fail from
cumulative damage.
   You should consult text books on Fick's Law for the rate of moisture
ingress and egress.  I'm sure you'll find it takes only a few minutes at
most for a typical balloon to equilibrate with the surrounding atmosphere.

   A short term moisture effect test:  Try filling a balloon with moist
air from your lungs (it should stretch oversize) and then leaving it out
in the desert (out of the sun to avoid heating effects) to dry out for an
hour or so.  Once the moisture leaves the rubber it should pop because it
now can't stretch as far.
   A long term moisture effect test:   Soak some balloons in water for
about a week.  Keep some more as dry as possible for the same time
period.  Blow all balloons up (it doesn't matter if it's humid, mouth, air
or not as long as all use the same air) and measure the maximum diameter
(before popping).  The wet, degraded balloons shouldn't blow up as large
(if they blow up at all).
--
Kirk Mueller


From: david rogers
Subject: Re: Help with humidity effects on latex rubber?

I carried our research funded by the Science Council of British Columbia
in Vancouver Canada in 1992-93 to extrude an Improved Porous Elastic
Irrigation Pipe made from TDP Tire (Rubber) Derived Product.

The key mechanism involved at the core of the research was that of the
permeability of rubbers to water.

Key references were:

(1) "Water and Rubber do mix" by D.C. Edwards. Chemtech October 1986

(2) "Predicting Water Diffusivity in Elastomers" by T.M. Aminabhavi,
     R.W. Thomas and P.E. Cassidy Polymer Eng. and SCi., Dec. 1984,
     Vol. 24, No. 18.

(3) "Surface Enthalphy and Entropy and The Physio-Chemical Nature
     of Hydrophobic and Hydrophilic Interactions" Journ. Dispersion
     Sci. and Technology, 12(3&4), 273-287 (1991)

The key factor in the admission of water molecules into a rubber matrix
are the prescence of polar nucleating sites ( typically salts ) around
which form pools of water molecules. The driving force is both
osmotic pressure ( vapour pressure ) and epectrophoresis ( Polar forces ).

D.C. Edwards work was such a breakthrough it helped explain the basis
for many phenomena previously not fully understood associated with the
work I was investigating.

Dr. Patrick Cassidy was working on the use of starches in bioderadable
polyethylene films for use as agricultural mulches in China when I last
spoke to him some 20 months ago RE: Ref. (2) above.

Ref.(3) is an example of an avenue for investigation I explored RE:
engineering a solution to controlling water egress into rubbers i.e.
using polar compounds.

Sincerely,
David.
I went to the library and got copies all the references which David mentioned above. The first one is a very interesting paper, and I will post a translation it into layman's terms when I get a chance.
I'm sorry I can't answer the original question, but I hope I provided some insight into what may be behind it.
PART15
Why do helium-filled balloons float?
- Why do balloons float?
- What sculptures can I make that will float?
- What can I do with floating sculptures?
- How Do Balloons Pop?
- Why Do Balloons Go Bang?
- Balloons at High Altitudes - when do they pop?
- The Big Bang Theory
Why do balloons float?
Can you fill a balloon part way with helium, make an animal out of it and have it float?
Definitely in water. In air... well, that depends.
This is an application of "Archimedes' Principle" which states that a body immersed in a fluid is buoyed up by a force equal to the weight of the fluid displaced. If an object immersed in a fluid is heavier than the fluid it displaces, it will sink to the bottom, and if lighter than the fluid it displaces, it will rise.
In our case, the "body" is a Helium-filled 260, and the "fluid" is air.
If we use the "Ideal Gas Law" we can quickly find the mass of the Helium or air in a 260. The "Ideal Gas Law says that m = PVM/RT where:
m = mass of the gas in grams
P = pressure inside the balloon, in atmospheres
V = volume in liters
M = Molecular weight of the gas
R = a constant = 0.082
T = Absolute temperature, Kelvin
At sea-level, the air pressure is 1 atmosphere and say we are at room temperature. Then P = 1 and T = 293K.
Then approximate a fully inflated 260 as a 1.75" dia cylinder that is 50" long. Since the pressure in the balloon is only slightly greater than the pressure outside the balloon, let's call them the same for now (both equal to 1 atmosphere).
The volume is pi x 0.875" x 0.875" x 50" long = 120.2 in^3 or:
                    1 liter
V = 120.2 in^3  x  ---------  =  2.0 liters.
                    61 in^3
We next look up the molecular weight of the gasses:
M = 4.00 for Helium,
M = 28.97 for the mixture of gasses we call "air"
and plug all these numbers into the Ideal Gas Law to find:
                                      1 x 2.0 x 4.00
the mass of Helium in a 260  =  m  = ----------------  =  0.33 grams
                                       0.082 x 293
                                     1 x 2.0 x 28.97
the mass of air displaced  =  m  =  -----------------  =  2.41 grams
                                       0.082 x 293
OK, we're almost done.
The mass of a 260 is 1.6884 grams (it's nice to have a laboratory balance that weighs to a ten-thousandth of a gram... ), but let's just call it 1.70 grams since we're all friends here. Now add that to the 0.33 grams of Helium inside the balloon for a total weight:
The total mass of the "body" (balloon + Helium) is 2.03 grams
The mass of the fluid displaced (air) is 2.41 grams
An object's mass doesn't change, but it's "weight" depends on the force of gravity. Converting these masses to equivalent weights on earth, the Helium-filled balloon weighs 0.0045 pounds and the displaced air pushes up with a weight of 0.0053 pounds. This results in a net buoyant force or "lift" of 0.0007 pounds on a Helium-filled 260, so it should float (but just barely!) !!!
So, let's see if any of this works in the real world:
PFFFFffffffffffffffttt! PFFFFffffffffffffffttt! PFFFFffffffffffffffttt! PFFFFffffffffffffffttt! PFFFFffffffffffffffttt! PFFFFffffffffffffffttt! Squeak, squeek, SQUEEEEEAAAK, SQUeak, squEAK, squeak... Ta-dah!
Well, I now have a parasol floating above my head, so yes, fully inflated 260 sculptures with a minimal number of twists will indeed float (just not for very long...). This would be good for a quick demo, if nothing else. The Helium diffuses out rapidly, and there is just not enough reserve lift to keep it aloft as the 260's start to shrink.
HOWEVER, Freda asked "Can you fill a balloon *part way* with helium and make an animal out of it and have it float?"
Yes, you could make an animal that will float for a short period of time if you inflate the balloon *most of the way*, leaving only a short nipple. Neglecting the lift (but not the weight) for the uninflated nipple, the math says that for neutral buoyancy (the "just" floating condition where the weight equals the lift):
            0.33 g                            2.41 g
1.7 g + ------------ x (inflated length) = ------------ x (inflated length)
        50" inflated                       50" inflated
Solving this equation for the "inflated length" term gives the minimum inflated length for buoyancy = 41". So if you could fill a 260 up to 1.75" diameter and make a figure that had a total bubble length of at least 41", it should hang in the air for a while.
How do you get more than a few minutes of flying time out of a Helium-filled 260?
- inflate all the way and don't twist it much.
- inflate to as large a diameter as you can (don't burp it).
- cut off the rolled nozzle after you tie it (shed those milligrams!).
To get as large a diameter as possible for # 2, try this trick: put a paperclip across the nozzle of the uninflated 260 and drop it into some boiling water for a while. Take the balloon out of the water, remove the clip (which has kept any water from getting inside the balloon) and *immediately* inflate it with helium without even drying the outside. You'll see that water has a huge effect on the properties of latex.
What is the effect of the latex compressing the helium?
You can fill a balloon, then you can fill it some more before it pops.
Assuming the balloon is not getting as much bigger as it had been
during inflation, the helium is more compressed.
I don't know what the exact pressures are because I don't have a pressure gage that measures fractions of a psi. I would have to use a manometer to measure the "head" (height that a water column is raised by the air pressure) in a 260 and then convert that to pressure.
Is it heavier for having more helium inside?
Yes. Consider how a tank full of compressed gas is heavier when full than when empty. Since we are talking about tenth-of-a-gram lift levels here, this can't be neglected for a 260. However, if the extra pressure causes the diameter to grow a bit, then we will most likely see an increase in lift.
Where is the optimum lift on the inflation graph?
The lift is directly proportional of the volume of helium in the balloon.
The volume of helium is directly proportional to the length of the balloon. (A fully inflated 280 will have 33% more lift than a 260) The volume of helium is also directly proportional to the cross-sectional area of the 260.
BUT, the cross-sectional area of the 260 is proportional to the square of the balloon diameter.
So, the fastest way to increase the lift is to increase the diameter. That's why I suggested soaking the balloon in boiling water before inflating. The water is absorbed into the latex and reduces its elastic modulus, allowing it to stretch more. It will stretch more in the direction of maximum stress, the circumferential or "hoop" direction, and you'll see this as a diameter increase.
(No, I don't know how much water is absorbed, and yes, the weight of the absorbed water does make the balloon heavier, and yes, there is probably an optimum amount of time to soak the balloon which maximizes the diameter increase to water-weight gain ratio... but that's a little deeper than I wanted to get into this). Inflating with heated air may also result in a diameter increase.
Inflating & deflating a balloon several times will also increase it's diameter. You wouldn't have water weight gain to worry about either. It does tend to make the balloon thin-skinned & harder to work with, but the added volume of helium is well worth the effort.
To answer your original question, to find the optimum lift as a function of helium
pressure, you need a graph of the balloon diameter against internal pressure. Given those
numbers and the formulas above, you could find the pressure for optimum lift. However, it
might all be an exercise in futility because:
- the wall thickness variation may exceed the pressure/diameter variation,
- the balloon weight variation may exceed the few tengths of a gram lift we have,
- more pressure makes the helium diffuse out faster (but overall I'd expect it to last longer - just not twice as long for twice the pressure)
- the optimum may be at the burst point, which would vary for each balloon depending on it's surface and wall condition. Have you ever looked closely at an uninflated balloon? Each Qualatex 260 typically has a few particles embedded in the wall. In the paint industry, they call these specks of solid matter in a coat of paint or varnish "nibs". In the balloons, I am not certain what the nibs are made of - they may be hardened latex, dirt, lumps of coloring agent, etc. and it would take a little work to find out exactly what they are. Upon inflation, a thin-walled region develops around some of the nibs. The size of the nib in the wall seems to determine whether or not there is a thin area around it (as I'm certain the specific nib material would as well, due to the interfacial bond with the latex of the balloon). The larger nibs cause greater stress concentrations which create the thin areas around them (from elementary solid mechanics principles). I would say that the balloon would burst at these thin areas first, and that the variation in the burst point may outweigh the pressure/diameter variation.
Are you saying that a twisted dog won't float because the gas makes it too heavy to float?
No, just that the more gas you add, the heavier the balloon becomes. (It's the same as adding more water to a water balloon. It's true that air is a gas and water is a liquid; but they are both "fluids" in a technical sense and obey many of the same laws)
Also I was saying that I don't know how much pressure a balloon will hold before it bursts, because I don't have the equipment to measure pressures that small.
Part of Tom's question was: once the balloon is fully inflated, does adding more Helium increase the lift? Well, if the balloon doesn't get any bigger at all, the answer would be no. If the answer was that the balloon stretches a tiny bit bigger, then I'd have to know; did the tiny increase in size add enough lift to offset the extra weight of helium added. I don't know the answer because latex properties are highly nonlinear, the stress state is complicated, and you really can't calculate an answer - you just have to do an experiment and measure it.
When everyone says that the gas leaks out real fast, how fast is fast?
Like a normal balloon? Or in a few minutes?
I think that the gas leaks out at the same rate (per unit of surface area) as it would in a round balloon of the same initial wall thickness.
When looking at how fast Helium leaks out of a 260, as compared to round balloon, the overall rate is not equal. Consider that a round balloon has greater initial lift due to a higher volume : surface ratio, right? (the lift being due to the volume, the major weight being that of the "surface"). Where does the gas escape? Through the surface (the latex). Well, a 260 has greater surface : volume ratio, so it should have a faster relative deflation.
Generally, a helium filled 260 sculpture has "landed" and is starting to droop in just a few hours, whereas a round balloon may have an "float" time of 8 - 10 hrs., and have landed, but still round the next day. The difference is that in a Helium-filled round balloon there is so much more initial lift than in a 260 that even after the round balloon loses some Helium, there is enough lift left to keep it afloat. (enough lift left... enough lift left... say that 10 times as quickly as you can :-) Also, consider the *apparent* deflation. A round balloon can loose some volume without being visibly much smaller, whereas a 260 sculpture can begin to "droop" with minimal deflation. In a helium-filled 260, you only have a few tenths of a gram of lift, and that is quickly lost as soon as just a little Helium diffuses out of the balloon and the diameter starts to decrease.
I'm guessing that the bigger the balloon, the better it will float?
Yes - the more weight it will lift off the ground.
Note that at high altitudes in Utah and Colorado, some foil balloons won't float; because of the low air pressure above 5500 feet, the buoyant effect of the helium is decreased.
Water vapor in the air (humidity) lowers the molecular weight of the air and decreases the buoyant effect of the helium. Mike Barr writes: Here in the New Orleans area we're 3 ft below sea level and 85-90% humidity is normal.
- I think most balloon decorators do this from choice, but here you must only use helium and not balloon gas (a mixture of air and helium).
- We don't sell (round) helium filled latex balloons without Hi-float, because without it, the float time isn't long enough to satisfy anyone. However, we often can't use as much, because of the humidity. In the New Orleans area, latex balloons with the same amount of Hi-float used in Denver won't float (because of the added weight of Hi-float).
- Watch the outside temp carefully. A fully inflated balloon will pop 4 seconds out the door on a warm day.
All of my suggestions are based on experience, so do what satisfies your customers best and makes you the best living.
I wonder what the effect of high float in a 260 or a 350 would do if it were filled with helium. My guess is that if would make it too heavy to float, but I know it would seal the pores. So, I don't know. Sounds like a good experiment to test and see what happens.
In *general*, I find that the more twists a 260 has, the faster it seems to deflate.
What sculptures can I make that will float?
You can fill a 260 with helium but there's no guarantee that it will float, because the 260 will only hold a limited amount of helium and usually the weight of the balloon will prevent it from floating. A 350 will float without a problem, although it still won't float for very long. If you want a helium 260 to float in mid-air you've got to fill it up all the way to overcome the weight and then there's nothing to twist/no place for the helium to be pushed to. I know 260's will float at sea level but higher elevations may be different. So you can fly sculptures, but only ones you can make out of full balloons, such as the heart, candycane, spiral, octopus, etc.
Try this: inflate a 260 and tie it end to end. (After you've tied the ends together, you can do an apple twist to hide the knot.) Then attach a string or ribbon and you've got a hollow balloon... similar to the look of a Geo only with a much bigger hole in the middle.
When I first started twisting I was in a store with a helium tank and I taught the old gentleman there how to make a basic dog. We then got several to float to the ceiling. They were just about completely filled.
I love floating sculptures. I do a variety of "floating" sculptures at various functions and have always gotten tremendous response from them. In addition to the traditional "heart on a string", I do planes, hummingbirds, butterflies, helicopters, swans, hats that won't stay put :), a 5' tall floating Goonie Bird, flying fish, and a bunch of others. Let your imagination go!
I tie 260's to round helium balloons, so just about anything will fly. Two 260's attached to one 11" balloon will hover (this is going to depend on how stingy they are with the gas at the store, however). I can adjust the balloon's ability to hover by tying on additional ribbon, then snipping it off as the balloon starts to sink. This way, the kid gets to have the fun of a floating sculpture without it disappearing into the stratosphere. I specifically used this to float Larry's bats last Halloween, and used them for party games.
One of my favorite things to attach to a hat is a hot air balloonist attached to a round. I make 1/2 of a guy out of a 130 and then I make his basket out of another 130 and attach them to the string of the round balloon and then tie the string to a hat.. It never fails to get a hoot.
A "huggy bear" on a helium balloon string has a kind of Whinnie-the-Pooh look.
What can I do with floating sculptures?
Our family does balloon launches on the 4th of July afternoon, instead of fireworks. The 260's don't have much volume so a small tank fills a lot of them. Just one sculpture at a time, and watch them float out of sight, listening to the cheers from the neighbor's yards. The kids love it, and nobody gets burned. (We spend the 4th at a relatives house on a hillside overlooking where the city does the public fireworks display. It passes the afternoon hours, waiting for dark and the big show.) After dark, if you have a strong spotlight you can follow a balloon quite a ways, and let the neighbors claim a U.F.O. sighting.
I've also used a clear Geo Blossom as a prop on somewhat larger airplanes to give them increased lift. I attach a peice of string as to a round balloon. It's fun to watch the kids flying in formation.
How do balloons pop?
Can static electricity pop a balloon?
If you work in the same general area for a prolonged period of time and that area happens to be carpeted, and/or in low humidity (you're inside a heated room on a cold, winter day) there's a really good chance for static build up. Static electricity sparks will cause your balloons to pop. So, here's what you can do:
- Get yourself a can of "static guard" and spray profusely whenever you feel like you're a victim of static cling.
- I keep a bounce dryer sheet in one of my apron pockets. When static builds up, I take it out and rub my hands on it - works for me!
- Buy a static gun at a record store - They takes the static away from record surfaces. I've used the gun on my bag of balloons and it seems to help. Every once in a while I squeeze the gun at the plastic bag and it takes the charge away.
- Attach a computer static mat around your pump and touch that before you touch the balloon.
- Don't use a pump! Inflate by mouth. The air in the balloon will be more humid.
- To prevent popping, try underinflating or working with a soft balloon.
- Use baby oil or glycerin on my hands. Glycerin will make them squeak a LOT more and baby oil needs time to soak in but both work well. A hand lotion that contains glycerin is also good.
- I've asked some engineers what could cause the popping; they told me it most likely has to do with ions in the air that are charged in such a way that they react with the balloon. I (we) don't believe it to be just static. How many of us have ever made a balloon stick to our hair with static electricity? One engineer recommended moving the air around with a fan to help keep the problem at bay.
Why do balloons pop around an adhered point when subjected to movement (pulling rubbing etc.)?
First create an adhered point by cleaning all the talc/cornstarch from a balloon, inflating it, and rubbing it against itself with a lot of force. Or by making a lock-twist. Or tie a knot in the nozzle and roll the ever-tightening knot towards the nozzle.
If you press your clean palm against a clean table, press down and then try to slide, you will get a jerky, stop-and-go motion called "stick-slip motion" or "stiction" (sticking-friction). If you look very carefully at the adhered point on the balloon when subjected to movement, you will get the same thing - the rubber welds to itself (sticks) and then tears (as it slides) because of the low shear and tensile strength of the latex. You can actually see the tearing debris accumulate when you do this (wear goggles!) Once this mechanism tears a hole in the balloon, the shape of the hole, stress in the wall of the balloon, toughness, and thickness of the latex all come into play in determining how the balloon responds. This kind of thing is studied in a field called fracture mechanics - the study of crack formation and growth.
Look at a balloon after it has popped. See that straight edge in the rubber that looks as if it was cut by a razor blade? That is the fracture surface along which the crack ran at the speed of sound in the latex. You can trace it right back to the origin of the fracture (the original tear). A familiar example are the cracks you get in glass windows when you hit them with a rock - you can tell where the rock hit, can't you? Because of the stress distribution present in an inflated 260Q, I'd expect the crack to run substantially more longitudinally than circumferentially.
Probably a better example are the cracks that can form in pressurized pipelines. When the pipelines are welded together, a crack can form and run for miles in a few seconds. After a few costly failures like this, pipeline designers now employ crack arrestors (bolted flange joints) every so often in pipelines to limit the maximum crack length (a crack can pass through a weld but can't pass through a bolted joint where the pipes are separated by a gasket in between the flanges).
Now let's talk about stress:
Normal Stress = Force / Area. Applying equal and opposite pulls of 1 pound, axially along to a 1" by 1" square bar results in a tensile stress of 1 pound per square inch (psi) at points far away from where the forces are applied. Pressure is a compressive stress, the same as you'd get by pushing on the above bar.
A 260 or 350 is what engineers would call a "thin-walled cylindrical pressure vessel with capped ends." The stress distribution near the ends can be very complex and requires methods of analysis that you learn in classes on "plates, shells and membranes" (where you even find solutions for stress distributions in toroidal shells... like a Geo donut!)
The stress distribution a few diameters from the ends is very simple though, and is derived in the most elementary textbooks. Skipping the derivation (...ha!... I remember having to derive it off the top of my head for the chief engineer who interviewed me 8 years ago for the job I used to have) the answer is:
axial (along the length) stress = Pr / 2t (tensile) hoop (like if it was wearing a belt) stress = Pr / t (tensile) radial (through the wall) stress = negligible
where:
P = pressure
r = radius (1/2 the balloon diameter)
t = balloon wall thickness
Notice this important point: the hoop stress is _always_ twice the axial stress for a 260, or a 350, or a 524.
Note, the above applies only to long skinnies. Using the thin wall pressure vessel approximations, the stress in a truly spherical balloon would be "equal biaxial tension plane stress"; Pr / 2t in each of the perpendicular "axial" and "hoop" directions (placed in quotes here because there is no one true pair of specific axial or hoop directions in a sphere because of the spherical symmetry) and again negligible radial stress.
Put something in and you get something out. Here, as a result of applying stress we get "Strain". Strain is the engineering quantity proportional to the deflection or "stretch" that occurs when you apply a stress (remember that stress is proportional to force) to anything. When you inflate a 260, the diameter and length each increase by 500 to 600 % (we say this is 500 to 600% hoop strain and axial strain, respectively), and then you reach a point where it gets very difficult to blow up any further. If you continue to inflate it further, it will burst. If we graphed the stress vs strain (think of it as force vs stretch) for latex we would get a sigmoidal (S-shaped) plot like the following:
     ^
     |
     |
 S   |
 T   |                            {
 R   |                            |
 E   |                            }
 S   |                           /
 S   |                         ,"
     |                       .'
     |               ._ - '"
     |     , - ~ '""
     |  ,~
     |,'
   0 +-------------------------------->
     0
             S T R A I N
The slope of a line drawn tangent to the curve is the "elastic modulus" or stiffness (first derivative for those of you who remember calculus). The slope of a horizontal line is zero, and increases with angle (measured ccw like on a protractor) until it becomes infinite for a vertical line. Notice that the stiffness becomes very large at high strains. The reason for this unique behavior of latex is due to the way its molecular structure changes with stress.
Latex is a polymer, and specifically, a type of polymer called an elastomer (a rubber). It is made up of spaghetti-like molecules that are all coiled up and intertwined like... a plate of cooked spaghetti. Each molecule attracts the neighboring molecules with weak bonds called Van der Waals forces, much like the starch that sticks individual spaghetti strands together if you don't make it right. When you start to stress the latex (put 2 forks into the spaghetti and move them in opposite directions), the molecules uncoil and start to straighten out. As more and more molecules straighten out, the latex gets harder and harder to stretch (read: more and more stiff). It also gets easier to see through since light can pass in-between the straightened molecules, rather than getting lost in the tangled jungle of unstressed molecules (this is NOT an effect due to wall thinning). Once the molecules are stretched out straight, further deflection would require stretching the atomic bonds that make up the backbone of the molecule. This is very hard to do, so before that point the Van der Waals forces (starch) give out and the mostly straight molecules (spaghetti) slide past each other, initiating cracks.
Some 260 have a very clear running crack and some break straight across. Why?
In materials with uniform properties in all directions, cracks like to extend perpendicular to the maximum applied tensile stress. In a 260, we have two tensile stresses which are perpendicular to each other. But remember that hoop stress is always twice the magnitude of the axial stress. Since these are "principal stresses" (no shear stresses), it turns out that the hoop stress will always be the maximum stress. In an ideal world then, cracks will start at a flaw, then turn so that they run perpendicular to the maximum stress which means they really want to run axially. However, this isn't an ideal world, and latex does not have uniform properties in all directions when inflated....
Are the molecules arranged differently by the different stresses as the latex is stretched?
Yes. when you stretch an uninflated 260 like a rubber band, you straighten out and line up the molecules in the direction that you are pulling. When you inflate a round balloon, the molecules are stretched equally in all directions tangential to the balloon wall because the stress in all tangential directions is the same. But when you inflate a 260, twice as many molecules (probably twice, I can't really count 'em...) uncoil in the hoop direction as in the axial direction because of the 2:1 ratio of the stresses. Now to answer your question of why some 260's break straight across, think of this. If there are twice as many molecules lined up with their strong direction in the hoop direction, it shouldn't be that hard for a crack to overcome the weak Van Der Waals forces that hold those molecules against each other, right?
Upon inflation, balloons get easier to see through primarily because light can pass in-between the straightened, oriented molecules, rather than getting lost in the tangled jungle of unstressed molecules (this is NOT an effect due to wall thinning). The wall does get thinner upon inflation, but that's not the point here.
Somewhere, find a heavy piece of clear latex just the right thickness so that when you stress it to the same stress level present in an inflated balloon, it is exactly as thick as the wall of an UNinflated clear balloon.
You will be able to see through the stressed heavy latex sheet much better than through the wall of the UNinflated clear balloon.
Does the action of dipping line up molecules?
No. It is the stressing of the latex upon inflation that lines up (orients) the molecules.
As an aside, the plastic grocery bags that you get at the supermarket are made from oriented polyethylene (oriented by stretching during the rolling of the polyethylene sheets). They are very strong in the vertical (load bearing) direction because that is the way the molecules run, and they are rather weak in the sideways direction (play with one and see!).
For a definite example of orientation effects in latex, try pulling on a 260 as hard as you can as it is inflated. When you pull it really hard it is very difficult to inflate by mouth. With a pump you can inflate the 260 about the diameter of a 130. This is the way Roger Seigel (?I think?) gets a great looking elephant trunk in one of his books. A balloon inflated this way will take an incredible amount of abuse - much more than a standard inflated 260.
Additional stretching or pinching of the balloon will further stress, strain and orient the molecules. But there's more to it than that, due to the competing processes of stress relaxation and creep.
Try this experiment which will demonstrate some of the viscoelastic (time dependent) properties of rubber: hammer three nails into the wall. a) Stretch a fresh rubber band over two of the nails. Now since the nails can't move, the amount of strain (stretch) in this rubber band will not change with time. b) Place a fresh rubber band on the third nail, and hang a weight on the rubber band. Now since the weight can't change, the amount of stress (force) in this rubber band will not change with time.
Over time, the tensile stress in the rubber band in (a) will decrease as the molecules slide past each other. This is called "stress relaxation". Over time, the amount of stretch of the rubber band in (b) will increase as the molecules slide past each other. This is called "creep".
Creep and stress relaxation cause uninflated balloons to be larger after an inflation/deflation cycle. You can take advantage of the strengthening that can be achieved by reorienting the molecules, the decreased stress from stress relaxation, and the increased stretch from creep if you pre-inflate the balloon all the way, wait a few seconds, and then deflate it "severely". Because of creep and stress relaxation, a given balloon diameter can now be achieved at a lower latex stress level than for the inflated-directly-to-size condition, and lower stress makes the balloon more resistant to popping. That's what is recommended for pushing balloons into those new SDS metal grid frames used for creating balloon walls in large scale balloon decorating. While all of the above applies to 260's and 350's, in practice it should be limited to "burping" them, because inflating 260's and 350's all the way first will make them unworkable for twisting.
On a side note, vulcanizing "cross-links" some of the polymer molecules (chains). Vulcanization can be thought of as spot welding the spaghetti strands to their neighbors every so often, but leaving them free to wiggle in between the spot welds. The more vulcanization, the closer the spot welds become, and the harder/stiffer/stronger/less-flexible the latex becomes.
Is vulcanization a fancy name for cooking?
Yes and no.
Here's an interesting history of rubber from "Tinkers and Genius, the Story of the Yankee Inventors, by Edmund Fuller, Hastings House Publishers, NY, 1955."
..."India rubber"... Its original name was Caoutchouc (pronounced something like koochook). It was widely known as "gum elastic" but had come to be called "rubber" because its earliest recorded use (other than as balls to play with) by white men who fetched it from South America, was as an eraser. The "India" crept in as a joint reference to the South American Indians who gathered it and to the West Indies which became a trading channel for it.
...Around 1834... The India rubber trade was the next thing to being dead.... The plagued India rubber either melted and ran in the summer or petrified in the winter.... Scores of people were experimenting with the rubber problem.... As for Charles (Goodyear).... He recognized this as God's chosen work for him. Nothing would stop him.... The discovery of the sought-for secret came in 1839.... he was boiling rubber and sulphur on the kitchen stove, trying to make the curing process permeate it. A blob fell on the hot stove top and hardened. It was what came to be called "vulcanized."
His work was not finished. How much sulphur? How much dry heat? How long for the process? These things had to be worked out experimentally. But Charles had it, he genuinely had it.... In success, he was at the extreme of bankruptcy.... For five years more he wandered in poverty around New England, working out the process, begging facilities, seeking a backer... It wasn't until 1844 that he got a patent.
Are there all levels of vulcanization from runny to hard?
from "Chem One by Trublood, Waser and Knobler, McGraw-Hill, 1980"
The vulcanization of rubber, by heating it with sulphur, which converts the rubber from a soft, gummy material into a product of varying hardness depending on the amount of sulphur used, involves the creation of cross-links that consist of -S-S- groups
          H
      H  HCH  H   H
      |   |   |   |          THIS IS THE REPEATING UNIT IN ONE
... - C - C = C - C - ... POLYISOPRENE (NATURAL RUBBER) MOLECULE
      |   |       |
      H   H       H


          H
      H  HCH  H   H
      |   |   |   |
... - C - C - C - C - ... ONE POLYISOPRENE (NATURAL RUBBER) MOLECULE
      |   |   |   |
      H   H   S   H
              |                     VULCANIZED TO ANOTHER
          H   S   H   H
          |   |   |   |
    ... - C - C - C - C - ... POLYISOPRENE (NATURAL RUBBER) MOLECULE
          |   |   |   |
          H   H  HCH  H
                  H
(Polyisoprene is the major constituent of natural rubber)
From Introduction to Material Science for Engineers, Shackelford, MacMillan Publishing Co, NY, 1985
The extent of cross-linking is controlled by the amount of sulfur addition. This permits control of the rubber behavior from a gummy material to a tough, elastic one and finally, a hard, brittle product as the sulfur content is increased.
Now Mark again: Oxygen is chemically very similar to sulfur, and can replace sulfur for cross-linking polyisoprene. They may take advantage of this fact in the balloon manufacturing process, or it may be what causes balloons to go bad from air exposure. I don't know for certain which - I'm a mechanical engineer, not a polymer chemist (though I play one on the net... :-)
Would not the amount of vulcanization make a great deal of difference in the balance of the long force and the side force of a 260?
No, the 2:1 balance of the hoop and axial stresses is a function of the pressure vessel (balloon) geometry, not the material. It's 2:1 for steel too.
There must be a best amount of vulcanization for a 260 to make the best balance of forces for a 260.
Well, there certainly must be a best amount of vulcanization for a 260 in order to make it best for twisting. It's probably determined by trial and error, then written down and kept in the company vault.
How would a 260 made from under cooked latex be different than a 260 that was made from over cooked latex?
The undercooked 260 would be red and bloody in the middle, and the overcooked 260 would taste smoky and burnt.
I wonder who is responsible for the cooking. Does Qualatex get the latex pre-cooked?
No. The "cooking" is done after the dipping.
In the Qualatex-published book "Design" by Gary Wells, they state that: "Qualatex balloons are made from 100% latex. No fillers or substitutes are used."
From Introduction to Material Science for Engineers, Shackelford, MacMillan Publishing Co, NY, 1985
A filler is added to strengthen a polymer primarily by restricting chain mobility. ("chain" is short for "polymer chain" or molecule) It provides dimensional stability and reduced cost.... Roughly one third of the typical automotive tire is a filler (carbon black).
Design also states: "Pioneer compounds its own latex and blends its own inks and dyes".
From Introduction to Material Science for Engineers, Shackelford, MacMillan Publishing Co, NY, 1985
Dyes are soluble organic colorants that can provide transparent colors... A pigment is an insoluble colored material added in powdered form.
monty writes:
> What about the thermal properties of latex? I still don't have any idea
> why small deviations in temperature have such a massive effect other than
> perhaps the fact that it is derived from TREE SAP. Which of course as we
> all know "flows" slower in cold. That was the only theory I had to explain
> the slow-mo spread and large pieces that never contracted in my outside
> clean-up.
From Introduction to Material Science for Engineers Shackelford, MacMillan Publishing Co, NY, 1985
Polymer properties vary tremendously with temperature. To demonstrate the temperature dependence of polymer properties , the modulus of elasticity (stiffness) is typically plotted against Temperature.
At low temperatures (well below Tg), polymers behave like rigid solids (exhibiting a relatively constant, high stiffness). They deform elastically (like spring steel) and are quite brittle. In this temperature range, they are also referred to as "glassy".
     ^
     |
     |     :
     |_____:
     |     :".
     |     :  `
     |     :   \
 S   |  g  :    }     :
 T   |  l  :    {     :
 I   |  a  :     !    :
 F   |  s  :      !   :                        :
 F   |  s  :   l   \  :                        :
 N   |  y  :   e    `.:               _  - " ~-.
 E   |     :   a      " _   -   "  "           :`
 S   |     :   t      :                        : \
 S   |     :   h      :                        :  i
     |     :   e      :        rubbery         :  |
     |     :   r      :                        :    viscous
     |     :   y      :                        :
     |     :          :                        :
     |     :          :                        :
     +-----:----------:------------------------:-------->
               Tg                              Tm

                   T E M P E R A T U R E
In the glass transition temperature range, Tg, the modulus (stiffness) drops precipitously and the mechanical behavior is termed "leathery". The polymer can be extensively deformed and slowly returns to its original shape upon stress removal.
Just above Tg, a "rubbery" plateau is observed. In this region, extensive deformation is possible with rapid spring back when the stress is removed. (Latex is an "elastomer" - a polymer with a predominant rubbery region. Note that the modulus of elasticity (stiffness) of rubbers INCREASES with temperature in the "rubbery" region.)
As the melting point Tm is approached, the modulus (stiffness) again drops precipitously as we enter the liquid-like "viscous" region where they behave like cake batter. The boundary between elastic and viscous behavior is known as the "glass transition temperature", Tg.
Images magazine says that after inflation, some vendors of round balloons will throw them in the dryer to get them back to original shape/size for reuse. The agitation and heat that the balloons get as they roll around inside the dryer is essential to restoring them to almost like-new condition. The dryer method works....but its safer to put them inside a terry cloth bag or old pillow slip first to avoid the possibility of melted latex on your dryer drum. Home dryers, even on low settings, can get quite hot! Use the lowest heat setting. Toss them for about 15 minutes and voila, the latex is shrunk back down to original size.
Viscoelastic materials like latex exhibit time dependent deformation behavior. Stretch a steel spring elastically (don't permanently deform it) and release it. You will observe that it instantly goes back to its original size. Now stretch a rubber band and release it. You will observe that the large initial contraction does not return it to its original size; instead it recovers its original size quite slowly. Likewise, inflate a balloon, and then deflate it. Again you will observe that it does not instantly return to its original size, but continues to shrink for quite some time. The rate of recovery can be increased by increasing the temperature. This is another great experiment that you can do with a hair dryer.
Increasing the temperature is what the mfrs. do when they "drum" the balloons in rotating industrial dryers to shrink them back to "like new" after they've been inflated for printing, etc. (Good quality printed balloons are inflated for printing - that's part of the reason they are so expensive). The drumming machines look like oversized stainless steel cement mixers, very similar to the coating drums used in the pharmaceutical industry, and work like the clothes dryer in your home.
There is another neat phenomenon called the "Gow-Joule Effect" wherein most elastomers (rubbers) contract when heated while stressed in tension (stretched). Quite the opposite of what you'd expect, but it's true as you can easily see for yourself. Hammer a nail in the wall, and put a rubber band on it. Hang a heavy weight from the rubber band and let the weight come to rest. Mark the spot on the wall where the weight is. As you gently heat the rubber band, like with a hair dryer (I used a propane torch, but then I like overkill...), you can watch the weight rise (until you start melting the rubber band, that is). The Gow-Joule Effect only works when tensile stress is present though.
Tom writes:
> The exact level of vulcanization may be a most important part of >making a 260.
Indeed. No doubt it's a crucial element of the total manufacturing process.
> The old Ashland balloons had a rubbery feel and seemed to decompose faster
> than the Qualatex.  The feel of a balloon is tricky because there are
> different finishes but I wonder if they started with a different level of
> vulcanization.
I expect that the exact process variables are proprietary trade secrets. This is schematically how vulcanizing affects the plot above (it raises and extends the stiffness curve at all temperatures):
     ^
     |
     |     :
     |_____:_
     |     :".`.                             vulcanized curve
     |     :  ` `.    :                      /
     |     :   \  `.  :                     /
 S   |  r  :    }   `.:               _  - " ~------.
 T   |  i  :    {     ` _   -   "  "                 `
 I   |  g  :     !    :
 F   |  i  :      !   :                        :
 F   |  d  :   l   \  :                        :
 N   |     :   e    `.:               _  - " ~-.
 E   |     :   a      " _   -   "  "           :`
 S   |     :   t      :                        : \
 S   |     :   h      :                        :  i
     |     :   e      :        rubbery         :  |
     |     :   r      :                        :    viscous
     |     :   y      :                        :
     |     :          :                        :
     |     :          :                        :
     +-----:----------:------------------------:-------->
               Tg                              Tm

                   T E M P E R A T U R E
What can be inferred from how a balloon breaks?
Pretty much anything a Tarot Card can tell you if you're good at it. Give me a call at $3.99 a minute and I'll be happy to pop and then read some balloons for ya...
But seriously, fracture mechanics is a powerful tool for post-mortem analysis, and detailed examination of fractures and fracture surfaces can provide all sorts of information.
Monty writes:
> the strangest break line from a round balloon is the Sawtooth zig zag edge.
> I suspect that it's from a pressure-overinflation rupture since that's
> how some distributors recognize pretend "defectives" (mylar) that some
> people try to return when they were actually overinflated.
In a round balloon the tensile stresses are the same in all directions tangential to the wall. Earlier we said cracks propagate perpendicular to the maximum tensile stress direction. Since all directions tangential to the wall are maximum tensile stress directions in a round balloon, a crack can run in any direction. What probably happens is that it runs until it is deflected into a new direction by a nub or other inclusion in the latex.
> I've also noticed that different balloon color "types" break differently.
> Pearl Tones seem to "shred" (explode into dozens of TINY shards) which is
> a pain on cleanup.
> monty
The pearl-metallic sheen of "Pearl Tone" balloons derives from the same technique used to make the "pearl" paint colors used in custom automobile paint jobs: the addition of powdered mica or aluminum. The powder particles in the latex can be thought of as inclusions, and if the latex-particle bond is not as strong as the latex-latex bond it replaces, each powder particle can be thought of as being like... one perforation in the line of perforations between a check and its check stub. When you pull hard on a check and stub perpendicular to the line of perforations, a tear (another name for a crack) runs from perforation to perforation. Well, if you had a piece of paper that was full of perforations everywhere (like what is used in some brands of paper hand towels to make them feel soft), and you pulled on it equally in all directions in the plane of the sheet (like the stress distribution in a round balloon), nobody could predict how the cracks would "connect the perforations", and each time you tried it you'd get a different result.
Additionally, the initial popping of the balloon sends stress waves out through the already highly stressed wall of the balloon, much like the waves that spread out when you drop a rock in a puddle of water. The high stress from the superposition of the existing stress plus the stress wave stress just might be enough to initiate other cracks at sites that were teetering on the edge of bursting, leading to additional crack fronts.
Inflate a balloon of any size/shape. Tell (or bet) the audience you can stick a pin in the balloon, and it won't pop!
If you put a piece of cellophane tape on the surface of the balloon, and jab the pin through the tape into the balloon, it won't pop (at least not right away). The tape keeps that initial "crack" from developing. The air will leak around the pin, or through the hole if the pin is removed. After a while,, one or more cracks will work their way past the edge of the tape, and _then_ it will pop if there is still enough air in the balloon. (I used to use this effect as a sort of "time-delay fuse". The wider the tape, the longer you delay the pop because the tape helps carry the stress that the latex would normally have to carry alone.)
But this can even be done without the tape. You can put an oiled, polished steel needle through a special balloon without popping it. If you know the trick you know the needle goes through the thickest parts of the balloon; near the nozzle and opposite the nozzle. These are the last parts of the balloon to be stretched out completely as it inflates. Make sure that the needle is very sharp, and be sure to wipe a very thin film of Vaseline on the needle... as explained earlier, friction is deadly to latex and you want an initially clean opening, not a tear.
The "Needle thru Balloon" consists of a giant needle (about 16" long) threaded with a bit of yarn. The needle is lubricated with petroleum jelly or silicone grease, and is best stored in a hollow magic wand. The needle has a special conical taper at the tip to make penetration of the balloon more reliable - but a sharpened knitting needle will work in a pinch. Keep the needle very sharp and well lubricated. When it goes through, the Vaseline jelly will plug up the hole and the balloon won't deflate. Secondly, only blow up the balloon half way. It should be about the size of a cantaloupe. The trick should work - I only failed once in 32 years!
A magician writes: I perform the Needle Thru Balloon using clear 11 inch balloons. I usually use Vaseline to lubricate the needle. In an emergency I've even used Salad oil! I blow up an 11 inch balloon with four full blows and let a little out to keep it soft. I tie it, then squeeze the top of the balloon and I'm ready to go into my routine: I get a volunteer up from the audience and have him blow up one of the balloons while I blow up the other one. I ask the kid what would happen if I touched the balloon with the needle. Then I pop the first balloon. I then have the kid hold out his hand. I place the balloon in his hand and have him place his other hand on the top. I take out some ear muffs and put them on me. I realize the mistake and then place the muffs on him. Then I stick the needle through the top of the balloon and through the knot side. I then have the kid let go and then proceed with pulling the thread through. (I use yarn for the thread.) I hand the kid the balloon at the end of the routine and as he goes away, I pop the balloon and give him an animal instead. In my travels, I found different grades of clear balloons and had trouble finding the "spot" at the top of the balloon to go through. So I came up with a foolproof solution: Go to the theatrical make-up counter at your local clown or theater store and get a bottle of liquid latex. Brush some on the part of the uninflated balloon you want the needle to go through and let it dry (usually 5 - 15 minutes). The liquid latex creates the needed spot for the penetration! I have even brushed some on the sides of the balloon and performed a sideways penetration. ( I believe that this is the way Doug Henning did the penetration on one of his specials.)
Another approach is using an 18" clear round and inflating it to 11". It leaves so much barely stretched out rubber on the end that you can poke it like a pincushion if your needle is in good shape. Baby Vaseline in the needle wand (holder) coats the whole needle. Without a coating of lubricant the odds of the trick working go way down.
T.Myers recommends using an 18" clear balloon, blown up to about 11" size. This leaves lots of extra stretchiness to the balloon, and makes the trick much less likely to fail. Failure, as any of you who perform the trick know, is inevitable and happens almost 50% of the time using 11" balloons.
Hmmm, I've been using the "needle-through-balloon" balloons, maybe they are just regular balloons and the name has me psyched but I only rarely have a failure, I can only remember one in the last 10 or so that I've done. There is a technique to it that includes slightly pinching the end before putting in the needle to give yourself some slack. I also use the needle wand to keep my needle well lubed .
I've been using the 18" clear balloons in needle-thru-balloon for about six months now. My success with the 11" clear balloons was very spotty, and seemed to depend on the batch of balloons. The 18" clears have a very large neck that is a bit troublesome to tie, and the "thick spot" at the crown may be quite a bit off-center when the balloon is blown up to 11" size -- you have to look for it. Overall, I like the 18" clears, and have had no failures in performance. I have no plans to go back to the smaller ones.
I use 11" balloons. Of course, I do not inflate them to the full 11" size. I always leave them a little soft.
Ickle Pickle Products , sells both sizes of needle for the needle through the balloon trick. The small one can be stored in a clear tube. The small one will work with saliva as a lubricant, it doesn't need vasoline.
Has anyone mentioned the similarity between the mini-needle thru the balloon and a *hat pin*? Although real hat pins are rare in this part of the world, you can make your own easily. Go to a bead store, (Jewel-Art in our area), and ask for a hat-pin pin. I think they come in 5" - 8" sizes.You can even purchase a fancy bead to glue on the end. Choose carefully, you don't want to get *stuck* with a dull one.
Tom asks: is it better to first overinflate and then let air out to have less tension at the point of penetration or does it make more sense to work with the wall thickness and tension of a inflated-directly-to-80%-full balloon? What is the optimum look of the spaghetti to stick a needle through without creating a tear? The trick will work either way but it seems like one should be better than the other.
The problem is that you need more info to answer this: specifically, you need to know the fracture toughness (a property meaning "resistance to crack growth") and how it varies vs. strain. Well, you need 2 graphs - one for pre-stressed (oriented) latex, and one for virgin latex. Hmmm, actually, the fracture toughness will vary with angle relative to the molecular orientation direction... and with state of stress (equal or different hoop and axial components?)... and... what a mess!
So, what you really need to do is to find a balance point between all these competing mechanisms, (stress driving the crack, stress changing the fracture toughness of the material, orientation effects, etc...) and you'll need quantitative info (numbers) to do it, not just qualitative hand waving like everything written here. Plus, all of these properties are functions of temperature, so it really becomes complicated. Here's a report of how substantially the properties can change with temperature:
Monty writes:
Latex reacts oddly in the cold. In one instance, after cleaning up from a New Years party, I used a pin to dispose of some 16 inch balloons that were outside in 15 degree Fahrenheit weather. Instead of the usual physics, The latex refused to contract in real time and split into two large pieces. The topmost piece was so large that it floated about 12 feet away before the helium escaped from it's edges. In fact the latex never fully contracted until it was brought inside. It did not have High Float in it or anything else that would impede it.
It's probably a lot easier to just do a series of balloon/needle controlled experiments to figure it out. If it's any help, there's a recommendation for making balloons more resistant to popping when pushing them into those new SDS metal grid frames (used for creating balloon walls in large scale balloon decorating). They evidently tell you to pre-inflate the balloon all the way, wait a few seconds, and then deflate it "severely". Because of orientation, creep and stress relaxation, a given balloon diameter can now be achieved at a lower latex stress level than for the inflated-directly-to-size condition.
Balloons at High Altitudes - when do they pop?
Released helium balloons explode at a height of about 28,000 - 30,000 ft. 2 studies prove that. One by Don Burchette, inventor of Hi-Float and winner of the crystal award.
How far can a balloon travel before it bursts? According to Totex Corp. (one of the world's largest makers of weather balloons) the rate of ascent for a large balloons is 320 meters per minute or 17.5 ft. per second. A large balloon released at sea level would reach it's bursting height in 26 minutes. The rest is up to wind currents. Treb Heining has released over 1.4 million balloons at once. Millions are released each year in the US. The National Weather Service releases 50,000 five foot diameter balloons each year.
Why Do Balloons Go Bang?
The energy stored in the compressed air inside a balloon is not very large at all. Balloons create very little overpressure, apparently on the order of 5 or 6 mm of mercury when inflated to normal size. On inflation, the pressure must be higher as the rubber just starts to stretch because, from our stress equations above:
the modulus (stiffness) of the rubber is initially large, (it then drops off, to finally get VERY large with increasing strain) the balloon wall is initially thick, and the radius of the balloon is small. Pressure falls rapidly as the balloon grows in size. This follows from the stress/pressure relationship, and the stress/strain curve for latex.
There is a well-understood differential equation applying to soap bubbles relating surface tension, bubble shape and internal pressure. The surface tension can be thought of as a *constant* hoop and axial stress (NOT a function of strain, as in latex). Two soap bubbles inflated to about the same size and connected with a pipe form a system that is not stable. One soap bubble will always collapse and the other will inflate. The smaller bubble size requires a higher air pressure than the larger bubble; it tries to develop the higher pressure by shrinking, but since the bubbles are connected by a pipe, shrinking just forces the air into the larger bubble. As the bubble size difference increases, so does the pressure difference generated to drive the air flow. This speeds up the collapse of the small bubble. Now, remember that the volume of a spherical soap bubble is proportional to the cube of its diameter. Visually, the process *appears* to speed up even more, because even for a constant air flow rate through the pipe, the diameter of the small bubble will be decreasing at a much greater rate than the large bubble diameter will be increasing.
This can be demonstrated with balloons, but the size difference has to be rather noticeable before the process will begin. When it does begin, it can become rapid and it can suddenly halt. With balloons, this is a much more complex experiment than meets the eye because there are so many variables changing at once. The 500 - 600% strains make it a "large deflection" problem, in which we can't make any of the simplifying assumptions which we usually do. The geometry changes substantially, and latex displays highly nonlinear behavior.
The sudden halt even shows up in ONE balloon when you are using 260's. Partially inflate a 260 and what do you get? a large diameter, thin wall, high stress bubble with 500 - 600% strain, a small diameter, thick wall, low stress nipple with but a few % strain, and a transition region between them. Note that each of these two distinct sections contains the same pressure! How is this possible? It's possible because this large deflection problem in nonlinear elasticity (remember the sigmoidal stress-strain curve?) has more than one stable solution! Amazing if I do say so myself!
As balloons reach maximum expansion they get to a point where the latex runs out of stretch and gets stiff and resists further stretching. This is obvious in a fresh, overinflated balloon. It will become stiffer and get very rigid as all the latex molecules all become oriented in the tensile stress directions. This increase in stiffness will cause balloons, unlike soap bubbles, to increase in internal air pressure just before bursting.
The Big Bang Theory
Here is some info on balloon bangs, big and little.
While the air pressure inside the balloon does not contain much potential energy, the latex does store terrific potential energy as "elastic strain energy". The rapid release of the stored energy in the latex produces the resounding bang.
When a balloon bursts, the latex splits into various pieces as cracks develop. The speed of sound in latex is much higher than the speed of sound in air. The speed of the crack propagation through the latex approaches the speed of sound in the latex. Therefore, the velocity of the crack faces break the sound barrier in air and make a sonic boom. The latex then violently contracts. The ends of the latex contract so rapidly that they break the sound barrier. Just like the end of a bullwhip, and they make a shock wave. The more latex breaking the sound barrier, the bigger the bang. The faster the latex is going the bigger the bang. A few large very tight pieces of latex contracting will make a bigger bang.
This explains the following:
1. Very large weather balloons made with the very thin latex tend to go "foom" instead of bang. The latex does not develop the high degree of elastic tension needed to really accelerate when it rips apart.
2. A balloon that has been well stretched by severe inflation several times does not expire with as extreme a bang as an identical balloon blown up to the point of fatal overinflation without stopping. (Stress relaxation, creep and fatigue may all play a part here) Also it tends to rip into more pieces (because there's more strain energy to dissipate).
3. Even small balloons like nine inch rounds can produce a very big bang if they are strong high quality balloons and are blown up to the limit. They can develop fantastically high tensions and the latex develops very high speeds when it bursts. Of course a larger balloon blown up to a similar extreme tension all over would make an even bigger bang since more latex would be breaking the sound barrier when it burst.
Implications of the Big Bang Theory
This theory predicts that the very biggest bangs should be produced by:
1. Using high quality balloons made of latex that will stretch very far and is not stiff and limited in the amount of stretch possible.
2. Inflating balloons to the maximum possible extent in order to get the latex as stretched as possible. That is to say, just keep blowing and do not speed things up with a pin or other sharp object.
3. Stretching the balloon a minimum amount. One partial inflation will take away the initial stiffness of the latex and help insure that it will stretch further than a balloon that has not been annealed with one previous inflation. However, this should not be overdone.
4. Have the balloon clear of anything that will impede the latex when it does burst.
Environment and the Big Bang
Environment can have a major affect on the sound produced when even the most optimum balloon is properly inflated past its bursting point.
A padded environment with many complex shapes, an environment full of things to make many canceling reflections, will muffle the bang considerably.
A simple environment with few hard surfaces and a large volume will enhance the bang and produce great booming echoes.
Optimum places for inflating large strong balloons for maximum effect include:
Empty gymnasiums in the middle of the basketball court. Sometimes a fantastic rippling echo can return from the banks of seats.
Large dance studios, often used for aerobics classes, especially with mirrored walls. The mirrors enable one to see just how big the balloon is getting and make optimum sound reflective surfaces.
Concrete stairwells in large buildings, the larger and taller the better. Massive booms can be produced, especially if the balloon is overinflated one floor from the top or bottom of the stairwell. (like a giant organ pipe!)
PART16
TEST OF TOY BALLOONS
PERFORMED FOR FEDERAL DEPARTMENT OF AVIATION
Contents
- IDENTIFICATION
- BACK GROUND
- GENERAL
- TEST AND RESULTS
- CONCLUSION
- APPENDIX: Curve for converting between pressure and height
IDENTIFICATION
    Project no.     : 25307
    Title           : Test of toy balloons performed for Federal Department of Aviation
    Rekvirent       : Statens Lufthavensvaesen
                      Box 744
                      Ellebjergvej 50
                      2450 Copenhagen SV, Denmark

                      Phone 011 45 36 44 48 48
    Reference       : Hr. Kofoed-Hansen
    Test Specimen   : 10 pcs. latex balloons (11 inch Qualatex)
                      10 pcs. mylar balloons (18 inch Anagram)
    Test Period     : 1992.April.23 - 1992.April.24
    Testing done by : Tom Hjerting Nielsen
                      Susanne Otto
    Signature       : Original Signed by Susanne Otto
BACK GROUND
The Federal Department of Aviation has until now had the understanding that toy balloons attain a maximum height of a couple of hundred meters, but have now received information that indicates that they can go much higher and with that become a larger danger for air traffic than previously considered.
Therefore, testing is performed with the purpose of determining the height at which balloons explode. The height is determined with the help of a vacuum chamber.
GENERAL
INTRODUCTION
At Electronic Central, tests were performed on toy balloons for the Federal Department of Aviation. The purpose of the tests was to determine the height at which balloons explode.
The tests were performed in a vacuum chamber, where the pressure was slowly reduced and the temperature was reduced simultaneously. Notes were made at which pressure the balloons exploded. The pressure can be converted to an equivalent height.
The tests were performed on two types of toy balloons: 18" mylar and 11" latex.
TEST SPECIMENS
As received from CHA CHA balloon company, Allerod, 1992.April.23:
10 pcs. latex balloons, 11" diameter (Qualatex)
10 pcs. mylar balloons, 18" diameter (Anagram)
The balloons were delivered, filled with 14 liters of helium.
TESTING EQUIPMENT
Thermal vacuum chamber, EC type TVK-2K
EC no. U2401
Date of last calibration: not relevant
U-tube manometer (absolute pressure gage?)
EC no. 23996
Date of last calibration: not relevant
Normal pressure was checked several times during testing according to
EC no. 23742 (Aneroid Barometer)
TEST AND RESULTS
This chapter describes the tests performed with consideration of the procedure and results.
Procedure
The tests were performed according to the following procedures.
5 balloons at a time were installed in the vacuum chamber. The pressure in the chamber was gradually reduced. The temperature in the chamber was reduced to -20*C. The pressure at which each balloon explodes is noted together with eventual comments. When all balloons have exploded the temperature and pressure in the chamber are increased to standard laboratory conditions.
First the 10 latex balloons were tested and then the 10 mylar balloons were tested.
Results
The test was carried out as described. Fig 1 and 2 show the test specimens in the vacuum chamber.
(The actual figures have been eliminated due to the poor quality of my copy.)
FIG. 1 Latex balloons in vacuum chamber. (on page 6 of original)
FIG. 2 Mylar balloons in vacuum chamber. (on page 7 of original)
The Table on the next page shows the pressure and the equivalent height at which each balloon exploded. The height was found with linear interpolation of values from IEC 68-2-13 and with that ISO standard 2533 (see appendix 1).
Balloon Type   Temperature    Pressure  Height    Notes
Latex          -20.9xC        228 mmHg  9200 m
Latex          -20.9xC        220 mmHg  9450 m
Latex          -20.9xC        220 mmHg  9450 m
Latex          -20.9xC        216 mmHg  9600 m
Latex          -20.9xC        204 mmHg  9900 m

Latex          -20.6xC        203 mmHg  9900 m
Latex          -19.4xC        193 mmHg  10250 m
Latex          -19.7xC        189 mmHg  10400 m
Latex          -21.9xC        180 mmHg  10650 m
Latex          -20.9xC        179 mmHg  10650 m

Mylar          13.8xC         677 mmHg  400 m
Mylar          -6.0xC         644 mmHg  1000 m    Note 1
Mylar          -6.0xC         644 mmHg  1000 m    Note 1
Mylar          -20.6xC        582 mmHg  2000 m    Note 1
Mylar          -20.3xC        549 mmHg  2600 m    Note 1

Mylar          -21.7xC        559 mmHg  2400 m    Note 2
Mylar          -20.5xC        549 mmHg  2600 m    Note 1
Mylar          -20.5xC        499 mmHg  3450 m
Mylar          -21.1xC        426 mmHg  4650 m
Note 1: 1 balloon sank down to the bottom of the vacuum chamber.
Note 2: 3 balloons sank down to the bottom of the vacuum chamber.
CONCLUSION
The results of the finished tests can conclude the following:
Latex balloons explode with in the area of 9200 - 10650 meters altitude with a middle value of 9945 meters altitude. In general, the balloons used in the second test exploded at a higher altitude that the balloons used in the first test. This can be attributed to helium loss during the waiting time having resulted in a reduced internal pressure.
The mylar balloons do not go higher than 1000 - 2400 meters before they either explode or lose their "lift". It is noted that there was a wide range in results for the mylar balloons.
Appendix
Curve for converting pressure and height
Altitude vs PressureIEC 68-213 (ISO 2533)Pressure (mbar)Altitude (meter)20100200300400500600700 0 5000 10000 15000 20000 25000 30000 3500
著作權屬QBN®所有,禁止拷貝、散佈、公開展示、教學、出售及出版。
歡樂氣球網 ® Joy Balloon Net. Copyright 2015, All Rights Reserved.
本站是氣球教學網站,並不提供商業服務